The agreement compliance audit workflow is a 3-step process: 1 – Scope, 2 – Conduct, 3 – Sign Off. This article deals with Step 2.
When an audit is set up, the agreements to be covered and the requirement types to be included are specified on the Scope tab. The audit form is then automatically generated and the full list of individual requirements that are to be audited is housed on the audit’s Findings tab:
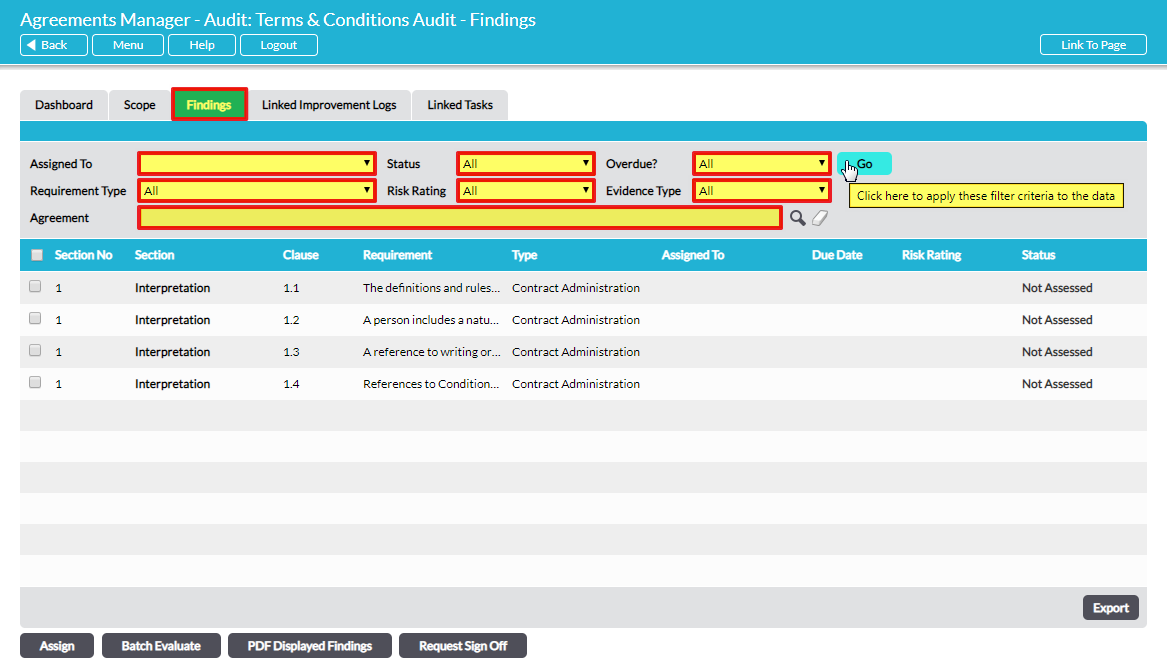
You can use the filters at the top of the tab to narrow the list by several criteria. Select the criteria and click on Go to apply the filter.
There are buttons at the bottom of the Requirements tab to allow you to efficiently carry out two actions: Assign and Batch Evaluate.
Assign – check-box individual requirements and click on Assign to batch-assign them to a chosen person to evaluate compliance. See Assign Responsibility to Other Users for Evaluating Agreement Compliance.
Batch Evaluate – check-box individual requirements to select them as a group, then batch-record identical compliance evaluation for them all simultaneously. See Batch Evaluate – Record Identical Audit Findings for a Batch of Agreement Requirements.
Batch Refresh Requirements – (only present If the audit contains requirements that have been updated since the audit was set up) if red triangles are present to indicate out of date requirements, a button labelled Batch Refresh Requirements will be available to allow all out of date requirements to be updated in one batch. See Red Triangles – Refresh or Delete Obsolete Requirements from Open Agreement Compliance Audits for more detail.
View Requirements
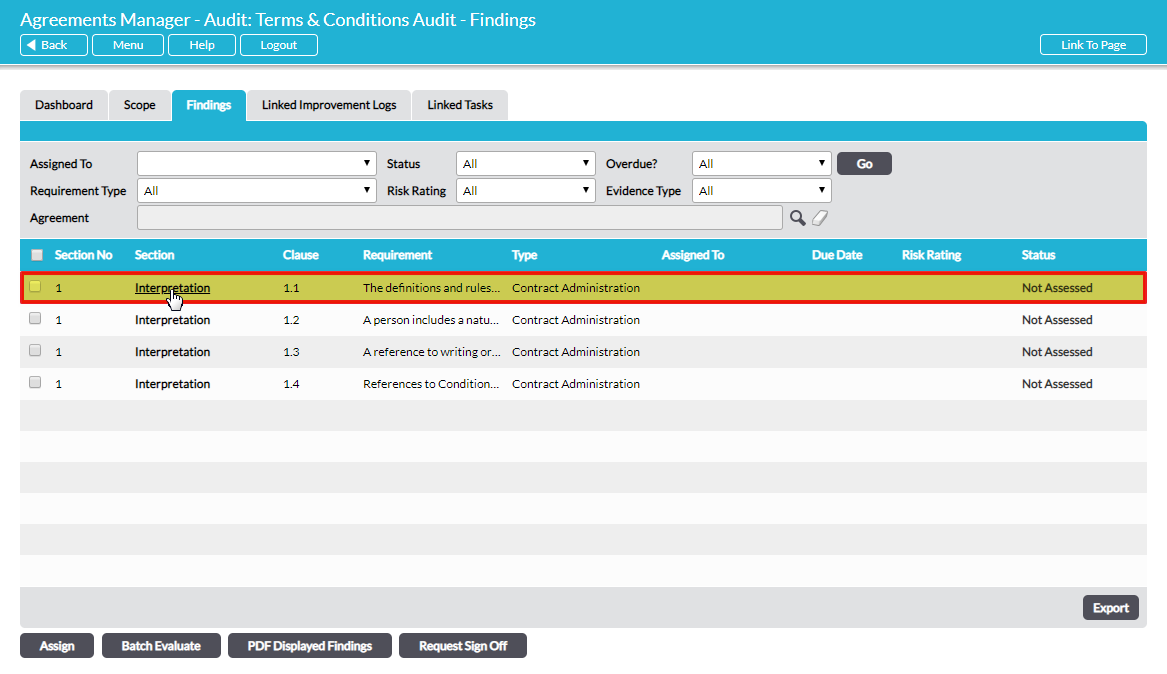
You can preview the text of any requirement by hovering over the requirement in the list on the audit Findings tab. To view the full requirement, click on it to open:
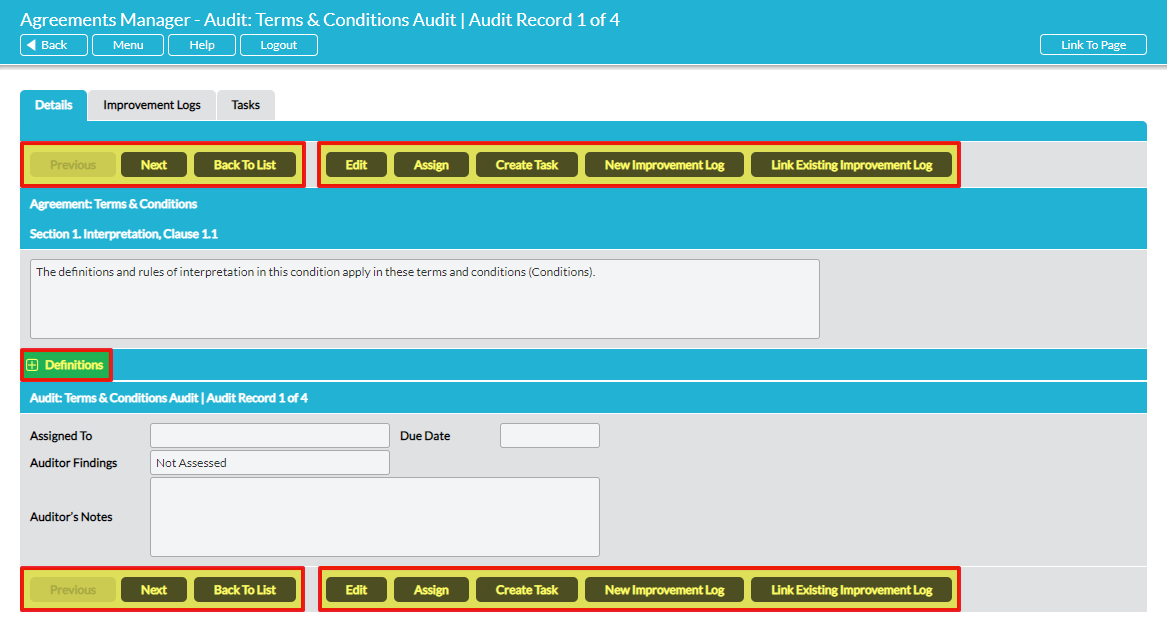
The requirement audit form opens in ‘view’ mode. The screen is sectioned. The upper portion shows the full detail of the requirement. Below that, if applicable, supporting Definitions and Links. The lower portion is the Audit Record and associated evidence:
If this is the first audit of the requirement the fields in the Audit Record portion will initially be blank. For second and subsequent audits of a requirement, the Audit Record may be pre-populated with compliance evidence imported from an earlier audit IF this option was selected when the current audit was set up (see Step 1 – Set up an Agreement Compliance Audit).
Click on the blue Definitions bar to view definitions of terms used in the requirement. If Linking is enabled in your system, there may also be a blue Requirement Links bar to view linked items.
In ‘view’ mode there are three navigation buttons – Previous, Next and Back To List – and up to six action buttons – Edit, Assign, Create Task, New Improvement Log, Link Existing Improvement Log and Refresh/Remove Requirement.
You can systematically navigate through the requirements in ‘view’ mode using the Next and Previous buttons. Alternatively, use the Back to List button to return to the main Findings tab where you directly select another requirement by clicking on it, thereby avoiding navigating through the list of requirements.
Assign – having viewed the details of a requirement in the upper portion of the screen you may decide to assign that particular requirement to somebody else to evaluate compliance. Click Assign and select the relevant person. See Assign Responsibility to Other Users for Evaluating Agreement Compliance.
Refresh Requirement or Remove Requirement– if a newer version of a requirement is published after the audit is set up but before the requirement is assessed, you are offered the option to update the requirement with the current published version. Likewise, if a requirement is deleted from the source agreement after the audit is set up, you are advised that the requirement cannot be audited and offered the option to delete the requirement from the audit. See Red Triangles – Refresh or Delete Obsolete Requirements from Open Agreement Compliance Audits.
Edit – Evaluate Compliance and Record Findings
To record audit findings against a requirement, click on Edit to open the form:
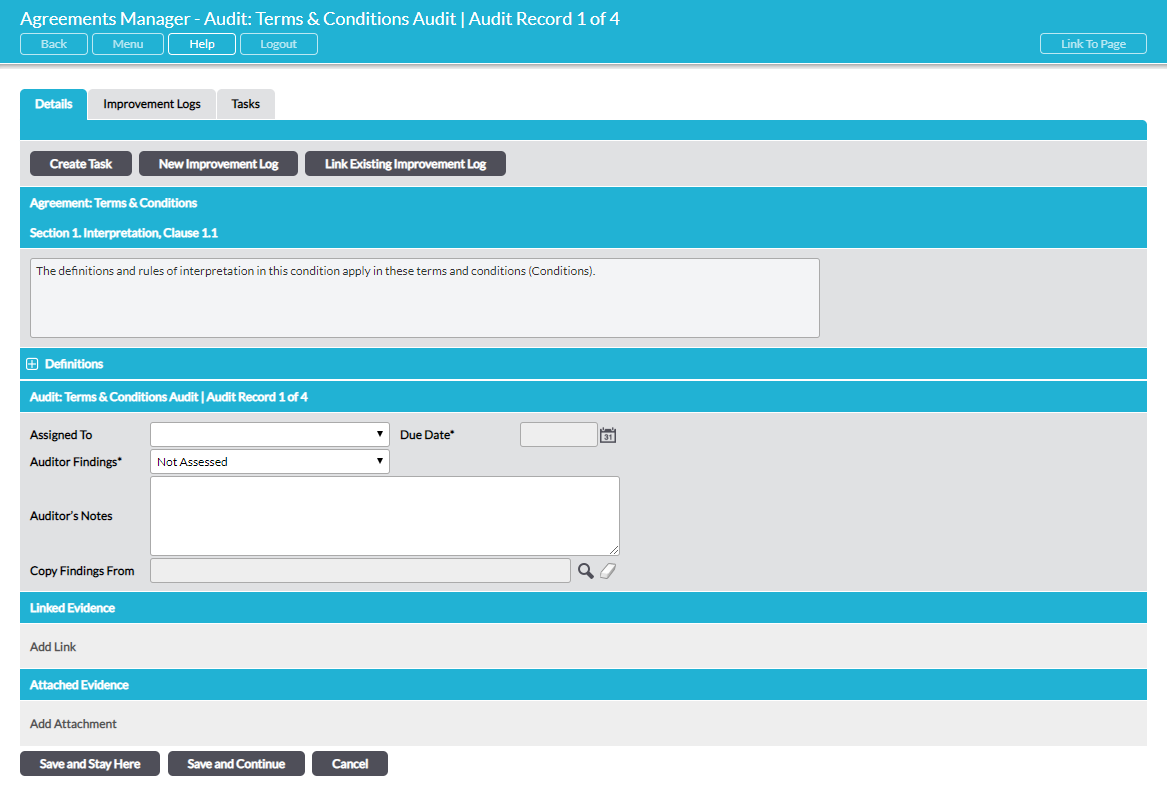
A guide to the available fields follows:
Assigned To – the name of the person given responsibility for evaluating compliance for this specific requirement and recording the evidence is shown here. If you wish to assign responsibility to someone, select the relevant name from the drop-down list. When a requirement is assigned, the person actioned will receive an automatic e-mail alert informing them, provided they have enabled the appropriate options in their Notifications in My Details. The action will also appear on their Home screen in the Dashboard and To Do List. The field is non-mandatory and if you proceed to complete the audit record yourself your details will be automatically recorded in the Audited By and Audited Date fields.
Due Date – if the requirement is assigned to a named individual for auditing, the due date set for this action is shown here.
Status – this is initially set to ‘Not Assessed’. Upon evaluation, change the status to ‘Compliant’ or ‘Not Compliant’ as appropriate.
Risk Rating – (not available if Risk Rating option is not enabled in Settings; see Settings – Configure Available Parameters and Defaults in Agreements Manager) select the assessed risk to the business associated with the requirement. The Risk Rating is selected from a drop-down list, configured in Settings.
Auditor’s Notes – use this field to record any additional information relating to the evaluation of compliance or supporting evidence.
Audited By – automatically populated with the name of the person who last edited the Auditor Findings field.
Audited Date – automatically populated with the last date the record details were changed (today’s date if the form is open for editing).
Copy Findings From – the time-saving facility to copy audit findings from another requirement within the current audit, reducing the effort involved in entering the same information multiple times within the audit. Click on the magnifying glass to the right of this field. A new pop-up window will open, where you can select the requirement to copy from. If the list of available requirements is long, use the filters at the top of the window to narrow the list of selectable requirements to copy from. See Copy Findings from Another Requirement in an Agreement Compliance Audit.
Linked Evidence – use this section to link to evidence of compliance. Create hyperlinks to items in other Activ modules (including files, processes, internal pages, companies and improvement logs) or to any external. Simply click on Add Link to create a new hyperlink. You can re-order the links by dragging and dropping (hover over the cross to the left of the linked items, click, drag and drop). IMPORTANT: when you link to files, processes and improvement logs within Activ, the link will be maintained to the version that was current at the time the link was created. If you subsequently edit a linked file, process or improvement log (and thereby generate a newer version of it in Activ), the compliance evidence will maintain the link to the version that was current at the time the link was created. This ensures that your compliance audit retains its integrity as a record of compliance evaluation at that moment in time.
Attached Evidence – click on Add Attachment to upload files from outside Activ to provide evidence of compliance.
Use the buttons at the bottom of the screen to navigate to your next action:
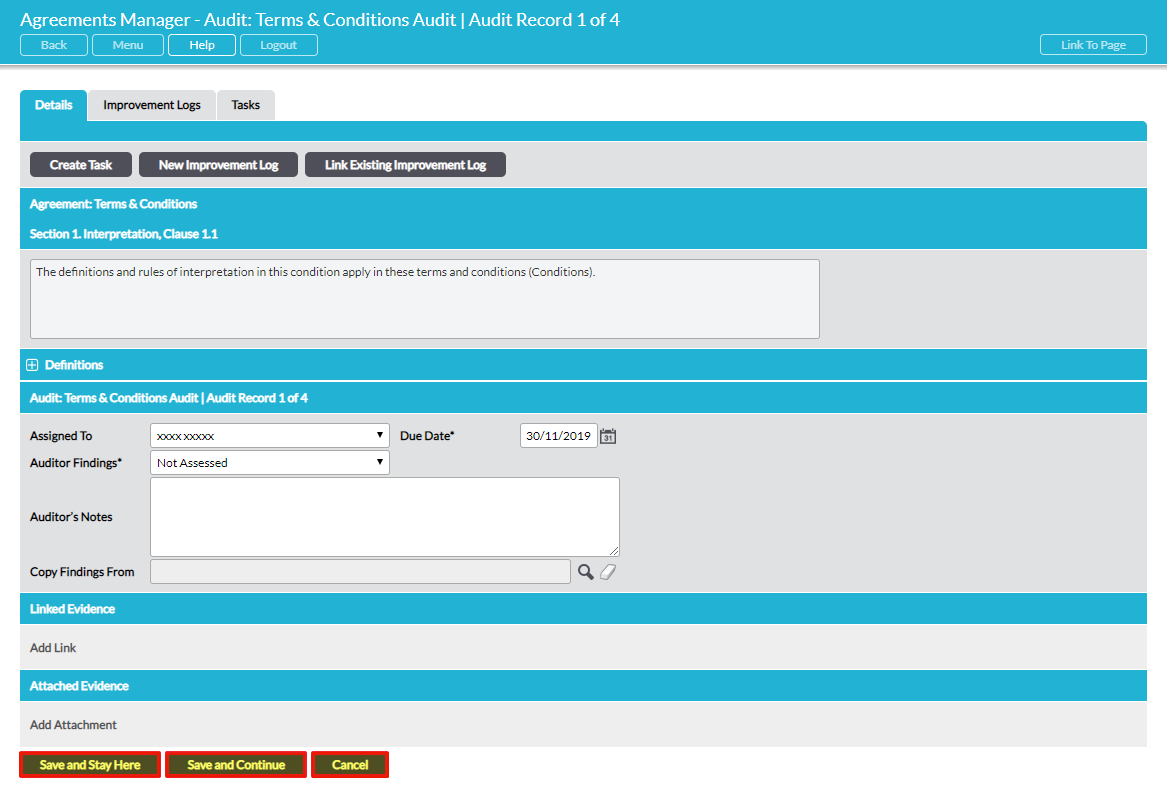
Save and Stay Here – saves your work, closes the audit record for editing and displays the page in view-only mode
Save and Continue – saves your work and navigates to the next requirement in the list, with the audit record form ready and open in ‘edit’ mode
Click Cancel at any time to close the audit record for editing without saving any changes and display the requirement in ‘view’ mode.
Three further buttons allow you to quickly take action as you conduct the audit and record your findings:
Create Task – as you conduct the audit you may wish to create a Task for yourself or somebody else. Click on the Create Task button to do this. If you create a Task for somebody else, they will receive an immediate alert e-mail and the Task will appear on their Dashboard/To Do List on the Activ Home screen. See Create a Task from an Agreement Compliance Audit.
New Improvement Log – raise a new Improvement Log associated with any requirement without having to leave the page. Clicking on New Improvement Log opens a new window where you can enter the relevant details and when you Save you will be returned to the requirement so you can continue your audit. See Raise a New Improvement Log Associated with an Agreement Compliance Audit.
Link Existing Improvement Log – efficiently link a requirement to an existing Improvement Log without leaving the page. Clicking on Link Existing Improvement Log opens a new window where you can select the relevant Improvement Log and when you Save you will be returned to the requirement so you can continue your audit. See Link an Existing Improvement Log to an Agreement Compliance Audit.
*****
When all requirements have been audited, the audit is ready to be ‘signed-off’. This is the final step in the audit. See Step 3 – Review and Sign Off an Agreement Compliance Audit.
