Throughout its development, we have strived to ensure that Activ is as intuitive and self-explanatory as possible to ensure that new and existing users can rapidly become familiar with each module and with the system as a whole. To support this, we aim to provide:
- logical, linear workflows for any function that involves multiple steps (e.g. saving a new record typically takes you to that record, which then gives you access to all ‘tabs’/features associated with that record; saving responses to individual audit questions can take you directly to the next question in the audit; key records can be progressed from ‘raised’/’open’ to ‘in progress’/’under review’ to ‘closed’; etc)
- consistent page structures throughout the platform (i.e. where appropriate, registers and records within one module will follow the same general structure as those found in other modules, and key areas such as the main Register, Reports, and Settings will be found in all modules)
- consistent labelling throughout the platform (i.e. where appropriate, like-fields/buttons/tabs/etc will use the same label names within every module. This allows you to transfer your understanding of one module’s labels directly into other modules).
- dedicated and easily accessible user guides for every module, broken down into articles covering most, if not all, of the module’s features.
This article has been written to assist you further by guiding you through your first steps within your system, and signposting you towards the key features that will be presented to you when you first log in. For convenience, it has been divided into six sections:
- The Home Page
- Navigating your system
- Help and Tutorials
- My Details – view and manage your user record
- System Administration – manage your system
- Important Notes – Time Outs and logging out
*****
The Home Page
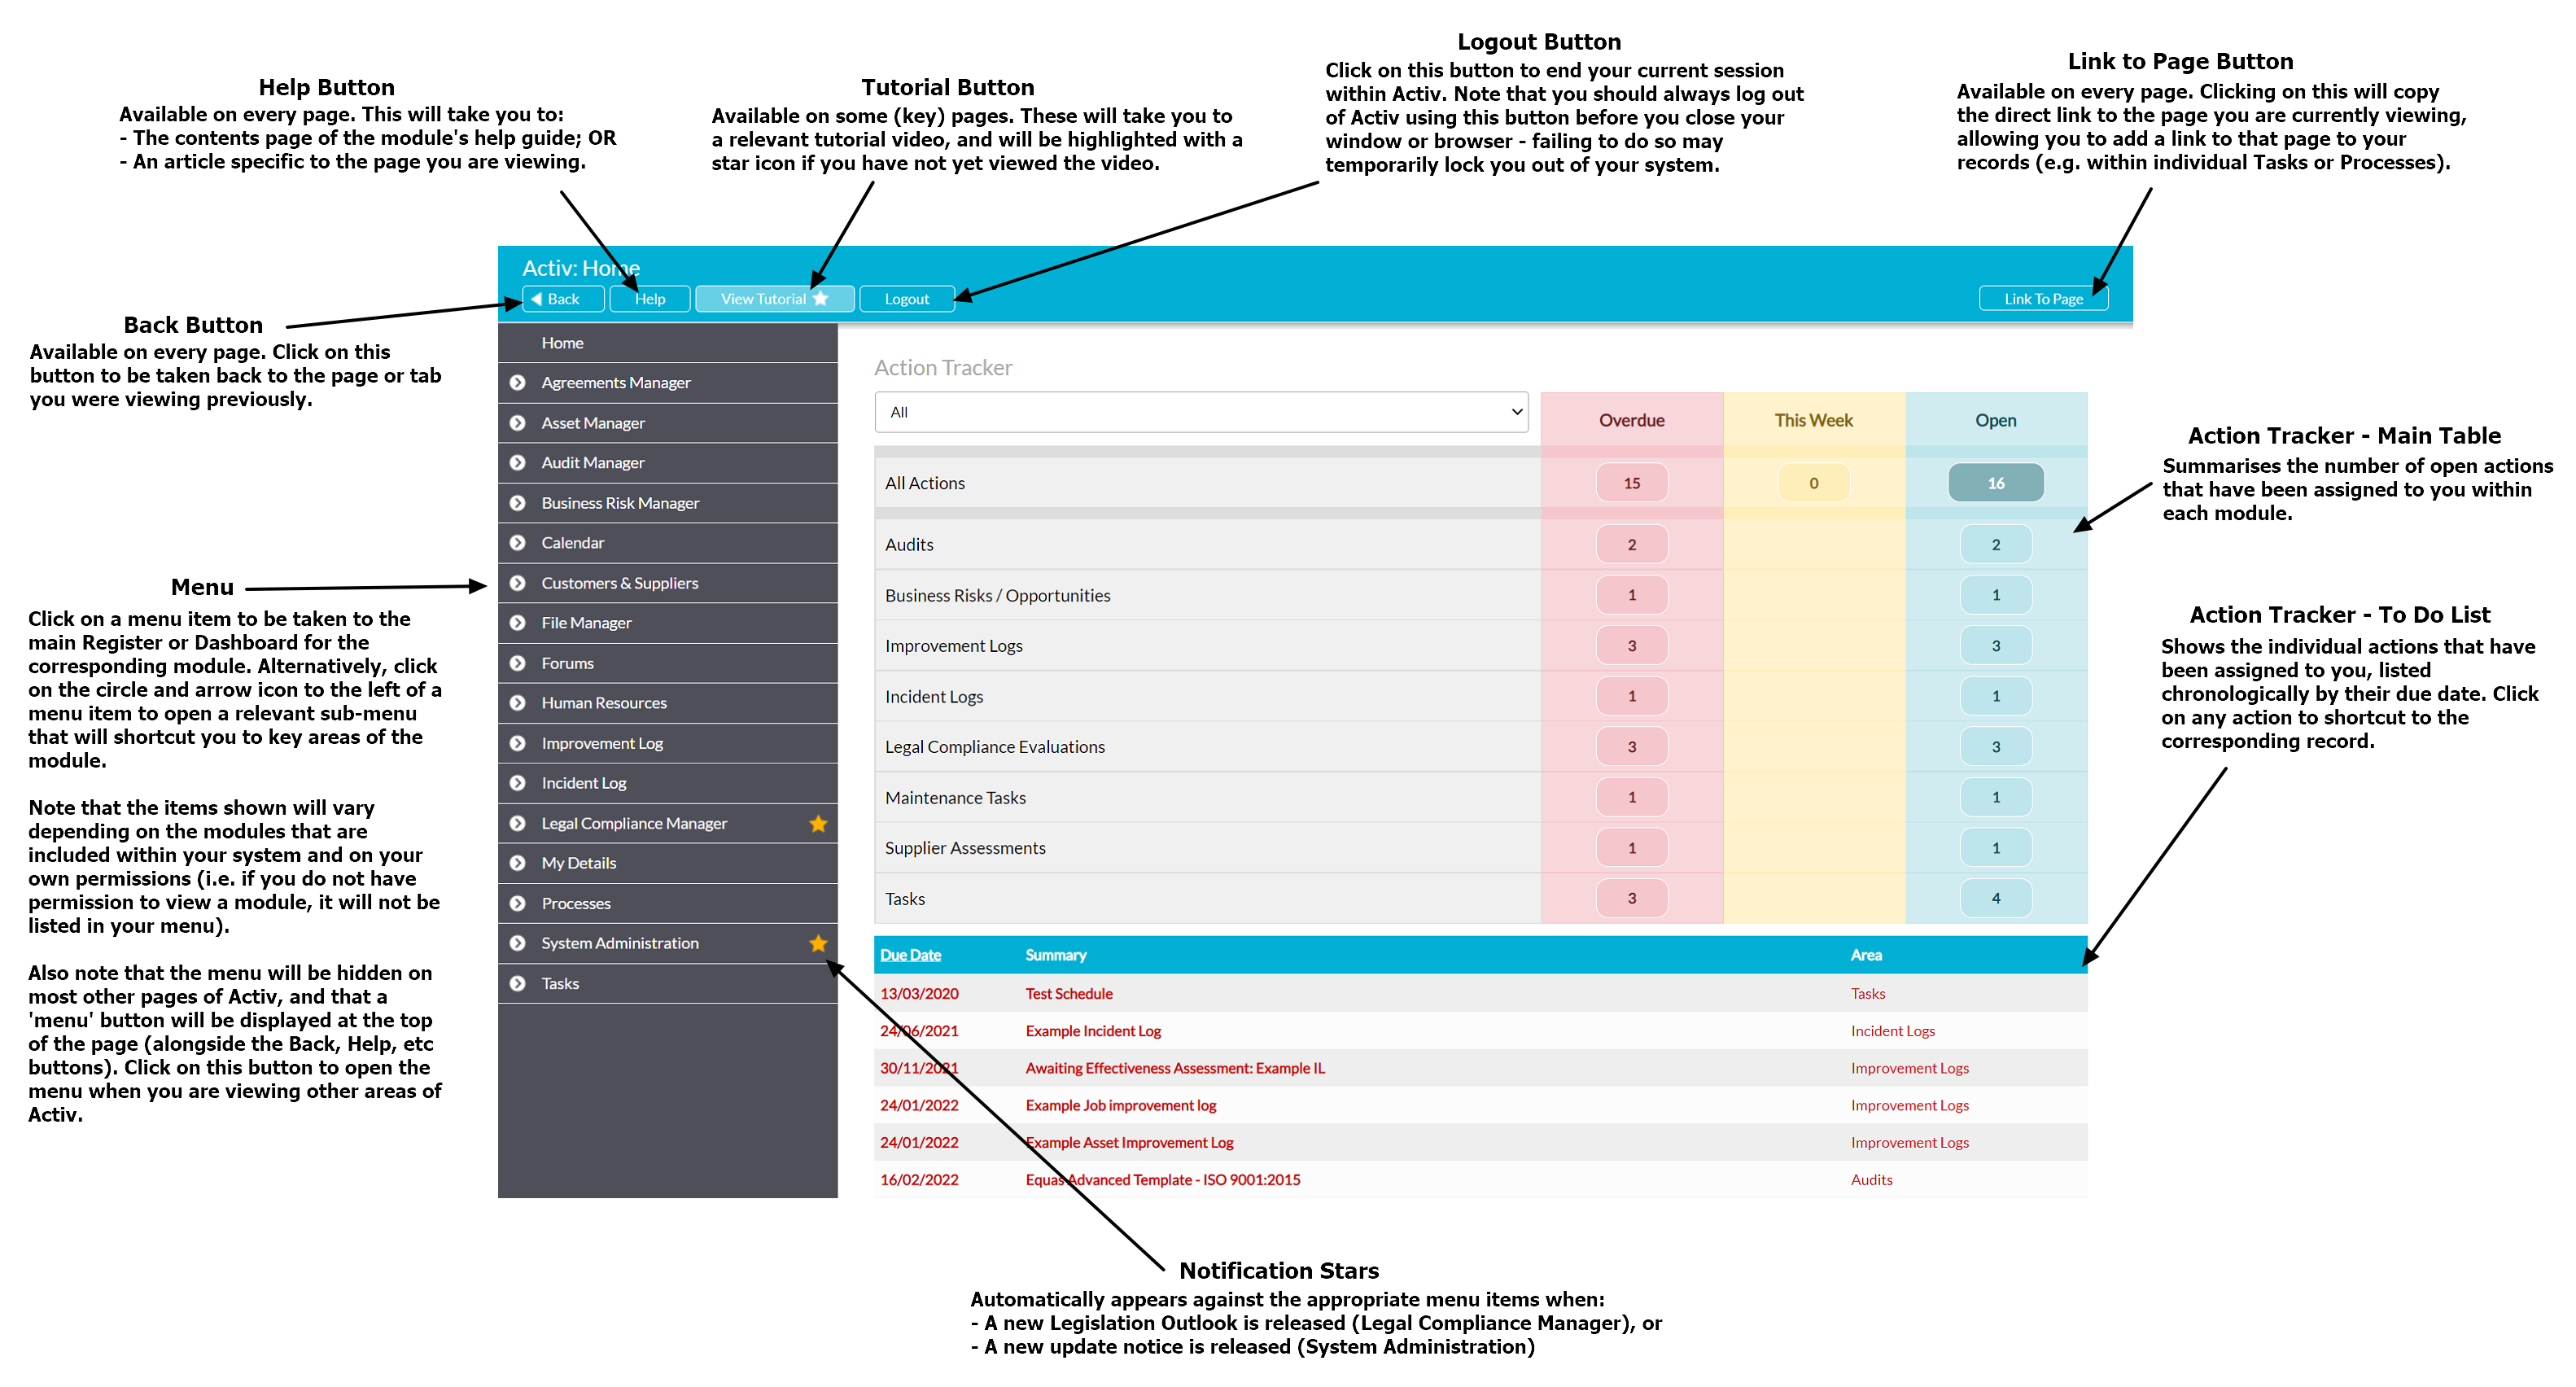
When you first log in to Activ you will be presented with the Home page, and this will continue to be your landing page each time you access the platform (unless you are accessing it using a bookmark or direct link to an alternate page). See the below screenshot for a summary of this page’s structure and a brief introduction to many of the features that will be covered in the following sections.
QUICK START TIP – The ‘Action Tracker’ referenced below provides you with a long-term view of the actions that you (and your staff, if you are a System Administrator) need to complete, along with shortcuts to each record. See The Home Screen’s Action Tracker for a detailed explanation of its functionality.
Navigating your System
Activ contains three key navigational tools, which will be available to you on all pages of your system. These are:
- The menu;
- The Back button; and
- Activ’s (or your Reseller’s) logo.
A summary of each of these has been provided below.
The Menu
When you first log in, Activ’s main menu will be displayed down the left-hand side of the screen, and will be customised based on your specific permissions to your system. This means that the menu will only display the modules that have been included within your company’s package (i.e. that your organisation is subscribed to or has on trial), and that you have ‘Read Only’ or higher permissions (‘access’) to. If you have not been given permission to a module, or that module is not part of your organisation’s current package, it will not appear within your menu.
Each item that is displayed within your menu can be used in one of two ways:
- To access the module’s Dashboard or main Register – in most cases, clicking on the menu item will shortcut you directly to the corresponding module’s Dashboard, if it has one, or to its main Register, if it does not have a Dashboard. In some cases, such as the Customers and Suppliers module, clicking on the main menu item will open its sub-menu (see the bullet point below).
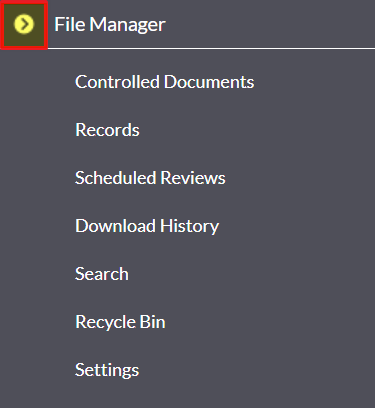
- To shortcut to a specific area within a module – clicking on the circle icon displayed to the left of any menu item will open a corresponding sub-menu, which will contain links to the key areas within the module (e.g. Records, Controlled Documents, Search, etc for the File Manager). Clicking on those sub-items will take you directly to the corresponding area within the module.
Note that, as with the main menu itself, the sub-menu items that are included within your menu will be dependent on your system permissions. If you do not have access to a specific area of a module, that area will not be included within the module’s sub-menu.
It is important to note that the menu will be hidden on all pages except for Activ’s Home screen, to maximise the space available for your data whilst you are using each module. However, you can open the menu at any time by clicking on the Menu button that will be displayed in the blue banner that appears along the top of each page.

The Back Button
Activ’s Back button will appear in the top left corner of the blue banner that is displayed along the top of each page of your system. When used, it will take you back to either the page (or tab) you were viewing immediately before the page you are currently on (if that page was not a form open in editing view), or the page immediately preceding an open form (if the previous page was open in editing view). In addition, if you had filters applied to the page you were previously on, then using Activ’s Back button will ensure that you are taken to the filtered view of that page, instead of its default view.

QUICK START TIP – clicking on your browser’s back button will often result in you being presented with ‘confirm form resubmission’ pages (particularly if you have filtered a register or edited a record). Using Activ’s Back button avoids this issue.
The Activ (or Reseller) Logo
Activ’s logo (or your Reseller’s logo) will be located in the top left corner of every page of your system, and can be clicked on at any time to shortcut you back to your system’s Home page. This may be useful if you need to gain quick access to your Action Tracker – especially if you initially logged into your system using a direct link to an update notice or a link from a notification.

*****
Help and Tutorials
Although Activ has a dedicated Support Team, we have also ensured that most of the questions you are likely to ask are covered within resources that you can access from directly within your system, without any need for you to wait for that Support Team to reply. These resources can be reached using
- The Help button; and
- The Tutorial button.
A summary of each of these has been provided below.
The Help Button
The Help button will appear in the top left corner of the blue banner, directly alongside the Back button. This button will be available on every page of your system, and will shortcut you to our main ‘Knowledgebase’ – i.e. a repository of step-by-step help articles that have been designed to walk you through the system’s available functionality. Each article will cover one specific function or process, and is presented using a combination of text and screenshots so that you can easily follow along through each action.
For convenience, the Help button has been programmed so that it will take you directly to:
- The contents page for the module you are currently viewing, if multiple articles are relevant to the page you are viewing; or
- A specific article covering the functionality that you are currently using.
QUICK START TIP – every module within Activ has been provided with a dedicated user guide, which can be viewed from directly within our Knowledgebase or downloaded as a PDF from the site’s Downloads page.

The Tutorial Button
In some cases, you will find that a Tutorial button will appear in the blue banner, directly alongside the Help button. When it is present, this button will shortcut you to a short tutorial video that demonstrates a key piece of functionality or gives you an overview of a key process, helping you to get started more rapidly.
To help you keep track of which Tutorials you have viewed, this button will:
- be displayed with a star icon and highlight when you initially access a page, when you have not yet followed the button to its tutorial, or when the tutorial has been changed; and
- be displayed without the star or highlight once you have viewed the associated tutorial.

*****
My Details – View and Manage Your User Record
Regardless of your user permissions, you will always find that you Activ menu includes the My Details item, which will give you at least ‘Read Only’ access to the key elements of your user record. This enables you to access your personal settings and information, and to verify that your basic details are correct. In addition, it provides you with the ability to reset your own password if you ever have the need to change it, and to clear out your Trusted Devices if your company uses MFA.
Although it is expanded within systems that have the Human Resources module, the standard user record consists of two tabs. These will be made accessible to you in at least ‘Read Only’ format through the My Details area, and are:
The Login Permissions tab – this displays your key user details and basic personal information, including: your name, manager(s) (if your system includes Human Resources), contact details, and System Permissions.
The Notifications tab – this displays your current notification settings – i.e. what automated e-mails Activ will send to you. If your Notifications are set to be managed by you, you will be able to configure these settings from directly within this page; otherwise they will be configured by a System Administrator. Note that your account may be set up with notifications disabled, so it is advisable to check this area when you are getting started to ensure that they have been appropriately configured (see Notifications – Automated Alerts, Notices, and Reminders for guidance).
QUICK START TIP – if you can’t access a specific area or functionality of Activ, check your user permissions for that area by opening your ‘My Details’ page and expanding the appropriate module at the bottom of the record. The ticks will identify your current permissions for each area, allowing you to confirm your current access levels. As a basic guide, you will typically need (at minimum) ‘read’ to view, ‘edit’ to modify, and ‘admin’ to delete.
*****
System Administration – Manage Your System
If you are a System Administrator or have ‘Read Only’ or higher access to the Administrator, Billing, or System Notices permission areas, then your menu will include the System Administration item. This provides you with access to a set of tools that will allow you to track and manage the key information relating to your system and its configuration. These tools cover four broad areas:
User Management – add or edit users and no-login employees, set your user’s permissions for each module, disable users, and (if you have the Teams module), create and manage your system’s Teams.
Security Settings – set your system’s key security settings, including your minimum password requirements, timeout window, token expiry times, and IP whitelist/blacklist.
Branding – set your company logo to appear in the top right corner of each page, brand certain documents with your logo, and specify the header and footer for system-generated PDF files.
General Administration – view system billing, usage information (i.e. your storage allowance), and system update notices.
*****
Important Notes – Time Outs and Logging Out
System Time Outs
It is important to be aware that your session will automatically time-out (logging you out of the system) after a set period of inactivity. This is a security feature that is intended to prevent unauthorised access to your account in the event that you leave your device unattended whilst you are logged in to your Activ system, and it cannot be disabled. It is also important to be aware that Activ is not refreshed when you are typing into open forms, so if you spend an extended amount of time entering data into a form then it is possible that your session will time-out before you click ‘Save’. When this occurs, you will be advised that your session has timed-out and will be prompted to log back into your system.
Where possible, Activ will attempt to store the information from your form when this occurs, and will automatically re-submit it when you log back into the system, if you log back in immediately after encountering the time-out message. However, we cannot guarantee that this failsafe will always be able to save your data, so you should save regularly when you are working on longer forms. Alternatively, consider altering your Time Out setting from the default 15 minutes to a longer period of time to give your users more time to complete long forms.
Logging Out (and Lock-Outs)
Your sessions within Activ will not automatically end when you close your tab or browser – instead, the session will remain live in the background until it times out (see above). However, if you close your tab/browser and then return to Activ using a new tab/browser you will typically be prompted to log back in even if a session is still live. Where this occurs, you are likely to be presented with Activ’s duplicate login error message and you will be temporarily locked out of your system. This lock will automatically be removed once your previous session times out, but it is important to be aware that attempting to log into your system whilst a session is still live will also refresh the old session, locking you out for a longer period of time.
To avoid being locked out of your system, aways log out of your system before closing your tab or browser.
