SEVEN IMPORTANT POINTS TO NOTE BEFORE YOU START:
- Automatic Document Stamping (ADS) is compatible with Word and Excel files of the .docx and .xlsx formats i.e. Microsoft Office 2007 or later. Files using legacy (.doc and .xls) formats will NOT accept footer stamping. If your files use pre-Microsoft Office 2007 software these files will first need to be converted to the newer .docx and .xlsx formats in order for the ADS feature of Activ to work.
- Any Word or Excel template files (.dotx and .xlts) will not accept ADS.
- Any Word documents containing page breaks or section breaks will not accept ADS.
- ADS is only applicable to Word, Excel and PDF files that are located in the Controlled Documents Files stored elsewhere within Activ will not be affected.
- The font style, font size, line spacing and overall size of the footer stamp cannot be configured from Activ. These aspects of the footer’s appearance are determined by the default footer settings in the Microsoft template(s) that your files are based on.
- When ADS is enabled the metadata is stamped into a file’s header/footer, clearing and replacing all existing footer content (except PDF files; see next point). If your existing files include footer content that you would not wish to be over-written, do NOT click the Update All button after enabling ADS (see guidance below).
- Caution on PDF files: Unlike Word and Excel files, PDF files do not have in-built header/footer fields. Therefore, any text/images that are located in the header/footer zones of a PDF file will not be cleared when ADS is enabled or modified. Any pre-existing content in the header/footer zones will remain and the new ADS information will simply be stamped over the top of it (not pretty). Therefore, before enabling ADS for PDF file types, take care to ensure that target PDF files do not have content in the header/footer zones. Likewise, if you edit ADS information and apply the changes to PDF files, use “Update All” with extreme caution, as all existing PDF files in Controlled Documents that have ADS information in their header/footer will have this information over-written with the modified information (not pretty).
*****
By default, all systems have the ADS feature disabled. To enable the feature, go to File Manager – Settings and select Automatic Document Stamping from the left-hand menu.
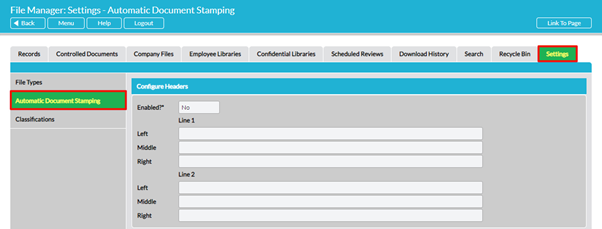
The right-hand side of the page displays the ADS configuration form. Click on Edit to open the form for editing:
There are four sections to the page:
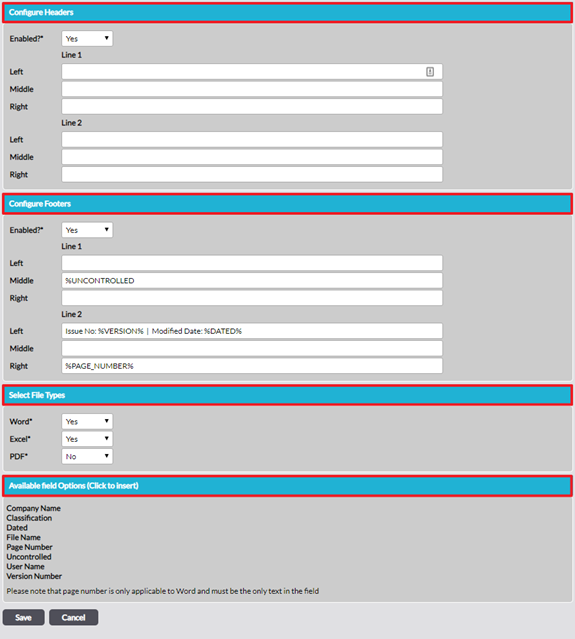
Configure Headers – to switch header stamping on/off and configure the content of headers
Configure Footers – to switch footer stamping on/off and configure the content of footers
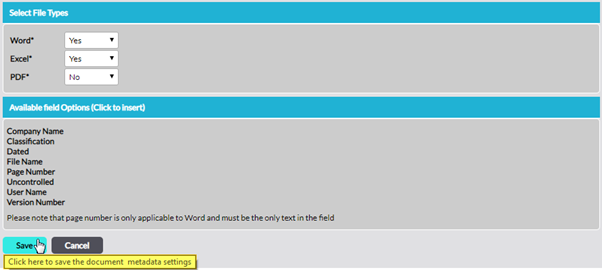
Select File Types – to switch automatic stamping on/off by file type (Word, Excel and PDF files)
Available Field Options – lists the eight items available to populate headers and footers
*****
Step 1. Configure Headers
To enable header stamping select ‘Yes’ in the Enabled?* field in this section. By default ‘No’ is selected, indicating that ADS is not activated and there is no automatic version stamping of file headers. All files uploaded to the Controlled Documents library from this point onwards will be automatically stamped with the correct version information in their headers. (If you click on Update All after saving your configuration changes Activ will also stamp all existing files with correct version information in their headers/footers. See optional Step 5 below).
Each line of the header is divided into three fields: left, middle, right. To populate a field, first click your cursor into the relevant field and then click on the chosen item in the list in Available Field Options. This will cause the item to appear in the relevant field. Once selected, the item is individually enclosed within % signs (e.g. if you select ‘File Name’ it appears as %NAME%). This indicates that the content will be automatically generated from current system information.
If you wish, you can put more than one item in any field, introduce spaces between the items and type in your own descriptive terms. Do this directly in the fields. Note that any spaces, words or characters that you type into fields are static. They do not change when new versions of files are uploaded. Only the automatically generated option information (in % signs) will update.
The font style, font size, line spacing and overall size of the header stamp cannot be configured from Activ. These aspects of the footer’s appearance are determined by the default header settings in the Microsoft template(s) that your files are based on.
The available field options are:
Company Name – as per the Name field in System Administration: Account Settings.
Dated – the date the file was uploaded.
File Name – the full name of the file, including the extension.
Page Number – note (a) this option is only applicable to Word documents and; (b) unlike all other fields Page Number must be the only item in the field (do not enter any additional free text or a second item into any field with the Page Number included).
Uncontrolled – stamps the word “Uncontrolled” into the chosen field
User Name – the name of the user who uploaded the file. Note that only the person’s name is automatically generated so you may wish to type the words “Created by” or similar before it.
Version Number – the current version number. Note that only the number is automatically generated so you may wish to type in the word “Version” before it.
*****
Step 2. Configure Footers
(as for Configure Headers)
*****
Step 3. Select File Type(s) to apply ADS to
In the Select File Types section, select ‘Yes’ against the file type(s) that you want ADS to apply to.

*****
Step 4. Save
Click on Save when you have completed your changes.
From this point onwards, files of the type(s) you selected (Word / Excel / PDF) in Step 3 that are uploaded to your Controlled Documents library will be automatically stamped with the information you have specified. Files already in the system will not be stamped.
*****
(Optional) Step 5. Update All
If you require all existing and future files to be stamped with version information, click on Update All.

A pop-up message will ask you to confirm that you wish to proceed. The pop-up re-iterates the warning that if you select Update All, all existing files of the type(s) selected (in the Select File Types section) in your Controlled Documents library will have their headers/footers stamped with version information, irreversibly over-writing all present header/footer content. See also the red warning relating to the limitations of ADS for PDF files at the start of this article. Click on Cancel if you are not sure.
