There are five broad steps involved in importing data into your Activ system:
- Collate the data and configure your system
- Upload the dataset
- Map the data to Activ’s fields
- Import the data
- Review the import’s results and make any necessary corrections
*****
Step One: Collate the Data and Configure your System
Ideally, any data that is to be imported into one of your modules should be collated into a single dataset, and this collation should be completed using one of the module-specific Import Templates provided by Activ. You should take your time whilst collating your data to ensure that there are minimal errors within the records, so that as much data as possible can be imported into your module during the initial process.
Once you have finished collating your data, you should take some time to compare the records that are to be imported to the corresponding module’s Settings. You will need to review all of the areas that are included within this tab, and ensure that each area contains all of the options that have been used within your dataset. This is because Activ will not modify your module’s Settings as part of the import process, and any record that contains an option that hasn’t been configured will fail to import. For example, if your dataset incudes a record with the Improvement Log Type ‘Security’, and there is no ‘Security’ option configured within your Improvement Log Type Settings area, that record will fail to import.
You may find it useful to apply filters to your dataset whilst you are comparing your entries to your module Settings, as this will provide you with a condensed list of the options that you have used. However, if you do this you must ensure that your dataset is saved as a CSV (or other delimited file type) before attempting the import, as Activ will not allow you to import data using any other file types.
*****
Step Two: Upload the Dataset
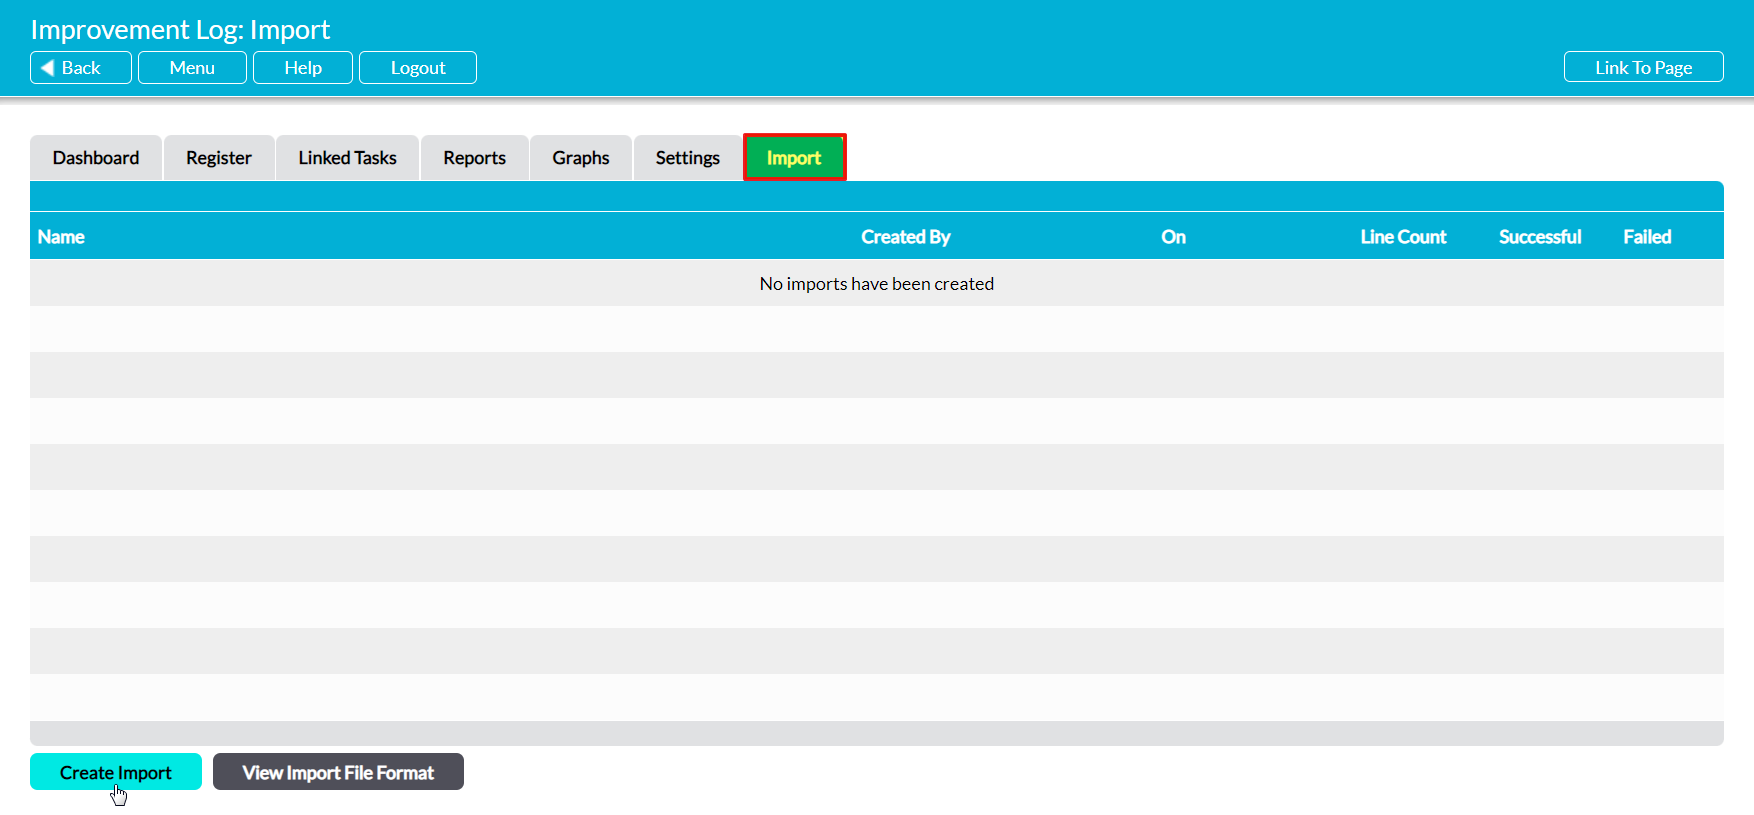
Once you have collated your dataset and are happy that the module has been properly configured, you can begin the process of importing the data into Activ. To do so, open the appropriate module and click on its Imports tab. Note that this tab will only be available if you have ‘Admin’ permissions to the System Administration: Administrator permissions area. Click on Create Import at the bottom of the screen once you have opened the appropriate tab.
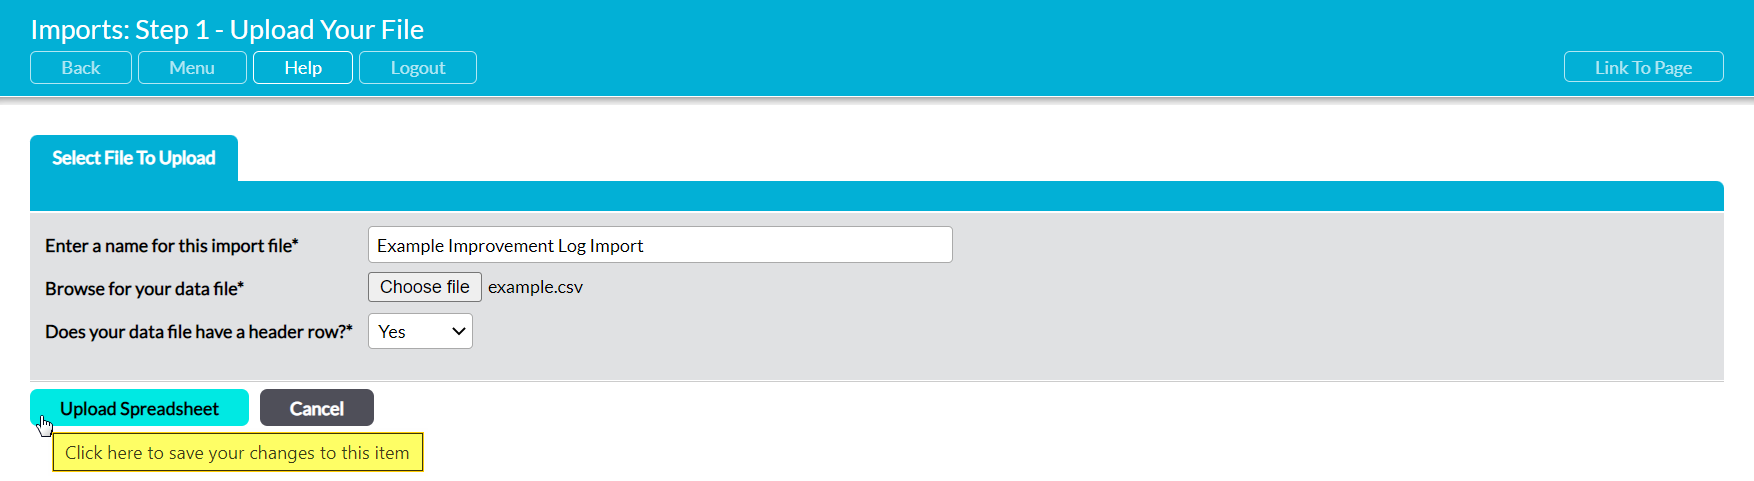
This will open a blank Upload Your File form for you to populate. Three fields are available for you to complete:
Enter a name for this import file – enter a short descriptive name for the import. This will be displayed within your main Import tab to provide an audit trail of all previous imports that have been completed within the module.
Browse for your data file – click on ‘Choose File’ to open your file explorer and select the file that contains your dataset. Note that this must be a CSV or other delimited file format, or the upload will fail.
Does your data file have a header row? – use the dropdown menu to specify whether your dataset has a header row (i.e. a row of column titles specifying what each column contains). By default, this will be set to ‘Yes’.
Enter the necessary details, and then click Upload Spreadsheet.
Your dataset will be uploaded to Activ, and you will automatically be progressed to the next step once the upload has been completed. Note that this may take some time if you are working with a large dataset.
*****
Step Three: Map the Data to Activ’s Fields
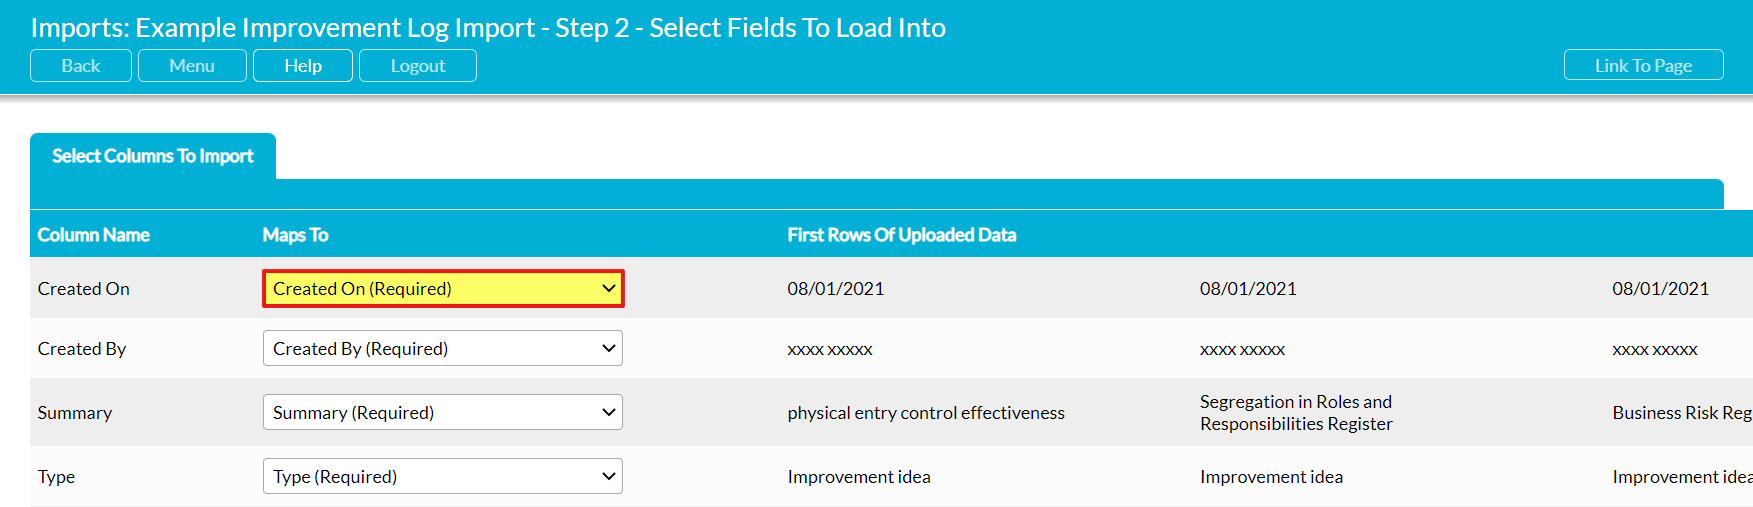
Once your dataset has been uploaded to Activ, you will automatically be progressed to the module’s field mapping page, which will display each column from your dataset as a new row within the form. Each row in the form will include three pieces of information:
- Column Name – this is drawn from the ‘header row’ within your dataset, if you specified that one exists.
- Maps To – this is the field within Activ that data from this column will be mapped (copied) to during the import.
- First Rows of Uploaded Data – this will display the column’s first few entries, to help you identify what data the column contains so that you can ensure that it is mapped to the correct field.
Activ will detect the column names that have been entered into your dataset’s header row (if one is included) and allow you to select which field each column should be mapped (i.e. copied) to. If you are using the template provided by Activ, the majority of these columns should automatically map to the correct fields – however, it is strongly advised that you check each row within the form to ensure that it has been mapped correctly.
If you notice any errors, or any row is set to ‘do not import’ (this will occur wherever Activ is unable to match a column heading to a field within Activ), then you will be able to change which field the column is mapped to by editing the selection within the corresponding row’s Maps To dropdown menu. Each option within this menu will correspond to a field within Activ, and you can select any of the options available – but you must make sure that each option is mapped to one column.
Note that if you notice any errors within your data at this point, you can exit out of the screen without any data being imported into your system. This allows you to make corrections before you commit to the import.
*****
Step Four: Import the Data
Once you are happy that all fields have been mapped correctly, click on Start Import at the bottom of the page to begin copying the data into your system.

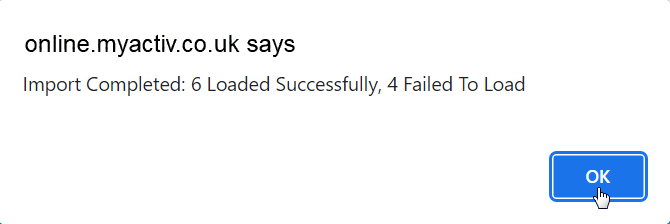
Activ will import your data into the module, creating a new record (and accompanying report) for each row from your dataset. Once the import has been completed, Activ will provide you with a popup confirming that the import was completed successfully, and detailing the number of records that ‘Loaded Successfully’ (i.e. have been added to your module) and the number that ‘Failed to Load’ (i.e. that have not been added to your module).
Note that this may take some time if you are working with a large dataset.
*****
Step Five: Review the Import’s Results and Make any Necessary Corrections
Activ will automatically create a dedicated record for the import within the module’s Import tab once it has finished copying your dataset into your system. You will be taken directly to this record once the process has been completed, and will be presented with three summary tabs:
- Details – this tab contains a copy of the mapping form from step two, providing you with a record of which columns were mapped to each field in your module.
- Imported Successfully – this tab contains a record-by-record report of all data rows that were successfully copied into your system. Any record displayed within this tab will now exist as its own record within the module itself.
- Not Imported – this tab contains a record-by-record report of all data rows that Activ could not copy into your system. The data for these records will be saved in the background, allowing you to review, correct, and then re-attempt the import of just the failed records without requiring you to re-start the whole process.
You should take some time to review the information contained within these pages to ensure that your data was imported correctly, and to resolve any errors that may have prevented your records from being copied into your system. See the following articles for assistance:
- Import Results: Review Successfully Imported Items
- Import Results: Review and Correct Unsuccessfully Imported Items
