For convenience, Activ allows you to create Appointments within your own Calendar and within other employees’ Calendars. This enables you to:
- create Appointments that only you need to attend
- create Appointments (e.g. team meetings) that you and other users need to attend
- create Appointments on behalf of other users, and that you do not need to attend.
In all cases, it is important to be aware that Activ will automatically list the Calendar’s owner as the owner of any Appointments that you create, and that the owner of Appointments cannot be deselected from the list of attendees. This means that if you create an Appointment whilst viewing another user’s Calendar (see View Another User’s Calendar) and do not change the Owner field, that user will be required to attend that Appointment. Similarly, if you create an Appointment whilst viewing your own Calendar and do not change the Owner field, you will be required to attend that Appointment.
Activ gives you the option to create an Appointment from:
*****
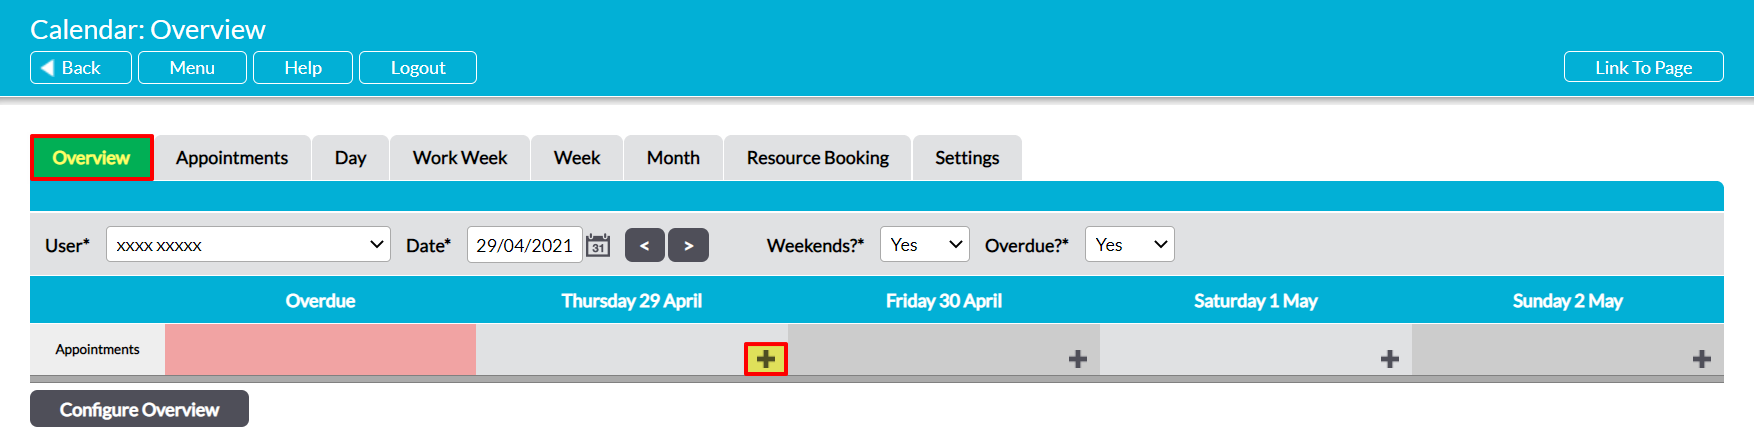
Create an Appointment from the Overview Tab
To create an Appointment from the Calendar Overview, open the Calendar module on its Overview tab and click on the plus icon within the appropriate day.
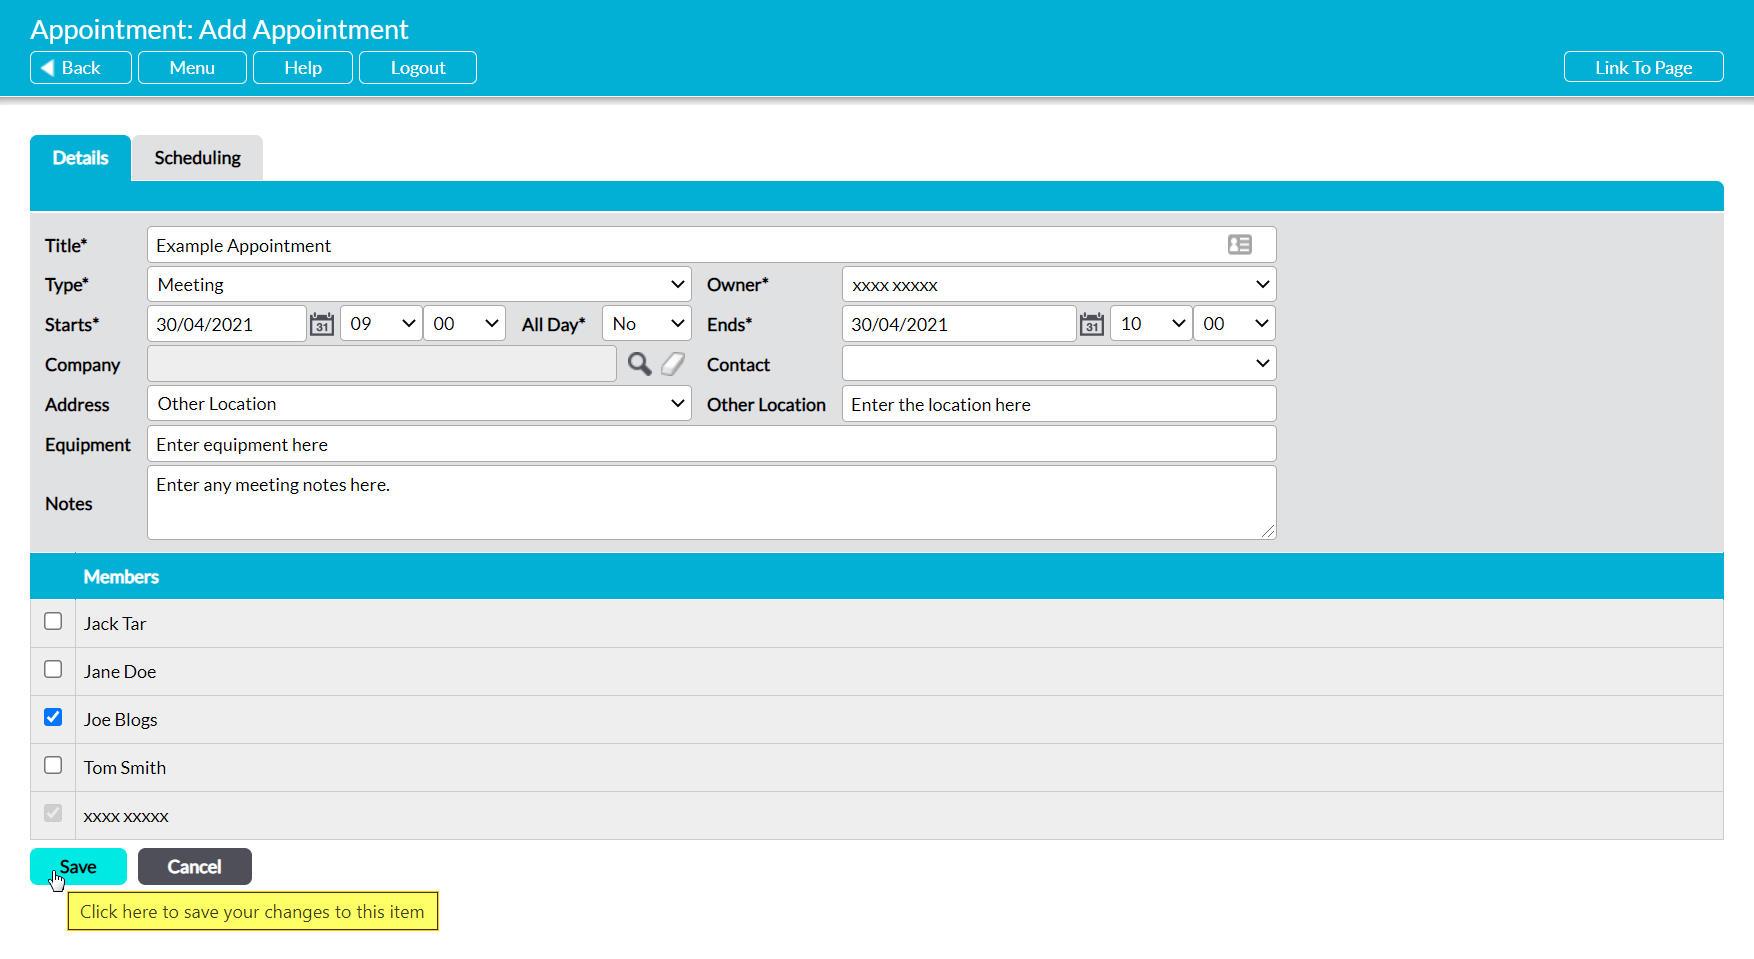
A blank Add Appointment form will open for you to populate. Up to thirteen fields are available for you to complete.
Title* – enter a summary of the Appointment.
Type* – use the dropdown menu to select the Appointment’s type. Note that these are configured in the module’s Settings (see Configure Calendar Settings).
Owner* – use the dropdown menu to select the Appointment’s owner. By default this will be set to the owner of the Calendar that the Appointment is being added to.
Starts* – use the calendar icon and accompanying dropdown menus to set the start date and time for the Appointment.
All Day* – use the dropdown menu to specify whether the Appointment lasts for the full working day. By default this is set to ‘No’.
Ends* – use the calendar icon and accompanying dropdown menus to set the end date and time for the Appointment. Note that Appointments can span multiple days if required.
Company – only available if your package includes the Customers & Suppliers module. If appropriate, use the magnifying glass to specify the third-party company (i.e. customer or supplier) that is involved in the Appointment.
Contact – only available if your package includes the Customers & Suppliers module. If appropriate, use the dropdown menu to specify the primary third-party contact that is involved in the Appointment. Note that the contact must already exist within your system (see Add a Contact), and that you must make a selection within the Company field before this option can be used.
Address – only available if your package includes the Customers & Suppliers module. If appropriate, use the dropdown menu to specify the address at which the Appointment will take place. Note that this will default to ‘Other Location’, and that alternate addresses can only be selected if they already exist within a third-party company’s record (see Add and Manage Company Addresses). In addition, you must make a selection within the Company field before addresses can be selected.
Other Location – enter the location of the Appointment. Note that this is a free-text field, and is intended for use alongside the ‘Other Location’ option in the Address field.
Equipment – enter any equipment that is required for the Appointment.
Notes – if needed, enter any additional information that the participants will need to know for the Appointment.
Members – use the tick boxes in this panel to select all users who are required to take part in the Appointment. Note that the new Appointment will be added to the Calendars of all selected individuals.
Enter the necessary details, and then click Save.
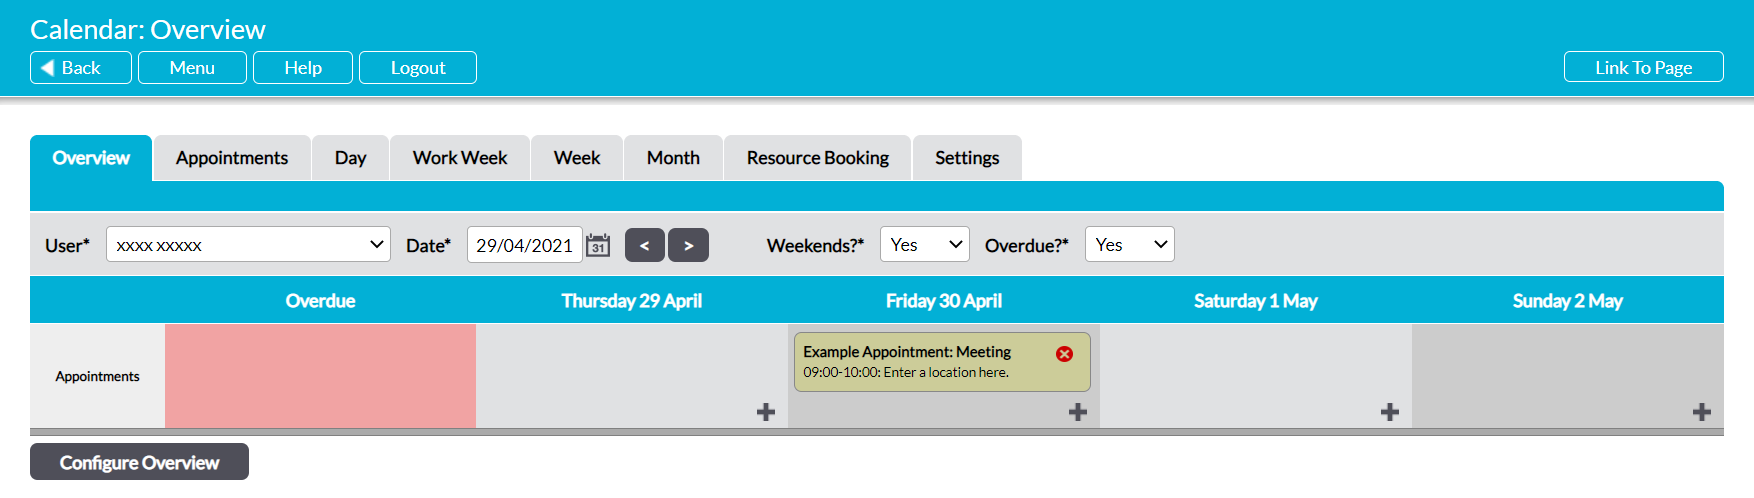
You will be returned to the Overview tab, and your new Appointment will be displayed within the Calendar. Note that Activ will automatically place it into the correct day(s) and time slot, and will apply a background colour to help visually identify the Appointment’s type. This background colour is configured within the module’s Settings (see Configure Calendar Settings).
*****
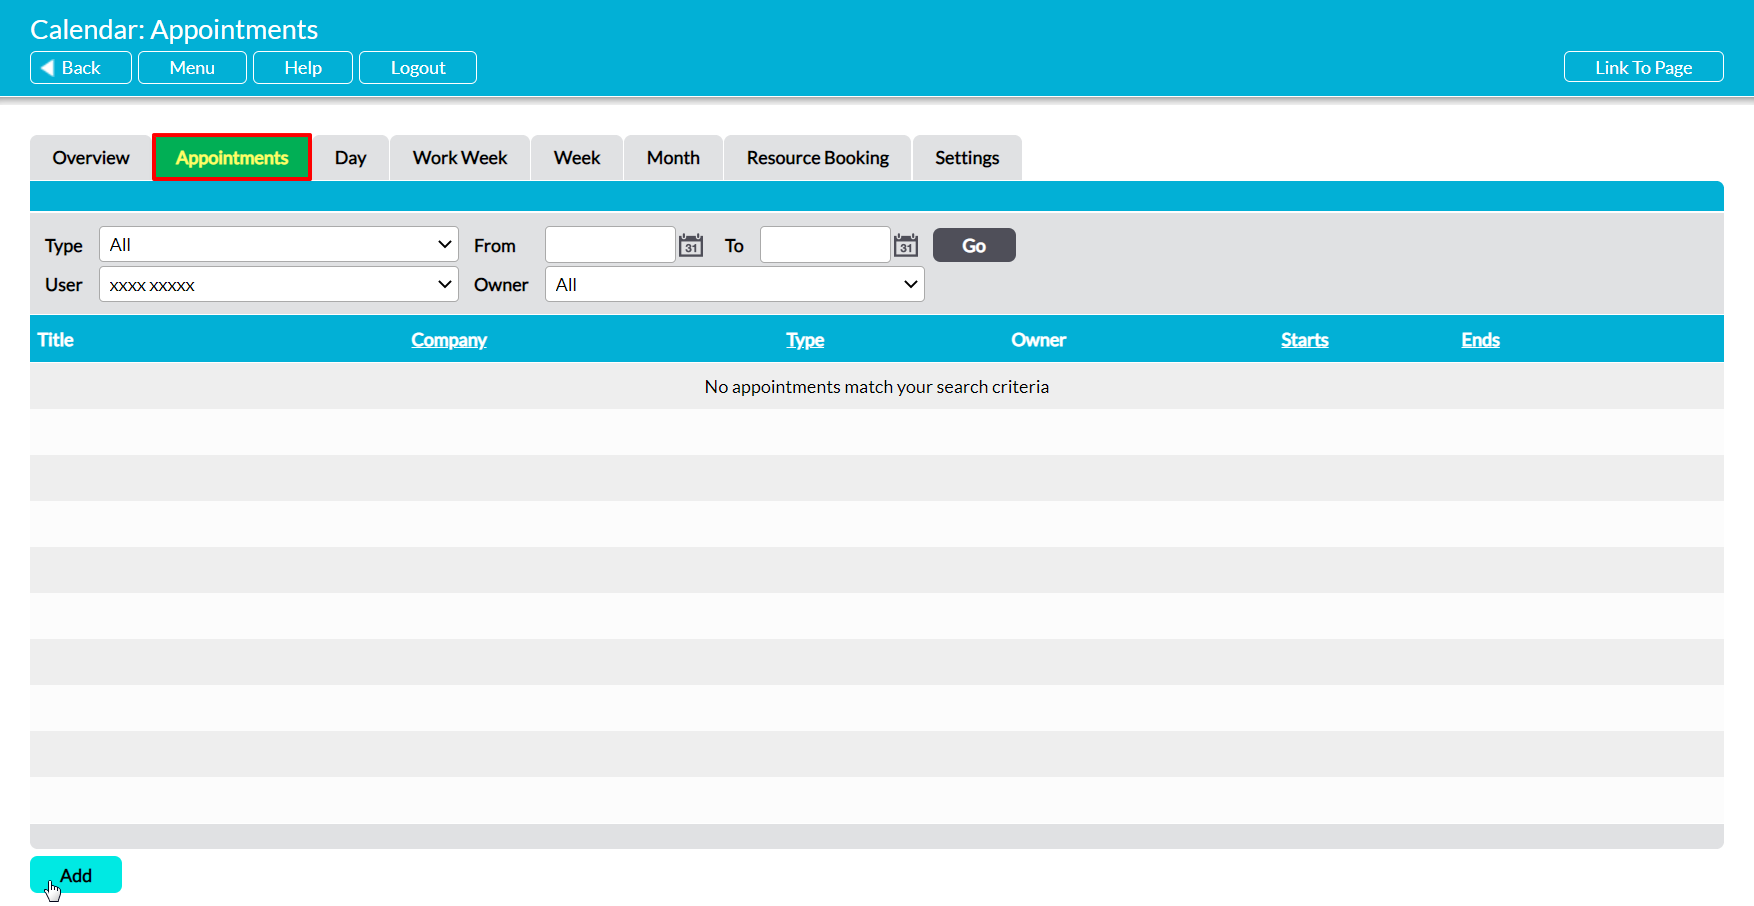
Create an Appointment from the Appointments Tab
To create an Appointment from the Appointments tab, open the Calendar module on its Appointments tab and click on the Add button.
A blank Add Appointment form will open for you to populate. Up to thirteen fields are available for you to complete.
Title* – enter a summary of the Appointment.
Type* – use the dropdown menu to select the Appointment’s type. Note that these are configured in the module’s Settings (see Configure Calendar Settings).
Owner* – use the dropdown menu to select the Appointment’s owner. By default this will be set to the owner of the Calendar that the Appointment is being added to.
Starts* – use the calendar icon and accompanying dropdown menus to set the start date and time for the Appointment.
All Day* – use the dropdown menu to specify whether the Appointment lasts for the full working day. By default this is set to ‘No’.
Ends* – use the calendar icon and accompanying dropdown menus to set the end date and time for the Appointment. Note that Appointments can span multiple days if required.
Company – only available if your package includes the Customers & Suppliers module. If appropriate, use the magnifying glass to specify the third-party company (i.e. customer or supplier) that is involved in the Appointment.
Contact – only available if your package includes the Customers & Suppliers module. If appropriate, use the dropdown menu to specify the primary third-party contact that is involved in the Appointment. Note that the contact must already exist within your system (see Add a Contact), and that you must make a selection within the Company field before this option can be used.
Address – only available if your package includes the Customers & Suppliers module. If appropriate, use the dropdown menu to specify the address at which the Appointment will take place. Note that this will default to ‘Other Location’, and that alternate addresses can only be selected if they already exist within a third-party company’s record (see Add and Manage Company Addresses). In addition, you must make a selection within the Company field before addresses can be selected.
Other Location – enter the location of the Appointment. Note that this is a free-text field, and is intended for use alongside the ‘Other Location’ option in the Address field.
Equipment – enter any equipment that is required for the Appointment.
Notes – if needed, enter any additional information that the participants will need to know for the Appointment.
Members – use the tick boxes in this panel to select all users who are required to take part in the Appointment. Note that the new Appointment will be added to the Calendars of all selected individuals.
Enter the necessary details, and then click Save.

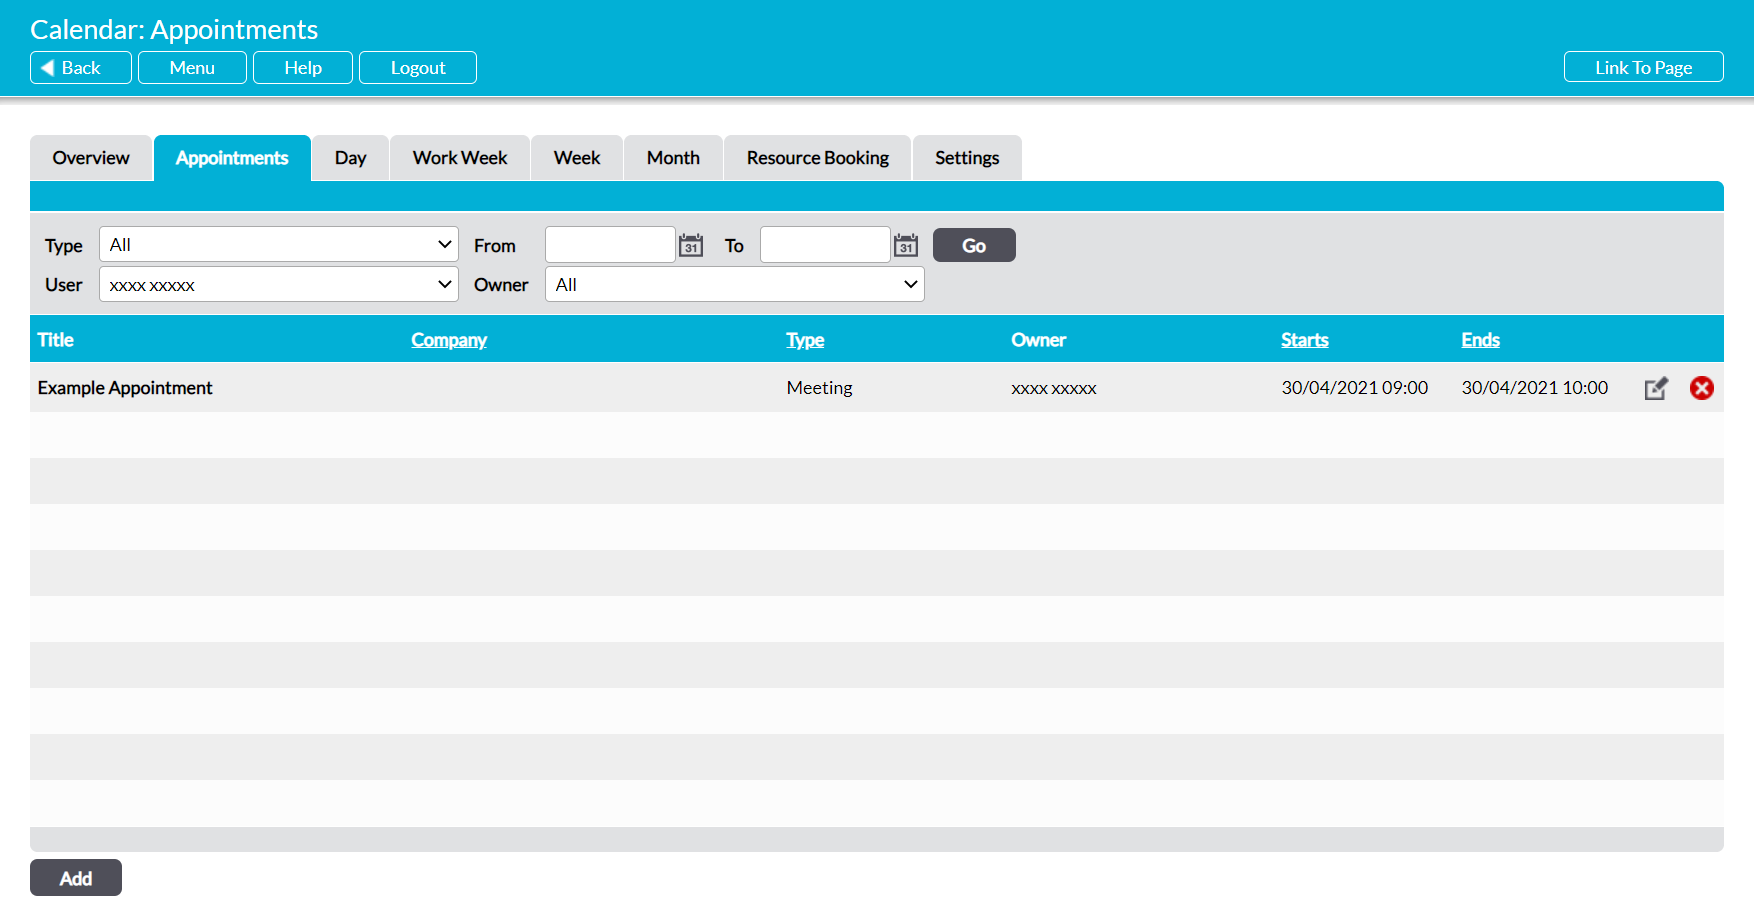
You will be returned to the Appointments tab, and your new Appointment will be displayed within the register. Note that Appointments will be displayed in chronological order using a combination of their start date and start time.
*****
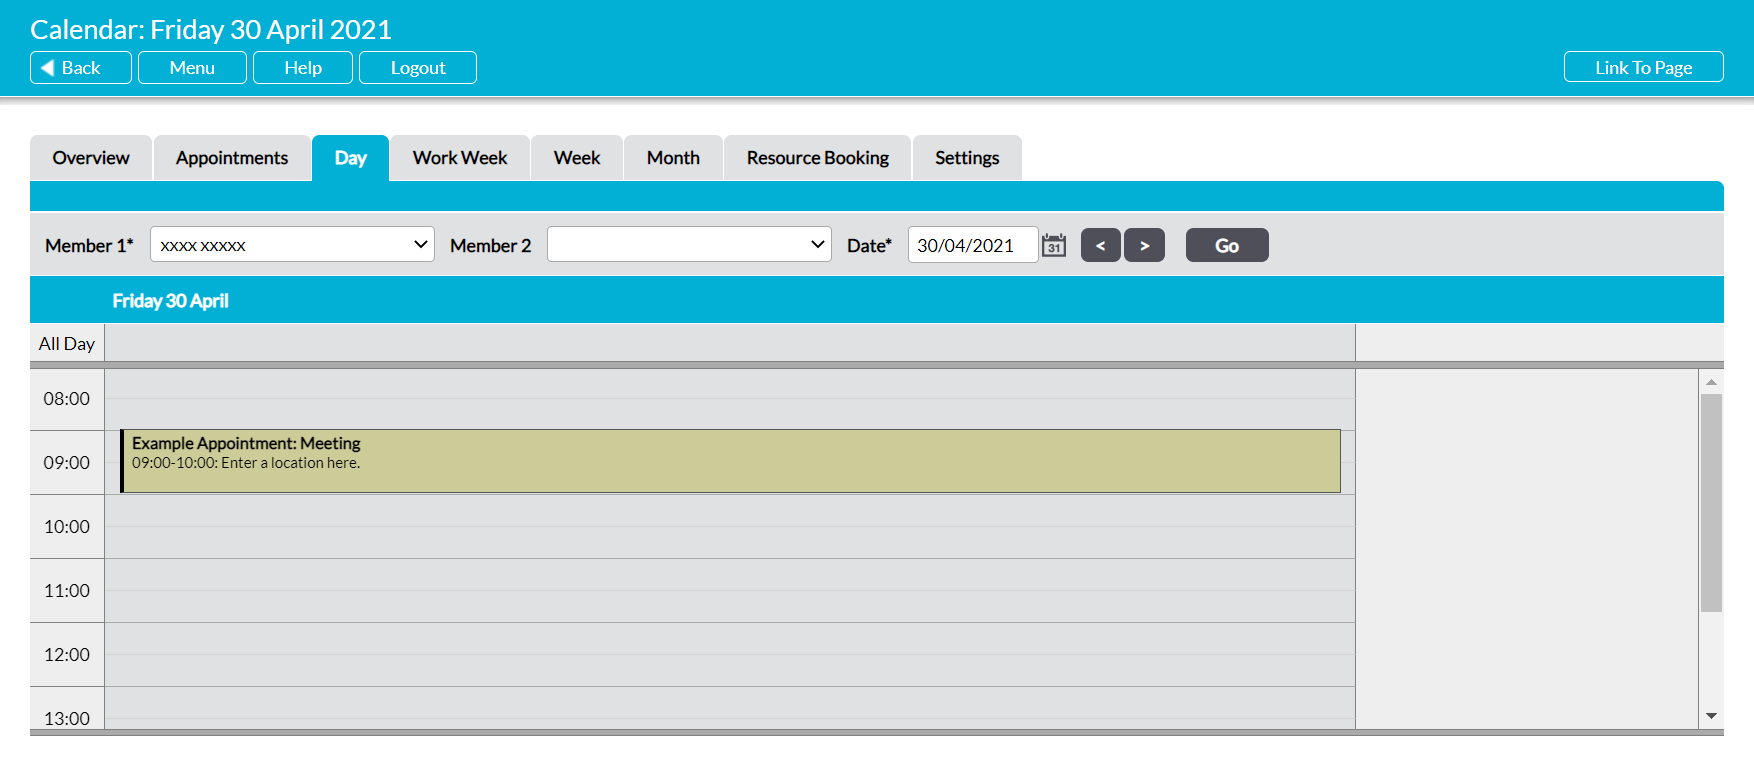
Create an Appointment from the Day Tab
To create an Appointment from the Day Overview, open the Calendar module on its Day tab. By default, Activ will open on the current day, but you can use the Calendar icon and left/right arrows at the top of the screen to switch to a different day if necessary. Once you are viewing the correct day, double-click within the appropriate time slot.

A blank Add Appointment form will open for you to populate. Up to thirteen fields are available for you to complete.
Title* – enter a summary of the Appointment.
Type* – use the dropdown menu to select the Appointment’s type. Note that these are configured in the module’s Settings (see Configure Calendar Settings).
Owner* – use the dropdown menu to select the Appointment’s owner. By default this will be set to the owner of the Calendar that the Appointment is being added to.
Starts* – by default, this will be set to the date and time that you opened the form from. However, you can use the calendar icon and accompanying dropdown menus to change the start date and time if necessary.
All Day* – use the dropdown menu to specify whether the Appointment lasts for the full working day. By default this is set to ‘No’.
Ends* – use the calendar icon and accompanying dropdown menus to set the end date and time for the Appointment. Note that Appointments can span multiple days if required.
Company – only available if your package includes the Customers & Suppliers module. If appropriate, use the magnifying glass to specify the third-party company (i.e. customer or supplier) that is involved in the Appointment.
Contact – only available if your package includes the Customers & Suppliers module. If appropriate, use the dropdown menu to specify the primary third-party contact that is involved in the Appointment. Note that the contact must already exist within your system (see Add a Contact), and that you must make a selection within the Company field before this option can be used.
Address – only available if your package includes the Customers & Suppliers module. If appropriate, use the dropdown menu to specify the address at which the Appointment will take place. Note that this will default to ‘Other Location’, and that alternate addresses can only be selected if they already exist within a third-party company’s record (see Add and Manage Company Addresses). In addition, you must make a selection within the Company field before addresses can be selected.
Other Location – enter the location of the Appointment. Note that this is a free-text field, and is intended for use alongside the ‘Other Location’ option in the Address field.
Equipment – enter any equipment that is required for the Appointment.
Notes – if needed, enter any additional information that the participants will need to know for the Appointment.
Members – use the tick boxes in this panel to select all users who are required to take part in the Appointment. Note that the new Appointment will be added to the Calendars of all selected individuals.
Enter the necessary details, and then click Save.

You will be returned to the Day tab, and your new Appointment will be displayed within the Calendar. Note that Activ will automatically place it into the appropriate time slot, and will apply a background colour to help visually identify the Appointment’s type. This background colour is configured within the module’s Settings (see Configure Calendar Settings).
*****
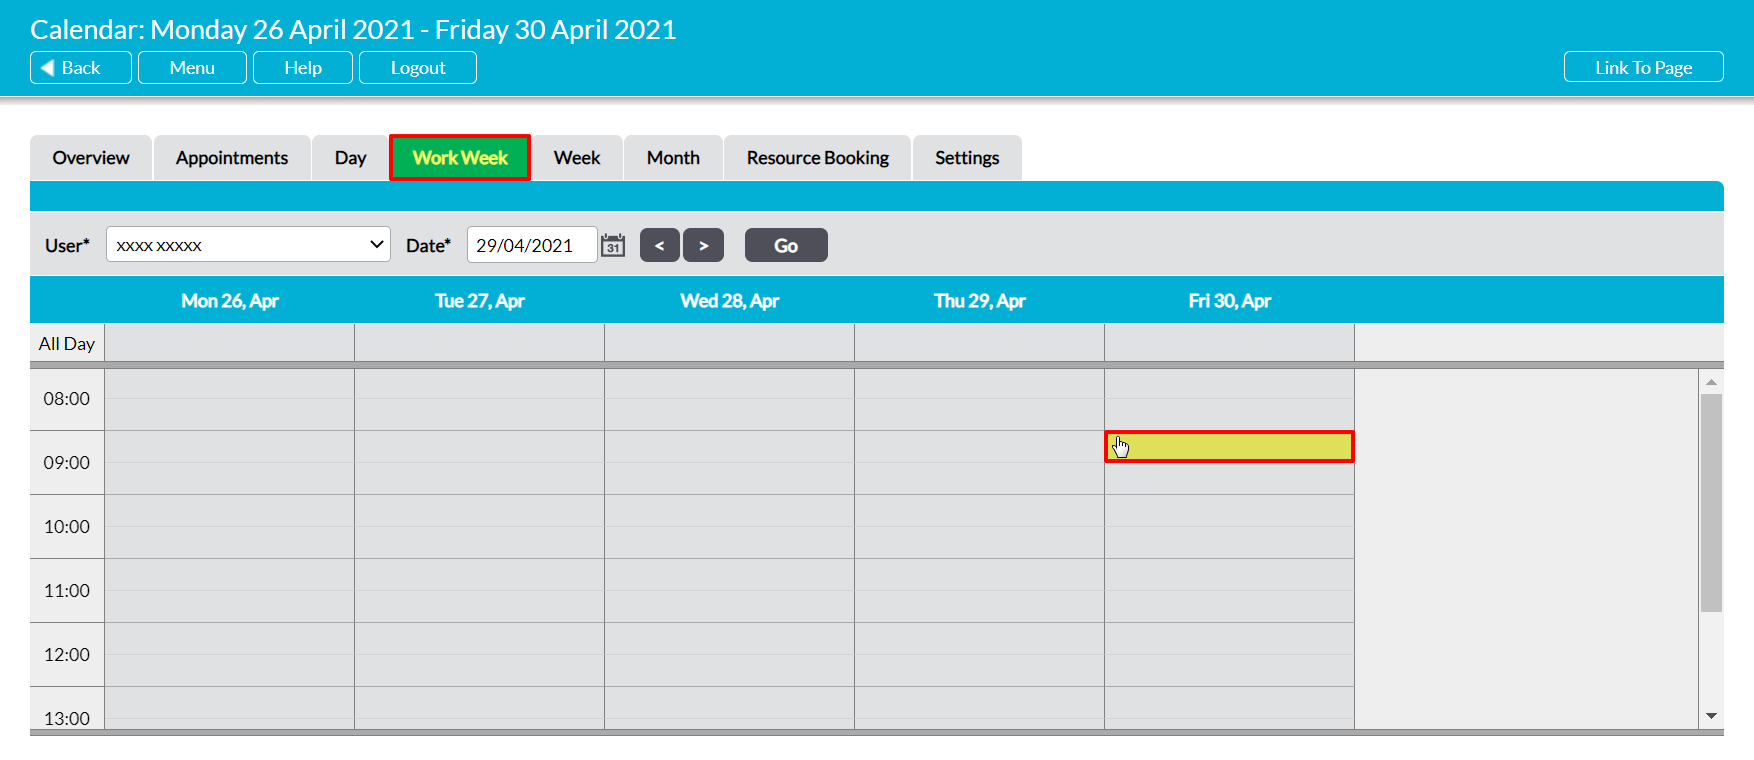
Create an Appointment from the Work Week Tab
To create an Appointment from the Work Week Overview, open the Calendar module on its Work Week tab. By default, Activ will open on the current working week, but you can use the Calendar icon and left/right arrows at the top of the screen to switch to a different week if necessary. Once you are viewing the correct week, double-click within the appropriate time slot.
A blank Add Appointment form will open for you to populate. Up to thirteen fields are available for you to complete.
Title* – enter a summary of the Appointment.
Type* – use the dropdown menu to select the Appointment’s type. Note that these are configured in the module’s Settings (see Configure Calendar Settings).
Owner* – use the dropdown menu to select the Appointment’s owner. By default this will be set to the owner of the Calendar that the Appointment is being added to.
Starts* – by default, this will be set to the date and time that you opened the form from. However, you can use the calendar icon and accompanying dropdown menus to change the start date and time if necessary.
All Day* – use the dropdown menu to specify whether the Appointment lasts for the full working day. By default this is set to ‘No’.
Ends* – use the calendar icon and accompanying dropdown menus to set the end date and time for the Appointment. Note that Appointments can span multiple days if required.
Company – only available if your package includes the Customers & Suppliers module. If appropriate, use the magnifying glass to specify the third-party company (i.e. customer or supplier) that is involved in the Appointment.
Contact – only available if your package includes the Customers & Suppliers module. If appropriate, use the dropdown menu to specify the primary third-party contact that is involved in the Appointment. Note that the contact must already exist within your system (see Add a Contact), and that you must make a selection within the Company field before this option can be used.
Address – only available if your package includes the Customers & Suppliers module. If appropriate, use the dropdown menu to specify the address at which the Appointment will take place. Note that this will default to ‘Other Location’, and that alternate addresses can only be selected if they already exist within a third-party company’s record (see Add and Manage Company Addresses). In addition, you must make a selection within the Company field before addresses can be selected.
Other Location – enter the location of the Appointment. Note that this is a free-text field, and is intended for use alongside the ‘Other Location’ option in the Address field.
Equipment – enter any equipment that is required for the Appointment.
Notes – if needed, enter any additional information that the participants will need to know for the Appointment.
Members – use the tick boxes in this panel to select all users who are required to take part in the Appointment. Note that the new Appointment will be added to the Calendars of all selected individuals.
Enter the necessary details, and then click Save.
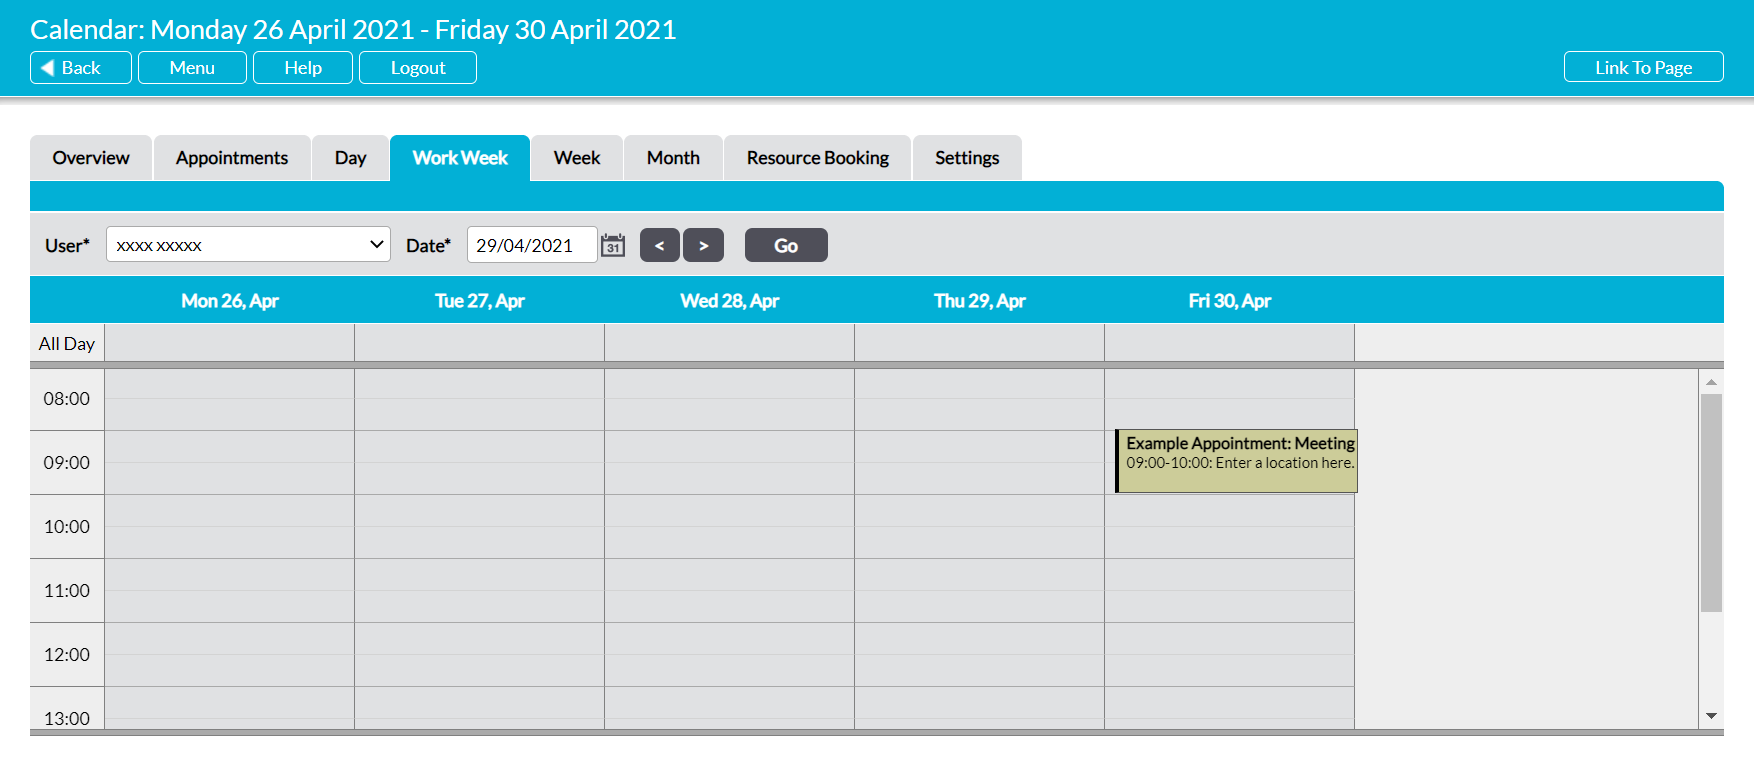
You will be returned to the Day tab, and your new Appointment will be displayed within the Calendar. Note that Activ will automatically place it into the appropriate day and time slot, and will apply a background colour to help visually identify the Appointment’s type. This background colour is configured within the module’s Settings (see Configure Calendar Settings).
*****
Create an Appointment from the Week Tab
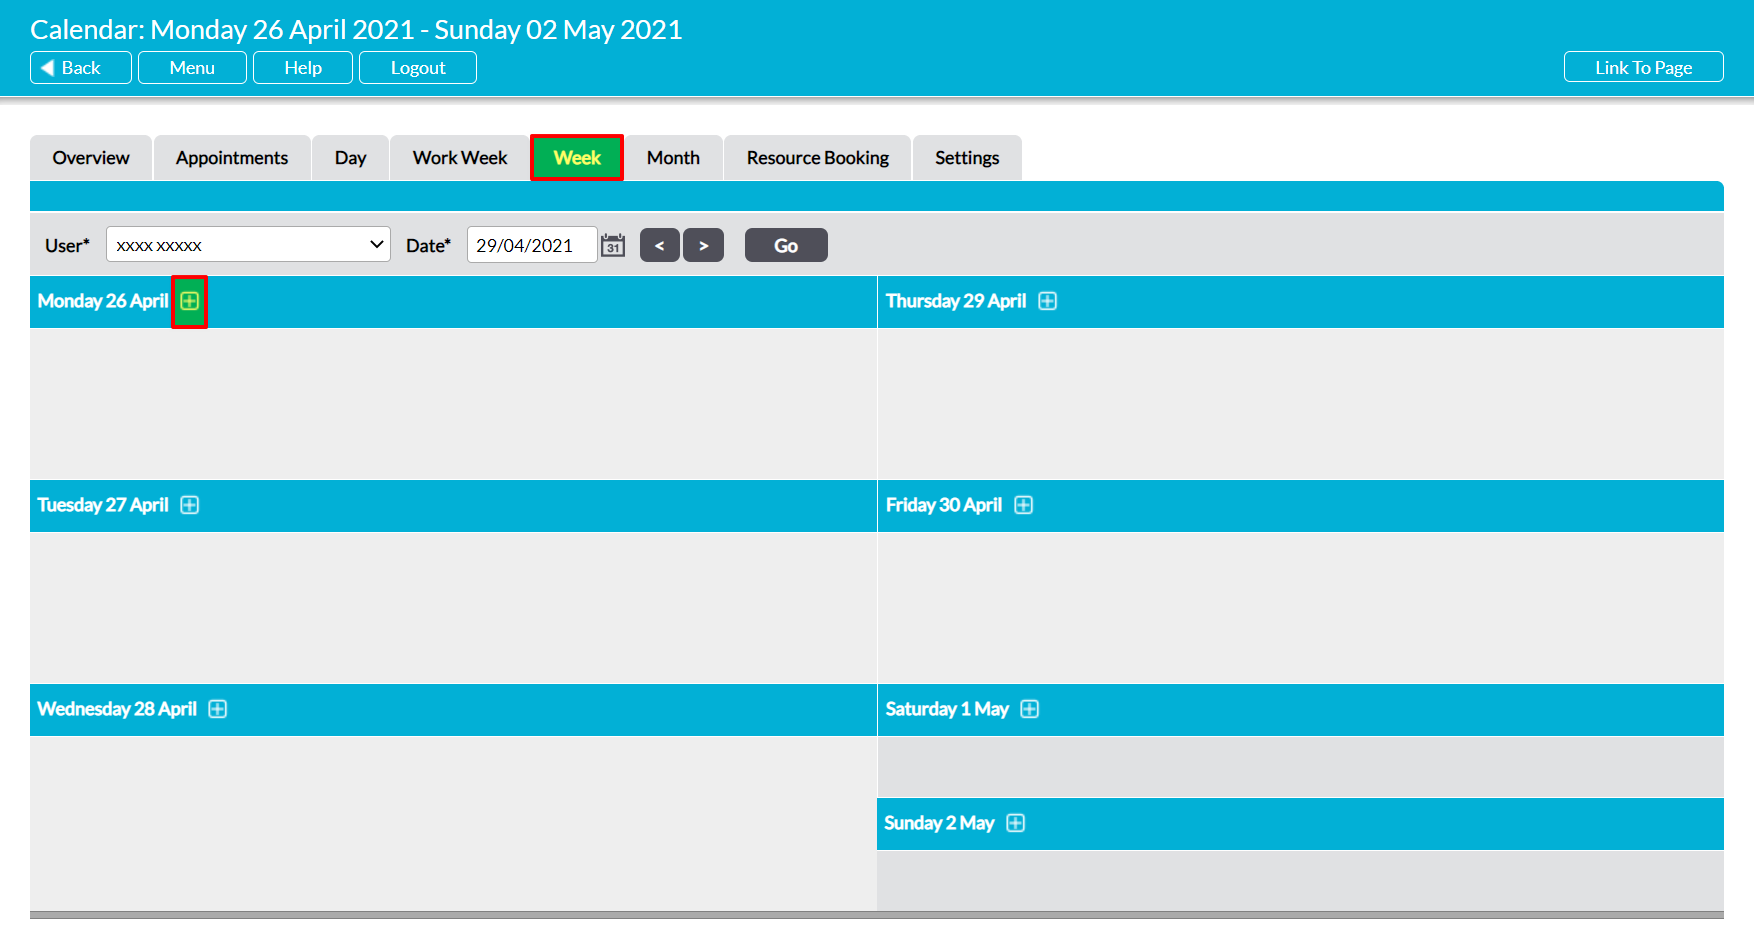
To create an Appointment from the Week Calendar, open the Calendar module on its Week tab. By default, Activ will open on the current week, but you can use the Calendar icon and left/right arrows at the top of the screen to switch to a different week if necessary. Once you are viewing the correct week, either double-click within the day or click on the plus icon alongside the appropriate date.
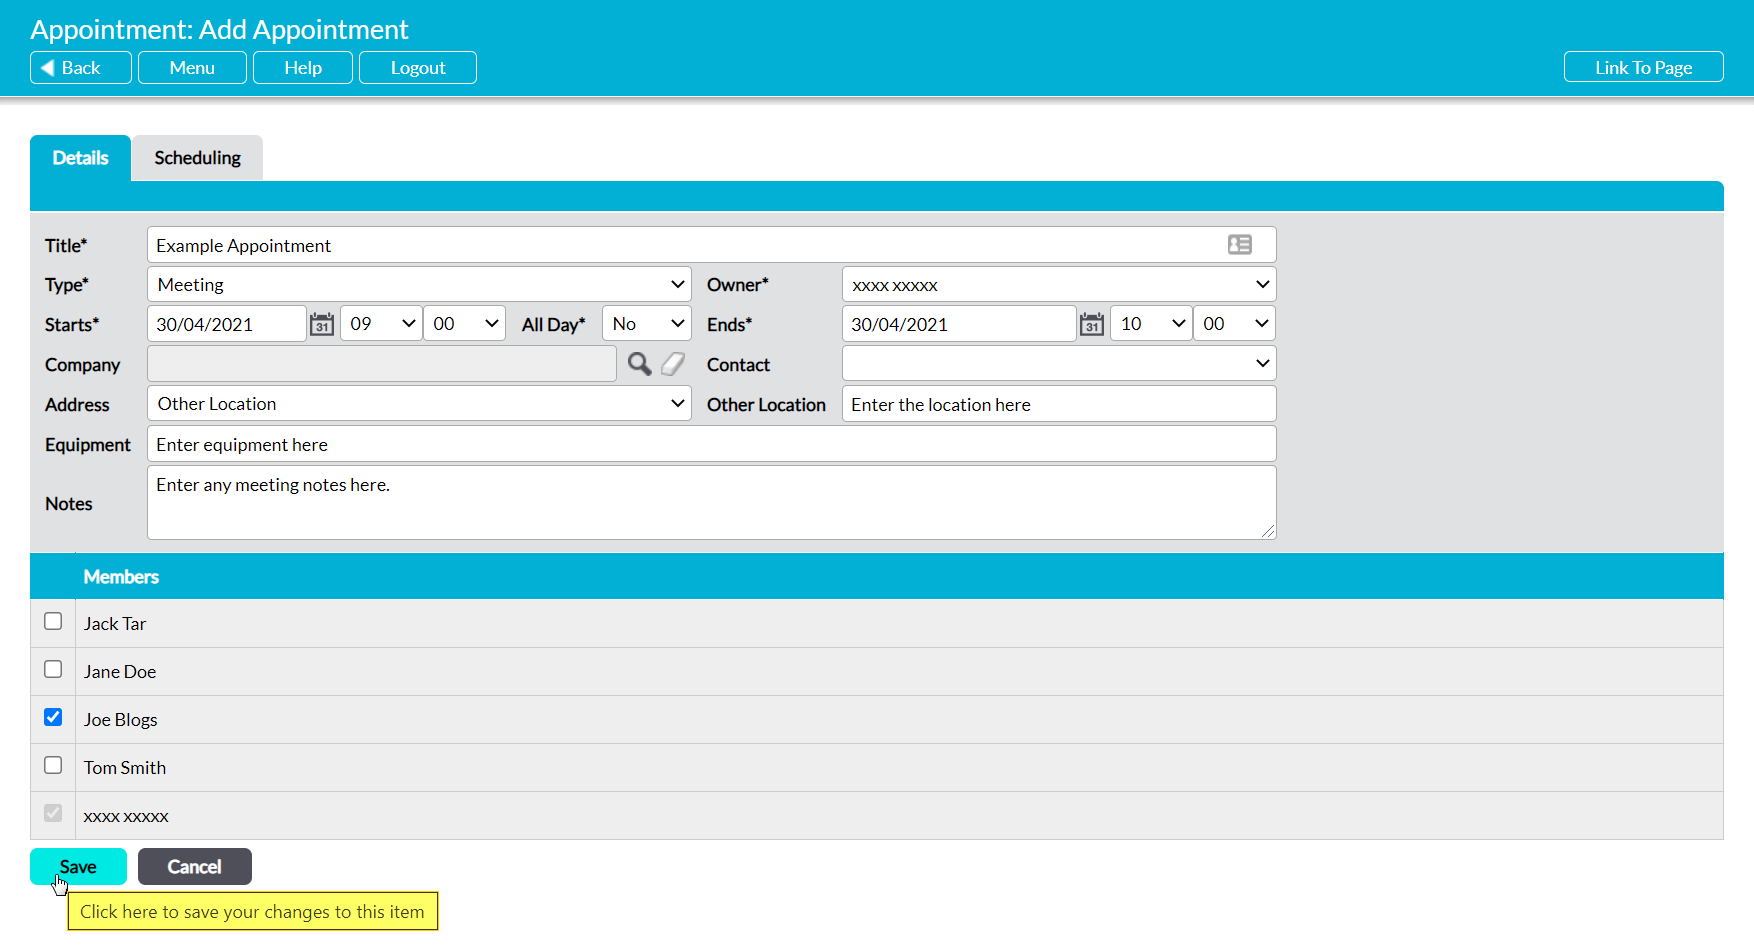
A blank Add Appointment form will open for you to populate. Up to thirteen fields are available for you to complete.
Title* – enter a summary of the Appointment.
Type* – use the dropdown menu to select the Appointment’s type. Note that these are configured in the module’s Settings (see Configure Calendar Settings).
Owner* – use the dropdown menu to select the Appointment’s owner. By default this will be set to the owner of the Calendar that the Appointment is being added to.
Starts* – by default, this will be set to the date that you opened the form from. Use the accompanying dropdown menus to select the appropriate start time for the Appointment, and the calendar icon to adjust the start date if necessary.
All Day* – use the dropdown menu to specify whether the Appointment lasts for the full working day. By default this is set to ‘No’.
Ends* – use the calendar icon and accompanying dropdown menus to set the end date and time for the Appointment. Note that Appointments can span multiple days if required.
Company – only available if your package includes the Customers & Suppliers module. If appropriate, use the magnifying glass to specify the third-party company (i.e. customer or supplier) that is involved in the Appointment.
Contact – only available if your package includes the Customers & Suppliers module. If appropriate, use the dropdown menu to specify the primary third-party contact that is involved in the Appointment. Note that the contact must already exist within your system (see Add a Contact), and that you must make a selection within the Company field before this option can be used.
Address – only available if your package includes the Customers & Suppliers module. If appropriate, use the dropdown menu to specify the address at which the Appointment will take place. Note that this will default to ‘Other Location’, and that alternate addresses can only be selected if they already exist within a third-party company’s record (see Add and Manage Company Addresses). In addition, you must make a selection within the Company field before addresses can be selected.
Other Location – enter the location of the Appointment. Note that this is a free-text field, and is intended for use alongside the ‘Other Location’ option in the Address field.
Equipment – enter any equipment that is required for the Appointment.
Notes – if needed, enter any additional information that the participants will need to know for the Appointment.
Members – use the tick boxes in this panel to select all users who are required to take part in the Appointment. Note that the new Appointment will be added to the Calendars of all selected individuals.
Enter the necessary details, and then click Save.

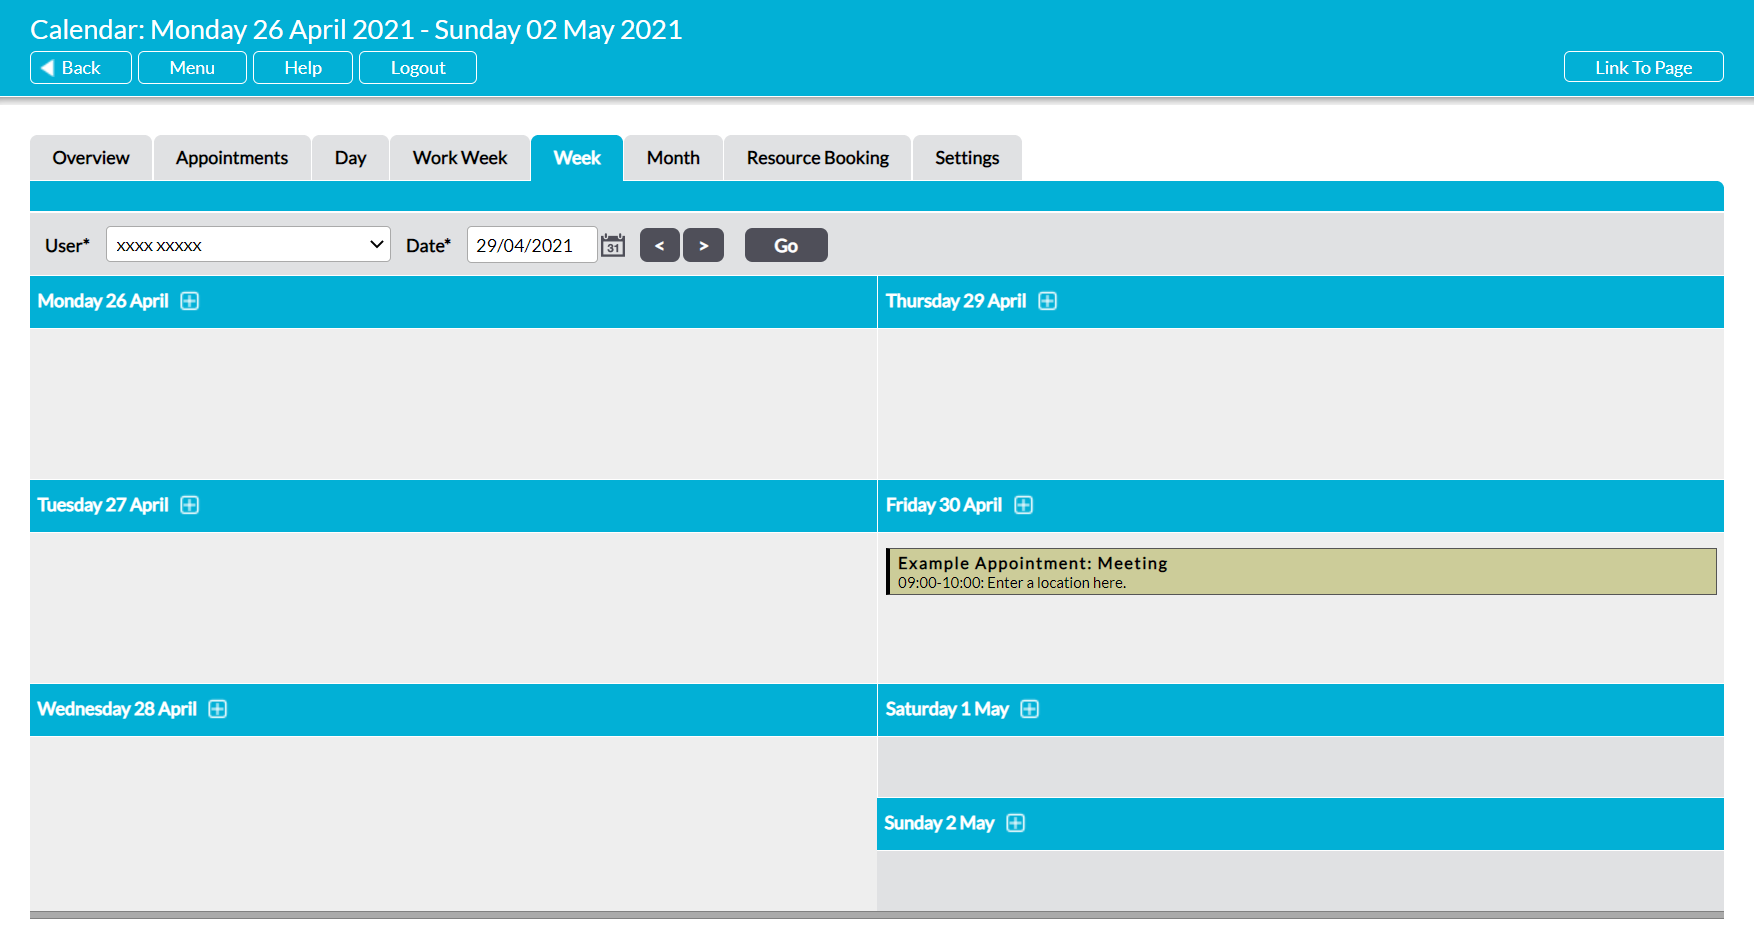
You will be returned to the Week tab, and your new Appointment will be displayed within the Calendar. Note that Activ will automatically place it into the appropriate day, and will list each day’s appointments in chronological order. In addition, Activ will apply a background colour to help visually identify the Appointment’s type. This background colour is configured within the module’s Settings (see Configure Calendar Settings).
*****
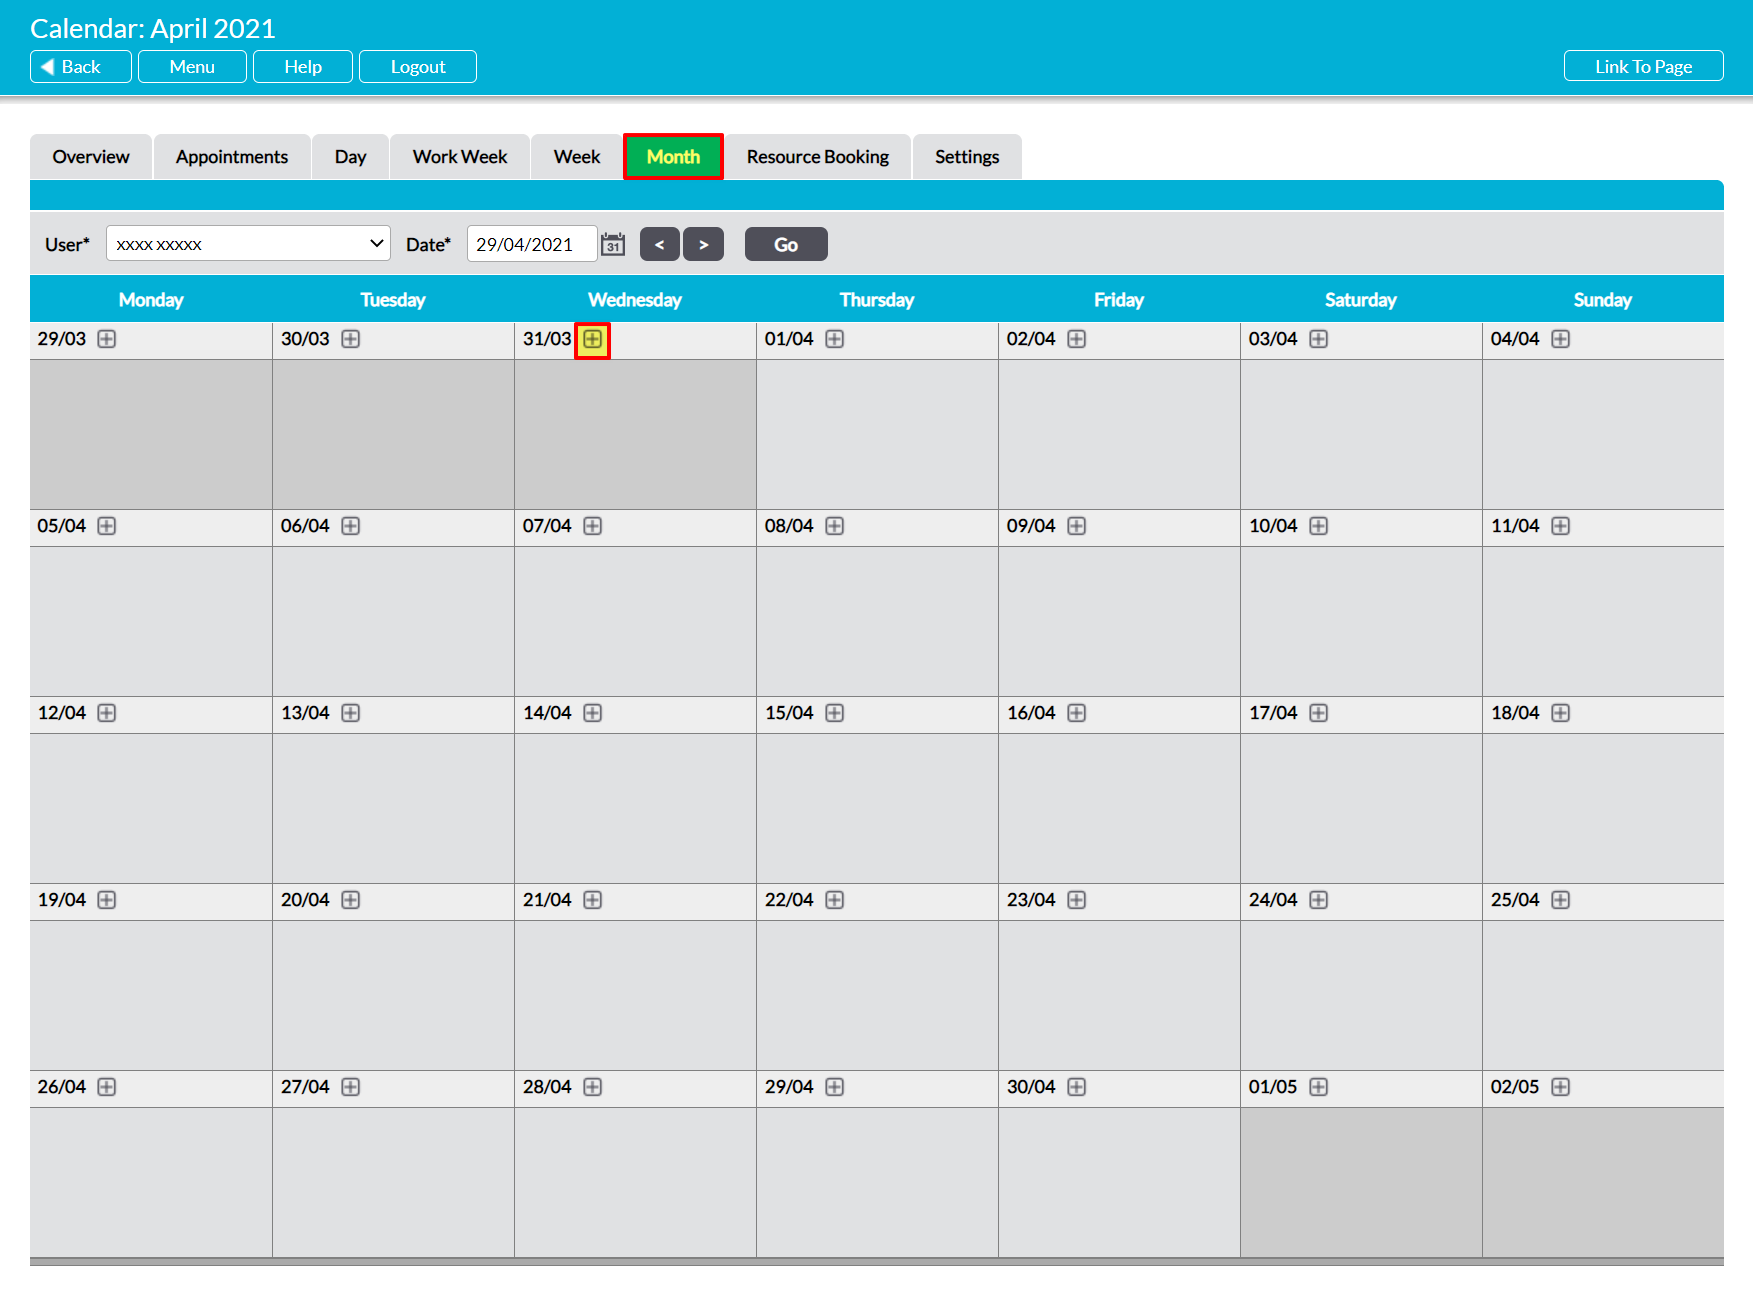
Create an Appointment from the Month Tab
To create an Appointment from the Month Calendar, open the Calendar module on its Month tab. By default, Activ will open on the current month, but you can use the Calendar icon and left/right arrows at the top of the screen to switch to a different month if necessary. Once you are viewing the correct month, either double-click within the appropriate day or click on the plus icon alongside the appropriate date.
A blank Add Appointment form will open for you to populate. Up to thirteen fields are available for you to complete.
Title* – enter a summary of the Appointment.
Type* – use the dropdown menu to select the Appointment’s type. Note that these are configured in the module’s Settings (see Configure Calendar Settings).
Owner* – use the dropdown menu to select the Appointment’s owner. By default this will be set to the owner of the Calendar that the Appointment is being added to.
Starts* – by default, this will be set to the date that you opened the form from. Use the accompanying dropdown menus to select the appropriate start time for the Appointment, and the calendar icon to adjust the start date if necessary.
All Day* – use the dropdown menu to specify whether the Appointment lasts for the full working day. By default this is set to ‘No’.
Ends* – use the calendar icon and accompanying dropdown menus to set the end date and time for the Appointment. Note that Appointments can span multiple days if required.
Company – only available if your package includes the Customers & Suppliers module. If appropriate, use the magnifying glass to specify the third-party company (i.e. customer or supplier) that is involved in the Appointment.
Contact – only available if your package includes the Customers & Suppliers module. If appropriate, use the dropdown menu to specify the primary third-party contact that is involved in the Appointment. Note that the contact must already exist within your system (see Add a Contact), and that you must make a selection within the Company field before this option can be used.
Address – only available if your package includes the Customers & Suppliers module. If appropriate, use the dropdown menu to specify the address at which the Appointment will take place. Note that this will default to ‘Other Location’, and that alternate addresses can only be selected if they already exist within a third-party company’s record (see Add and Manage Company Addresses). In addition, you must make a selection within the Company field before addresses can be selected.
Other Location – enter the location of the Appointment. Note that this is a free-text field, and is intended for use alongside the ‘Other Location’ option in the Address field.
Equipment – enter any equipment that is required for the Appointment.
Notes – if needed, enter any additional information that the participants will need to know for the Appointment.
Members – use the tick boxes in this panel to select all users who are required to take part in the Appointment. Note that the new Appointment will be added to the Calendars of all selected individuals.
Enter the necessary details, and then click Save.

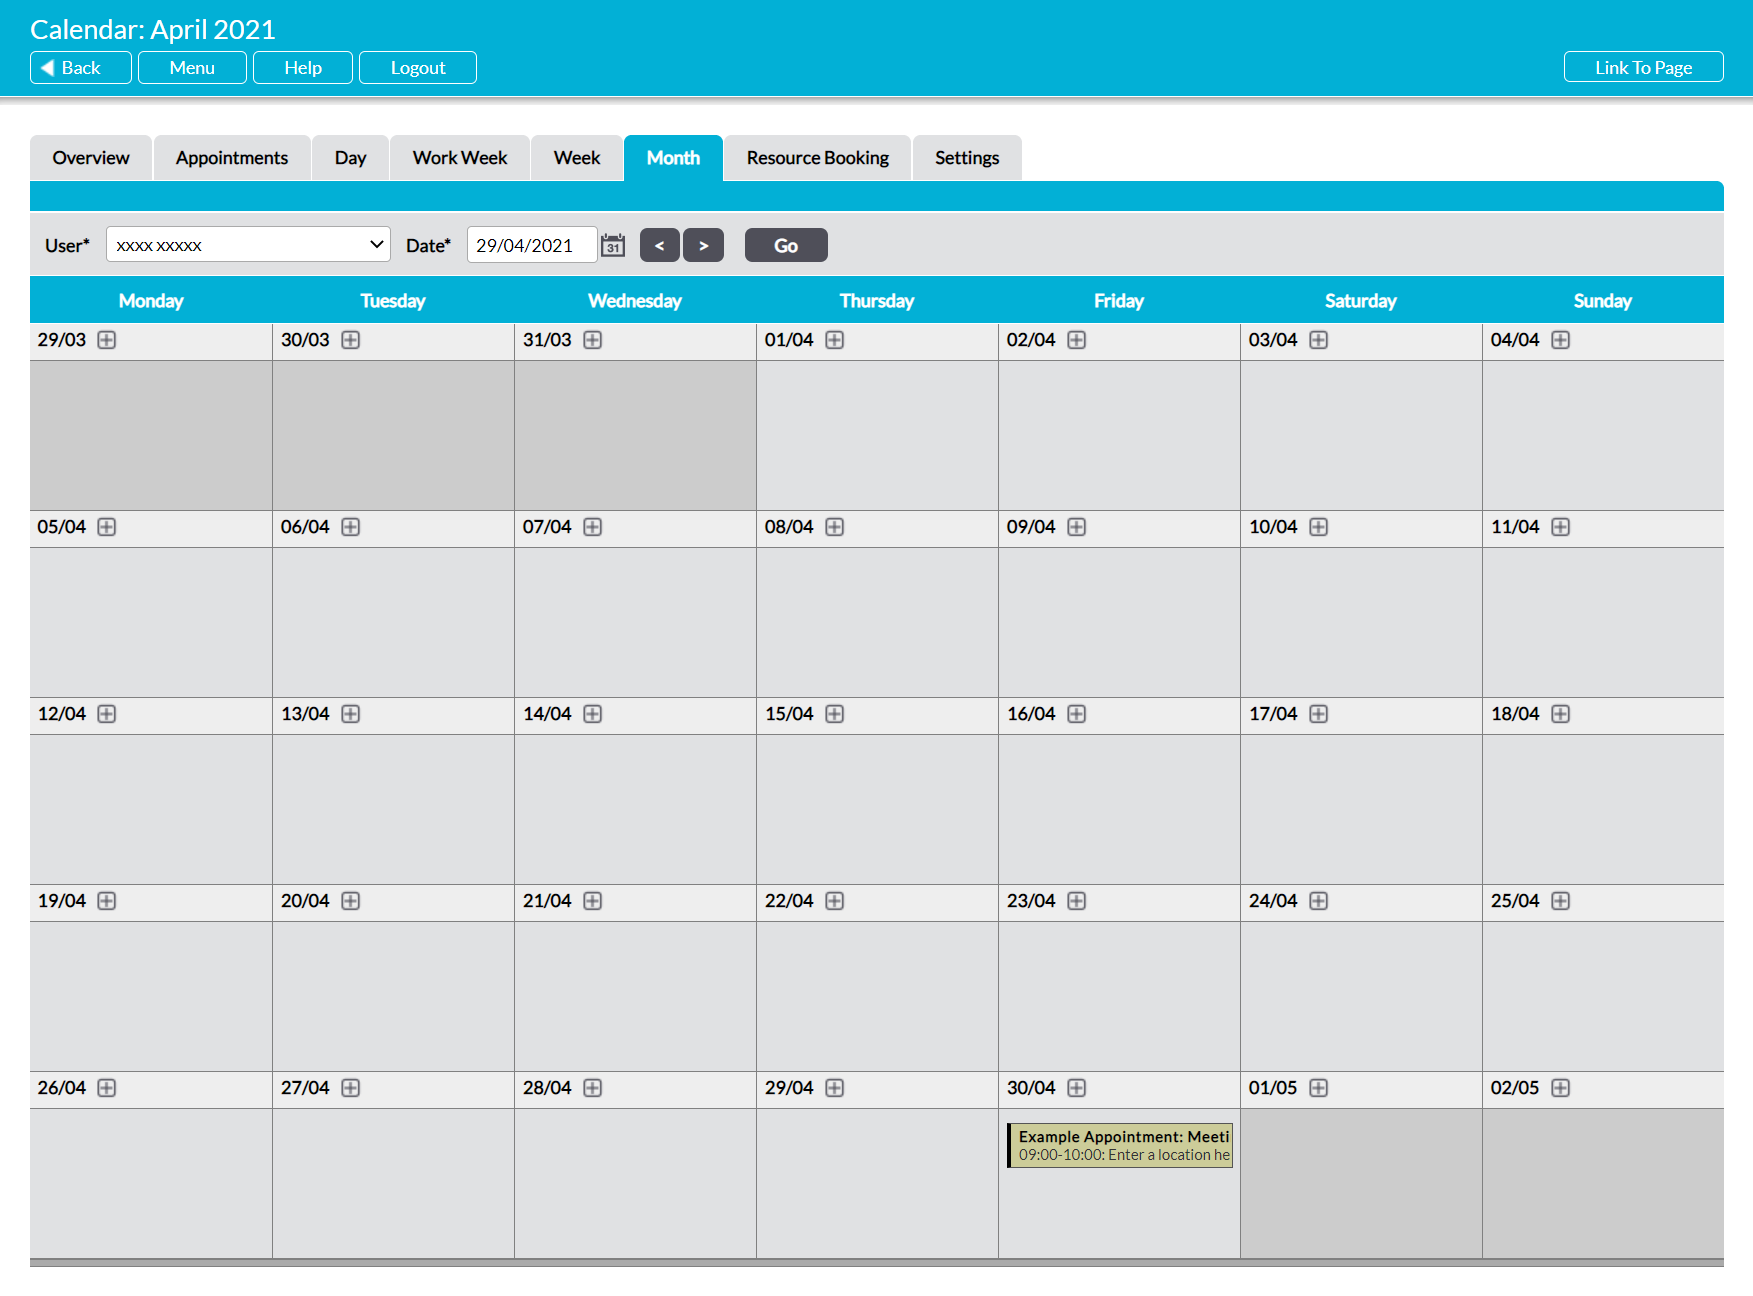
You will be returned to the Month tab, and your new Appointment will be displayed within the Calendar. Note that Activ will automatically place it into the appropriate day, and will list each day’s appointments in chronological order. In addition, Activ will apply a background colour to help visually identify the Appointment’s type. This background colour is configured within the module’s Settings (see Configure Calendar Settings).