Once you have enabled Teams, Activ will automatically add one Team and two ‘Libraries’ (to hold each Team’s content) to your system. These are:
- The Company Team and its accompanying Library (see Teams – Overview and Team Hierarchies for more information); and
- The Global Library (see Teams – Overview and Global Team Permissions for more information).
In addition, Activ will allow you to add an unlimited number of additional Teams to your system so that you can organise your employees and content (e.g. files, Processes, Improvement Logs, etc) in the manner that best suits your organisation. However, it is important to be aware that the Team dropdown menus throughout your system will be exchanged for a popup Team picker if you exceed 30 Teams (see Viewing Team Content when your System Exceeds 30 Teams).
Use of this feature also enables you to add an additional layer of security to all content that is stored within your system, as your users will not be able to view any non-Global content that is not tagged to their Team or one of their Team’s Child Teams (see Team Hierarchies for more information). Only Global content will be visible to all members of all Teams, and then only if the user has access to the module in which that content is stored (see Global Team Permissions).
New Teams can be added to your system from two locations:
*****
Create a Team from the Main Teams Register
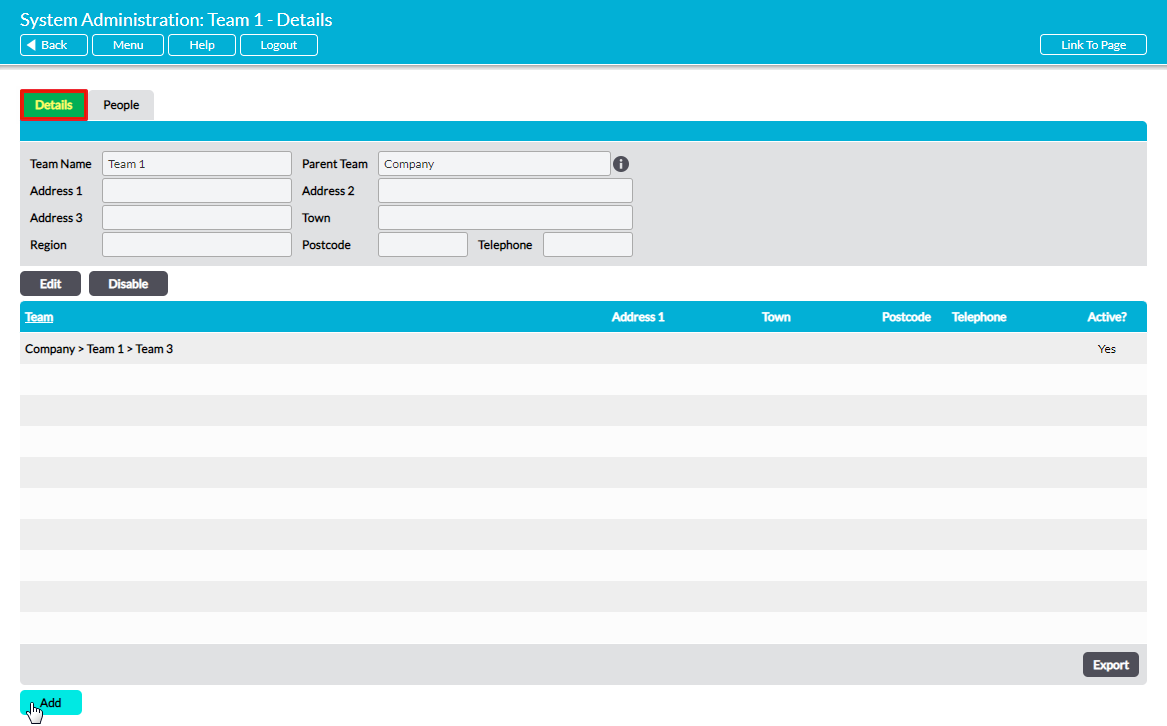
To create a Team from the main Teams Register, open the System Administration area and click on the Teams tab. This houses the register of all Teams (barring the Company Team) that are currently recorded within your system.
Click on the Add button.
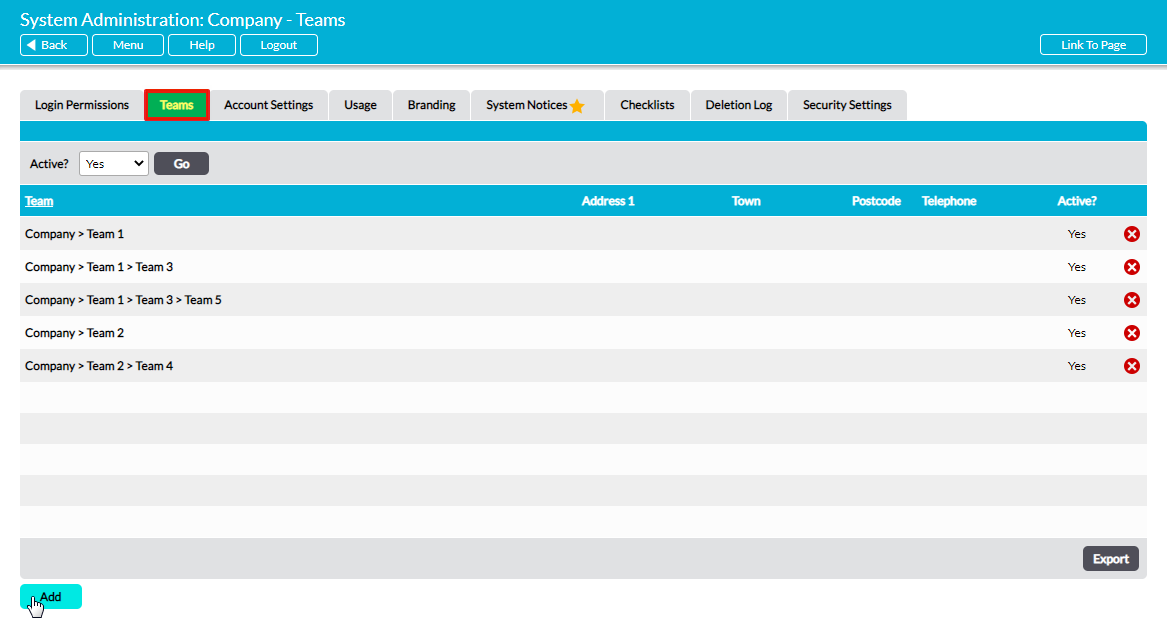
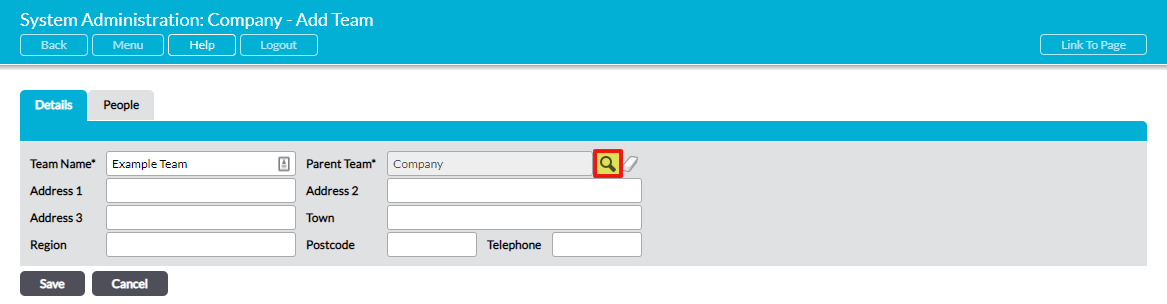
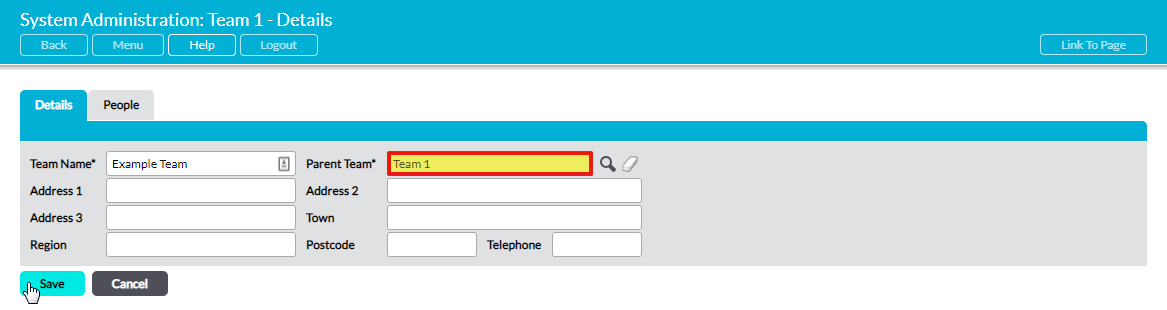
This opens a blank Details form for you to populate. Nine fields are available for you to complete:
Team Name* – enter an appropriate name for the new Team here. Your Team will be referred to by this name throughout the rest of your system.
Parent Team* – the direct Parent of the new Team. For example, in the Team structure ‘Company > Team 1 > Team 3’, Team 1 is the direct Parent of Team 3 (see Team Hierarchies).
Address 1/2/3 – enter address lines one to three of the site that the new Team is based at. This field is mainly useful if you have multiple sites and need to distinguish which site each Team belongs to.
Town – enter the town that the new Team is based at. This field is mainly useful if you have multiple sites and need to distinguish which site each Team belongs to.
Region – enter the region that the new Team is based at. This field is mainly useful if you have multiple sites and need to distinguish which site each Team belongs to.
Postcode – enter the postcode of the site that the new Team is based at. This field is mainly useful if you have multiple sites and need to distinguish which site each Team belongs to.
Telephone – enter the main phone number that is associated with the Team (e.g. the manager’s phone number).
Parent Team* is a required field and must be selected from your existing Teams. To select a Team, click on the magnifying glass to the right of the field.
A popup containing a register of your existing Teams will open. Use the radio buttons to the left to select the appropriate Parent Team for your new Team. Alternatively, leave this field unedited to make your new Team a direct Child of your Company Team.
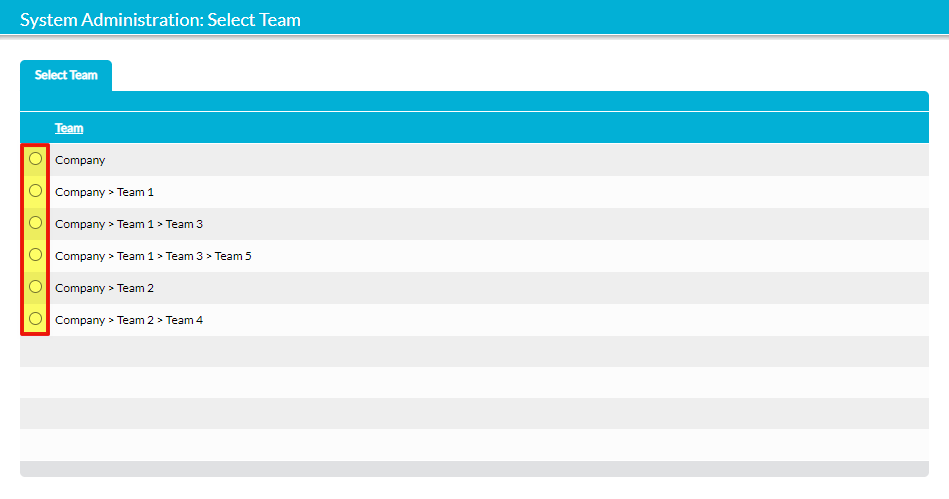
The selected Team will now be displayed within the Parent Team* field, meaning that your new Team will be added as a ‘Child’ of that Team (see Team Hierarchies).
Click on the Save button once you have finished entering the Team’s details.
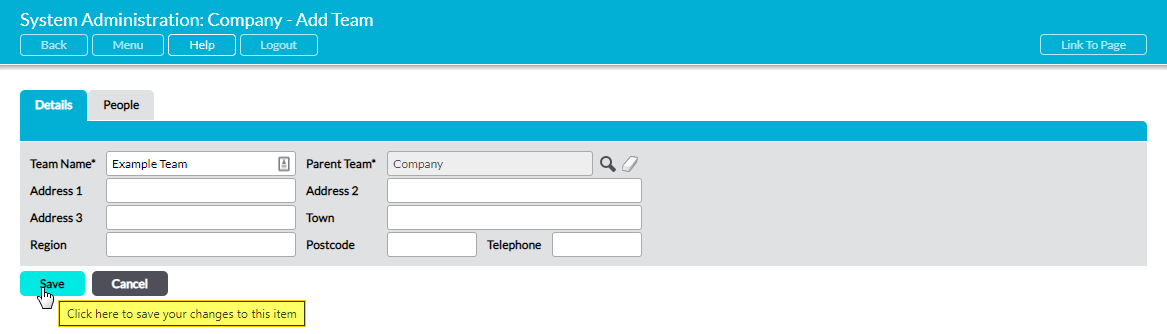
You will be returned to the main Teams register, and the new Team will now be visible at the bottom of the list. In addition, Activ will have automatically created a new Library in which to store the Team’s content.
*****
Create a Team from an Individual Team’s Record
For convenience, Activ provides you with the option to create a new (Child) Team directly from within an existing Team’s record. Using this option will ensure that the selected Team will automatically be entered as the new Team’s Parent Team, and may be useful when you are adding multiple Child Teams to one of your existing Teams.
To create a Team from within an existing Team’s record, open the Team on its Details tab and click on the Add button at the bottom of the screen.
This opens a blank Details form for you to populate. Nine fields are available for you to complete:
Team Name* – enter an appropriate name for the new Team here. Your Team will be referred to by this name throughout the rest of your system.
Parent Team* – this will be auto-filled with the selected Team’s name, denoting it as the direct Parent of the new Team.
Address 1/2/3 – enter address lines one to three of the site that the new Team is based at. This field is mainly useful if you have multiple sites and need to distinguish which site each Team belongs to.
Town – enter the town that the new Team is based at. This field is mainly useful if you have multiple sites and need to distinguish which site each Team belongs to.
Region – enter the region that the new Team is based at. This field is mainly useful if you have multiple sites and need to distinguish which site each Team belongs to.
Postcode – enter the postcode of the site that the new Team is based at. This field is mainly useful if you have multiple sites and need to distinguish which site each Team belongs to.
Telephone – enter the main phone number that is associated with the Team (e.g. the manager’s phone number).
Enter the necessary details, and then click Save.
You will be returned to the Parent Team’s Details tab, and the new Team will now be visible at the bottom of its Child Team register. In addition, Activ will have automatically created a new Library in which to store the Team’s content.
