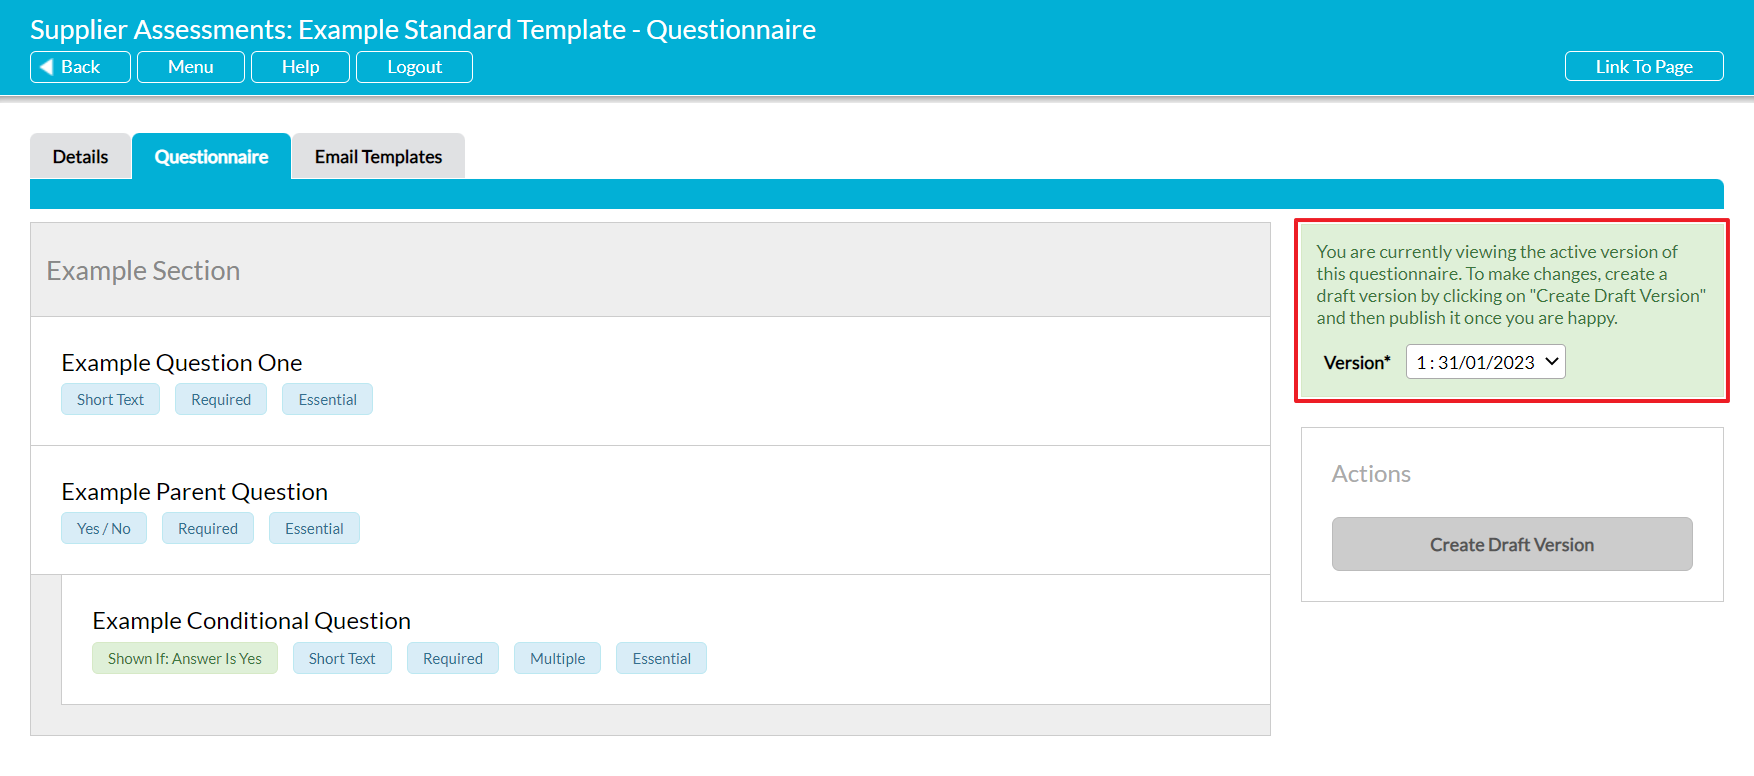
Supplier Assessment templates are a critical component of the Customers & Suppliers: Supplier Assessments area, as all Supplier Assessments that you create and send from your system will be based on one of the templates that exist within your system. It is not possible to send a Supplier Assessment that does not use one of your templates, and as such it is important that you create and maintain a library of templates that will suit your future Assessment needs. These templates can be a mixture of:
- ‘Standard’ Assessments, which require the Supplier to provide information by answering a series of questions, and then an appropriate user to review that information; and
- ‘Auto-Approved’ Assessments, which can be used to automatically approve Suppliers of non-critical products and services and do not require any data from the Supplier, or review from your organisation.
This article details the steps involved in creating ‘standard’ Supplier Assessments. See Create a New Auto-Approved Supplier Assessment Template if you wish to create an auto-approving assessment for non-critical Suppliers.
Note that all of your Supplier Assessment templates are created and managed from the Templates tab of the Customers & Suppliers: Supplier Assessments area, and that this tab is only accessible to users who have ‘Admin’ permissions to the area.
When you are creating a ‘standard’ Supplier Assessment template, the template design workflow can be split into up to six steps:
- Step 1: Name (create) the template
- Step 2: Design the template’s main questions
- Step 3: Add conditional questions to your template
- Step 4: Specify the accompanying email messages
- Step 5: Specify who is authorised to fulfil/review Assessments that use this template
- Step 6: Publish the template
*****
Step 1: Name (Create) the Template
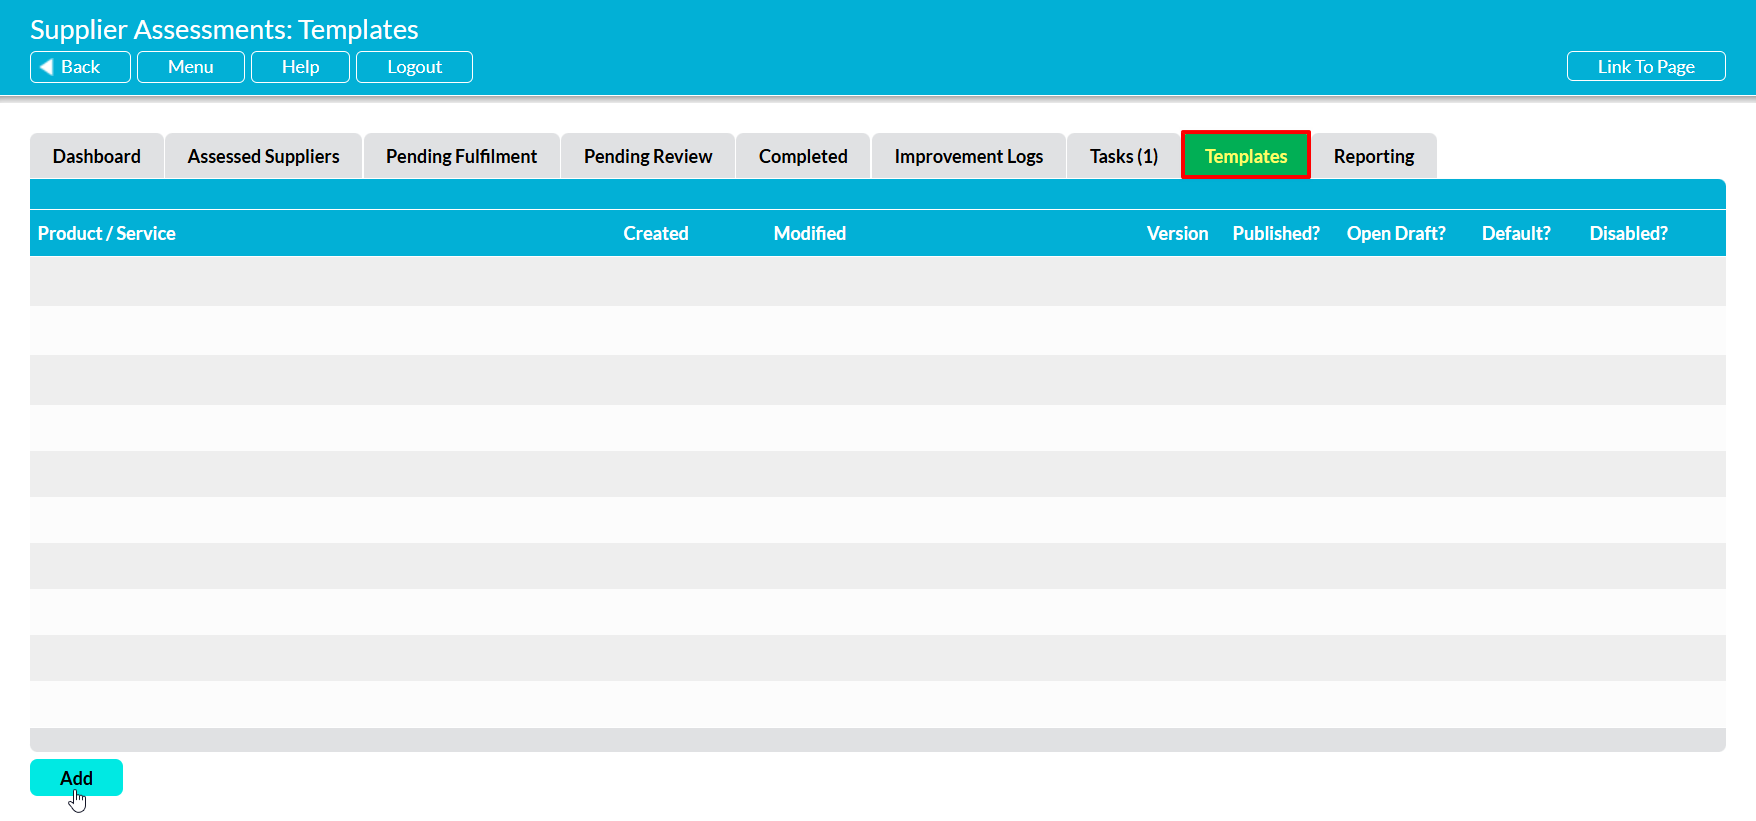
To add a new standard template to your system, open the Customers & Suppliers: Supplier Assessment area and click on the Templates tab. This will open the Supplier Assessments: Templates page, which houses a register of all the Assessment templates that are currently in your system.
Click on the Add button.
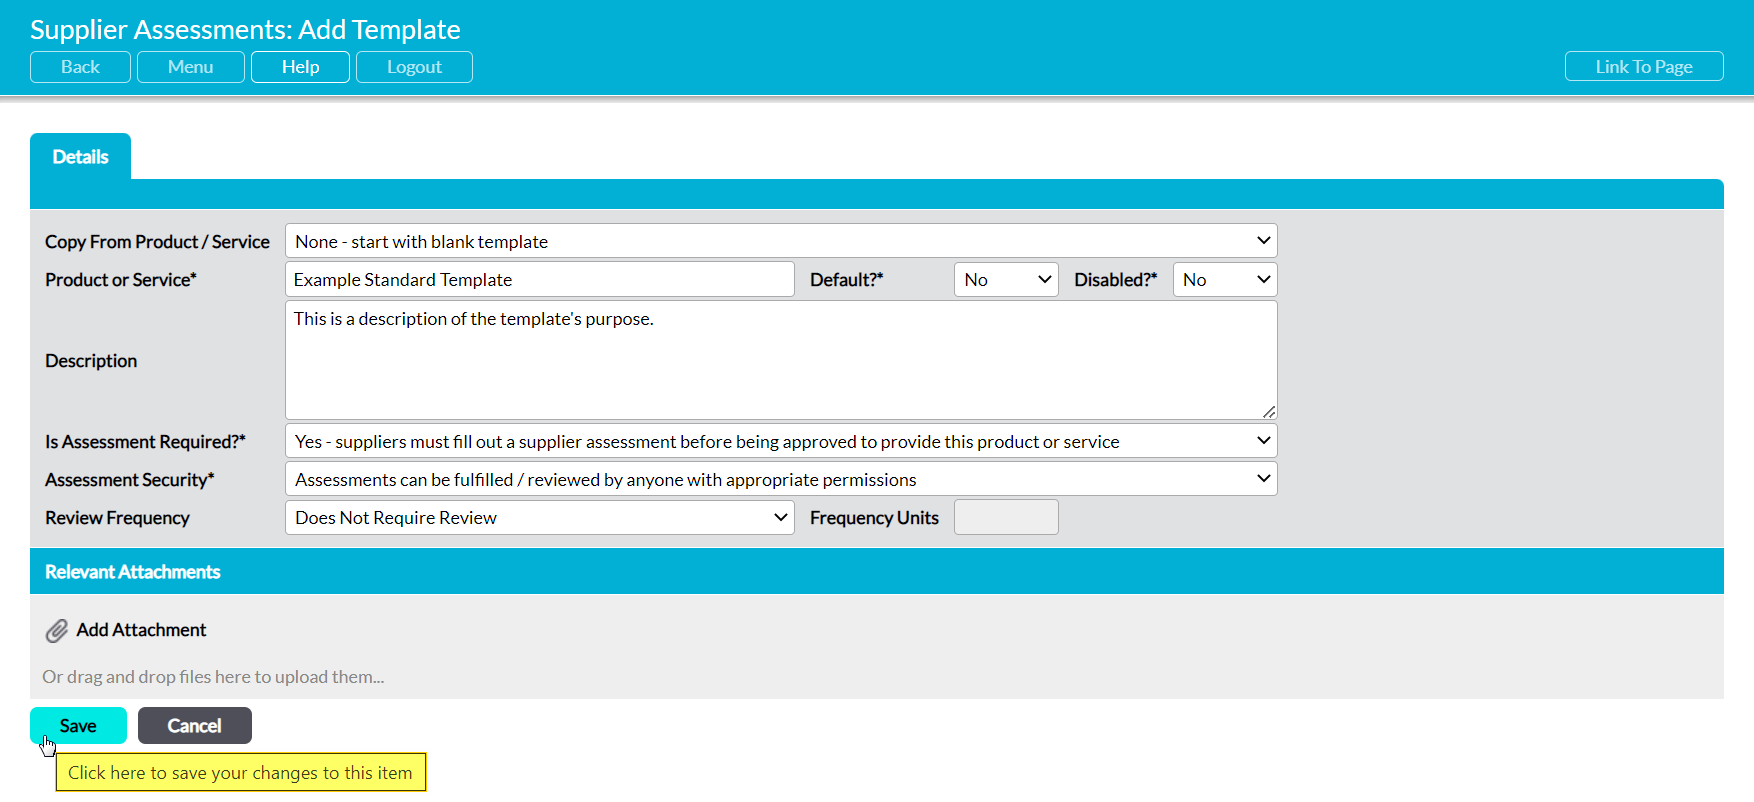
This opens a blank Add Template form for you to populate. Up to ten fields will be available for you to complete:
Copy From Product/Service – allows you to use an existing template as the basis for the new template, enabling you to efficiently create new templates that are similar to existing ones. This field defaults to ‘None – start with blank template’, allowing you to create a template from scratch. Note that if you choose to base your template on an existing template, all questions/etc from the selected template will be copied into your new template. These can be freely modified once the new template has been created. Also note that you will only be able to copy the most recent live version of templates that have been published. You will not be able to copy from draft versions or unpublished templates.
Product or Service* – enter a brief descriptive name for the Supplier Assessment template.
Default?* – allows you to specify which Supplier Assessment template appears at the top of the drop-down list when you are creating a new Supplier Assessment. Typically, you would select ‘Yes’ in this field for the template that will be most commonly used. Note that your users will be forced to manually select a template if none of your templates are marked as the default.
Disabled?* – allows you to specify whether the template should be ‘hidden’, preventing future use. This field defaults to ‘No’, meaning that the template will be available for selection when setting up Supplier Assessments. If you select ‘Yes’ here, the template will not be available for selection. If you disable a template after it has been used, existing Supplier Assessments using the template will remain on record within the system, but it will not be possible to select the template when creating a new Assessment.
Description – provides you with the option to enter guidance about the template’s purpose and/or coverage (e.g. the specific products/services that the template covers). The description is only displayed internally, and will be shown alongside each template when you are selecting which template to use for a Supplier Assessment.
Is Assessment Required?* – specifies whether suppliers who are assessed with this template will need to go through the formal Assessment process (and provide answers to a set of questions) before they can be approved for use. By default this is set to ‘Yes’, and the field should not be changed if you are creating a ‘standard’ Assessment template.
Assessment Security* – only available if Is Assessment Required? is set to ‘yes’. This allows you to specify whether anyone with ‘Edit’ to Customers & Suppliers: Supplier Assessments should be able to review and fulfil Assessments that use this template, or whether this should be locked to specific named individuals. If you choose to lock review and fulfilment to named individuals, an additional tab (‘Authorisations’) will become available after you save to allow you to specify who can complete each action.
Review Frequency – only available if Is Assessment Required is set to ‘yes’. This field allows you to specify that Assessments using this template should automatically be scheduled for re-assessment at set intervals. You can leave this set to the default ‘Does not Require Review’ option if you do not want to automatically schedule re-assessment, or you can use the dropdown menu to select between ‘Daily’, ‘Weekly’, ‘Monthly, or ‘Yearly’. Note that if you enable automatic re-assessment, the future Assessments will all be scheduled using the same template. As such, you should not use this feature if you need future Assessments of a Supplier to be conducted using an alternate template.
Frequency Units – only available if Review Frequency is set to ‘Daily’, ‘Weekly’, ‘Monthly’, or ‘Yearly’. Allows you to specify how frequently automatic re-assessments should be scheduled. For example, you would enter ‘1’ here and select ‘Yearly’ in Review Frequency to automatically schedule a re-assessment once every year.
Relevant Attachments – provides you with the option to upload supporting files (e.g. your T&Cs, or additional forms that need to be completed as part of the Assessment) from outside of Activ. These will be displayed within all Assessments that are created using the template, and will be sent alongside the Assessment when it is sent to Suppliers. Click on Add Attachment within this section to open your file explorer, from which you can select the appropriate Attachment(s). Note that you can add as many attachments to the template as required.
Enter the relevant information, and then click Save.
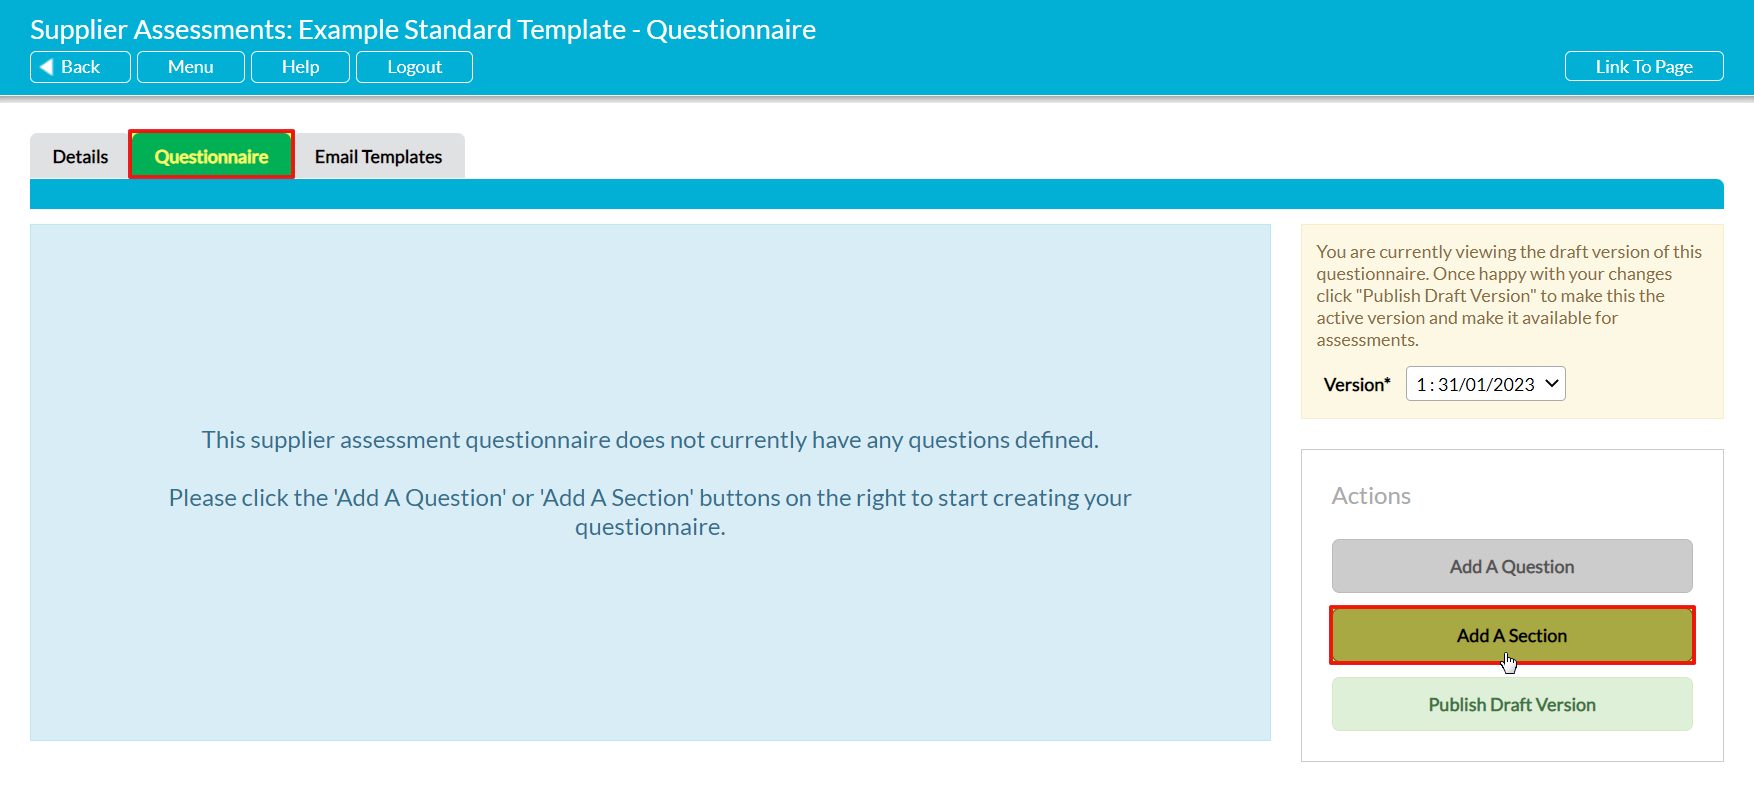
Your template will be added to Activ, and you will automatically be taken to its Questionnaire tab so that you can begin building the Assessment’s questions (see step 3, below).
Note that the template will initially be created as a draft version, meaning that it will not be available for selection by your users when they are creating new Supplier Assessments. It will only become available for selection once it has been published (see step 5, below).
Also note that the remainder of this article assumes that you are creating a new template from scratch. If you instead chose to base your template on an existing template, see Edit a Supplier Assessment Template for further guidance.
*****
Step 2: Design the Template’s main Questions
Activ allows you to fully customise the questions and sections that are included within each Supplier Assessment template, enabling you to design them to meet your exact needs. If you are creating a new template from scratch, your template’s Questionnaire tab will initially be blank, but if you chose to base your template on an existing template then it will initially contain all of the questions and sections that were part of the original template.
Note that all Assessments that require review should contain at least one question, but that sections are entirely optional. These are available to help you organise your templates, and are largely of use when you are designing long and/or complex templates. If you wish to include sections within your template, then we advise that you complete each section (i.e. create all of the questions for the section) before adding a new one, as this will streamline the process.
For convenience, the Questionnaire tab is split into three key panels:
- The Questions Panel – this is the blue panel on the left side of the screen. All of your questions will be displayed and managed here. Note that this panel will turn white once you begin to enter questions and sections.
- The Versions Panel – this is the yellow panel on the top right side of the screen. This panel contains the template’s current version number and the date that the version was created. Note that this panel will turn green when you are viewing the current published version of a template, and blue when you are viewing a previous version of a template.
- The Actions Panel – this is the white panel on the bottom right side of the screen. This panel contains the key action buttons that allow you to create your questions and sections, publish your draft, and (later) create or discard future drafts.
To create a section (if you are using them), click on the Add a Section button within the Actions Panel.
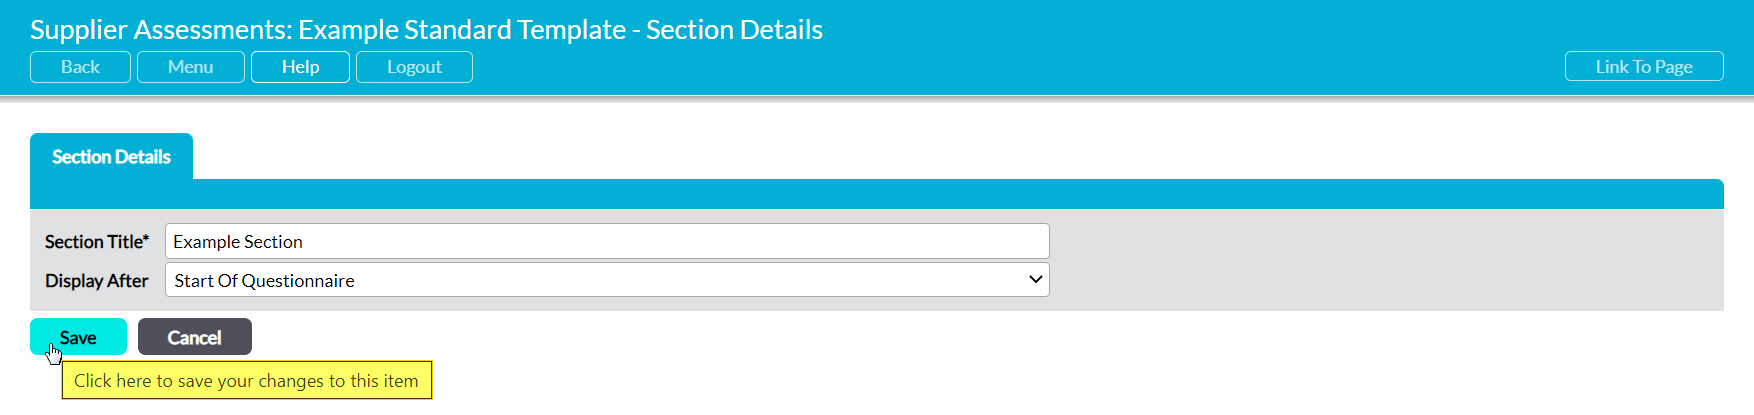
Activ will open on a new Section Details form. Two fields will be available for you to complete:
Section Title* – enter an appropriate title for the section.
Display After – use the dropdown menu to specify which question or section the new section should follow. Note that this will default to ‘Start of Questionnaire’ if your template does not yet contain any questions or sections, and to the last item (i.e. question or section, as appropriate) within the template if it does contain questions/sections.
Enter the necessary information, and then click Save.
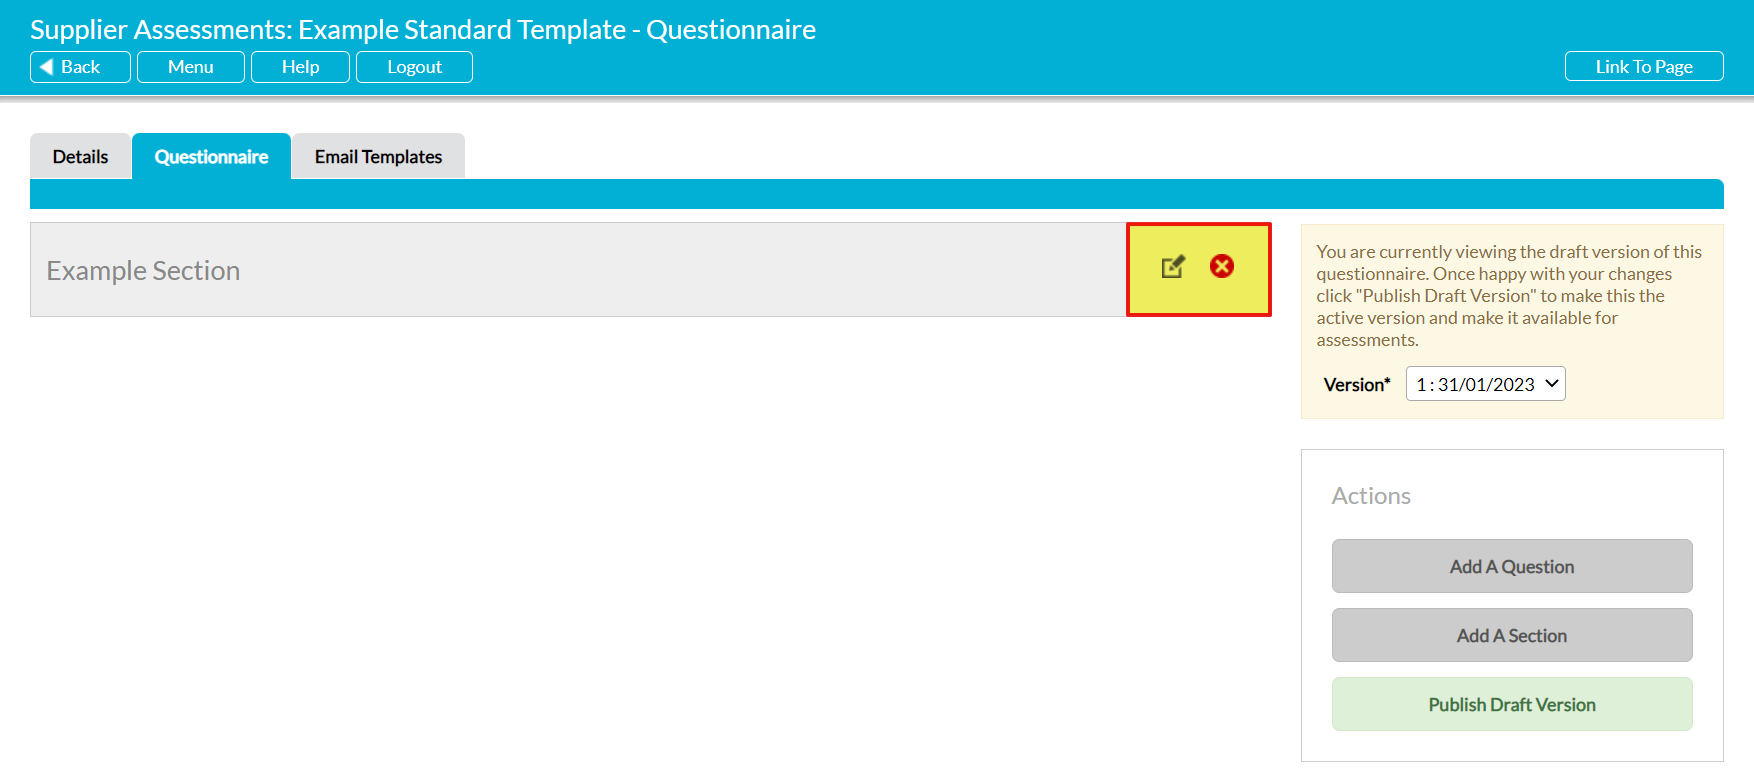
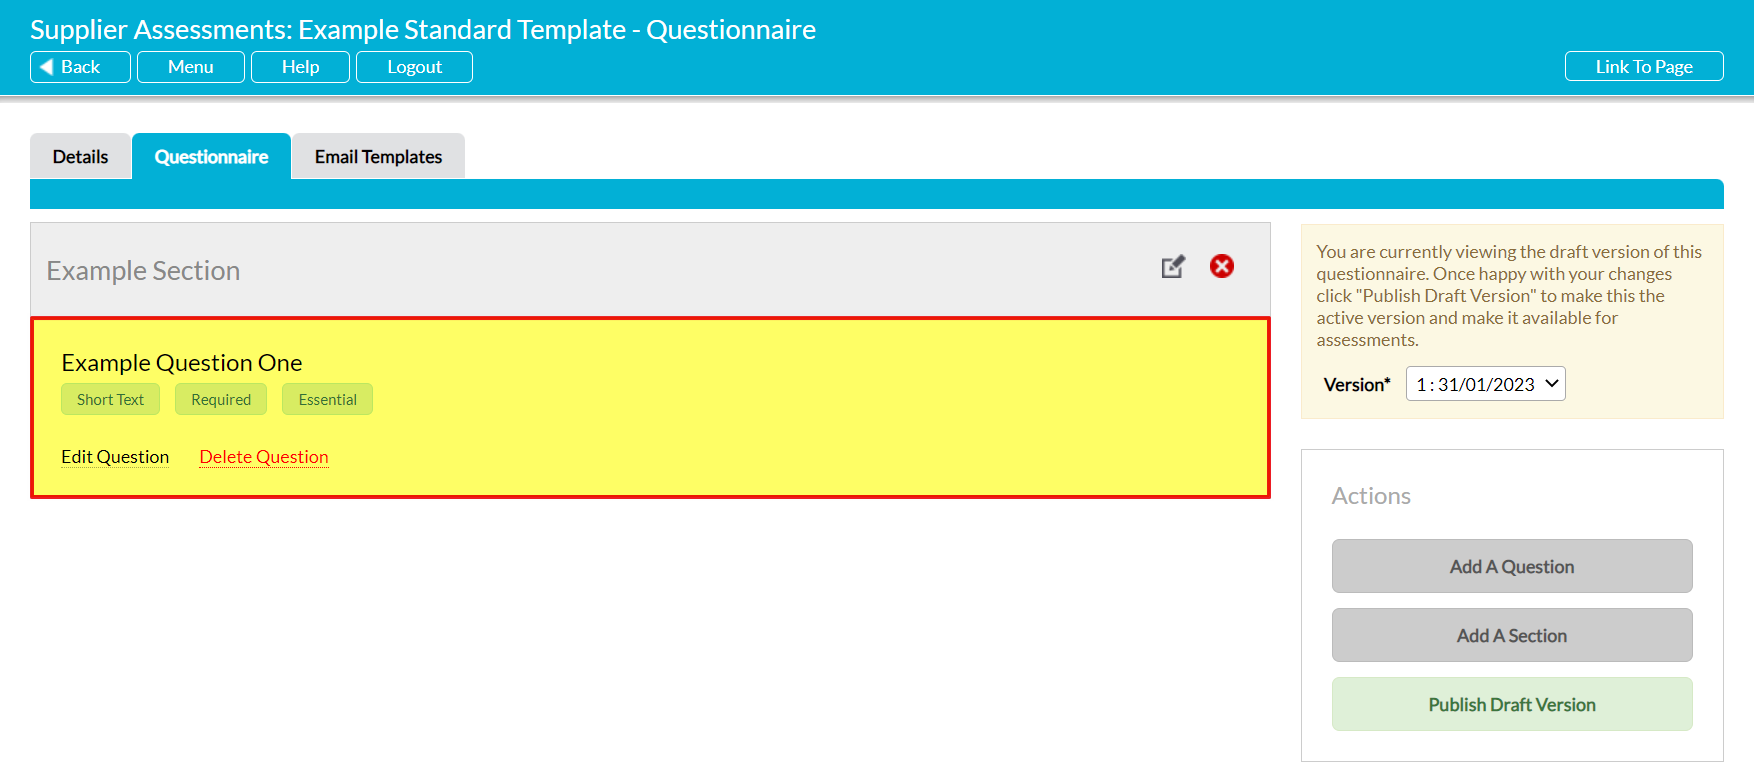
Your section will appear in the left-hand panel, in the position that you specified. It will be displayed as a grey banner within the template. In addition, you will be able to edit or delete the section using the action icons displayed in its top right corner (note that the red cross is ‘delete’, and the pencil is ‘edit’).
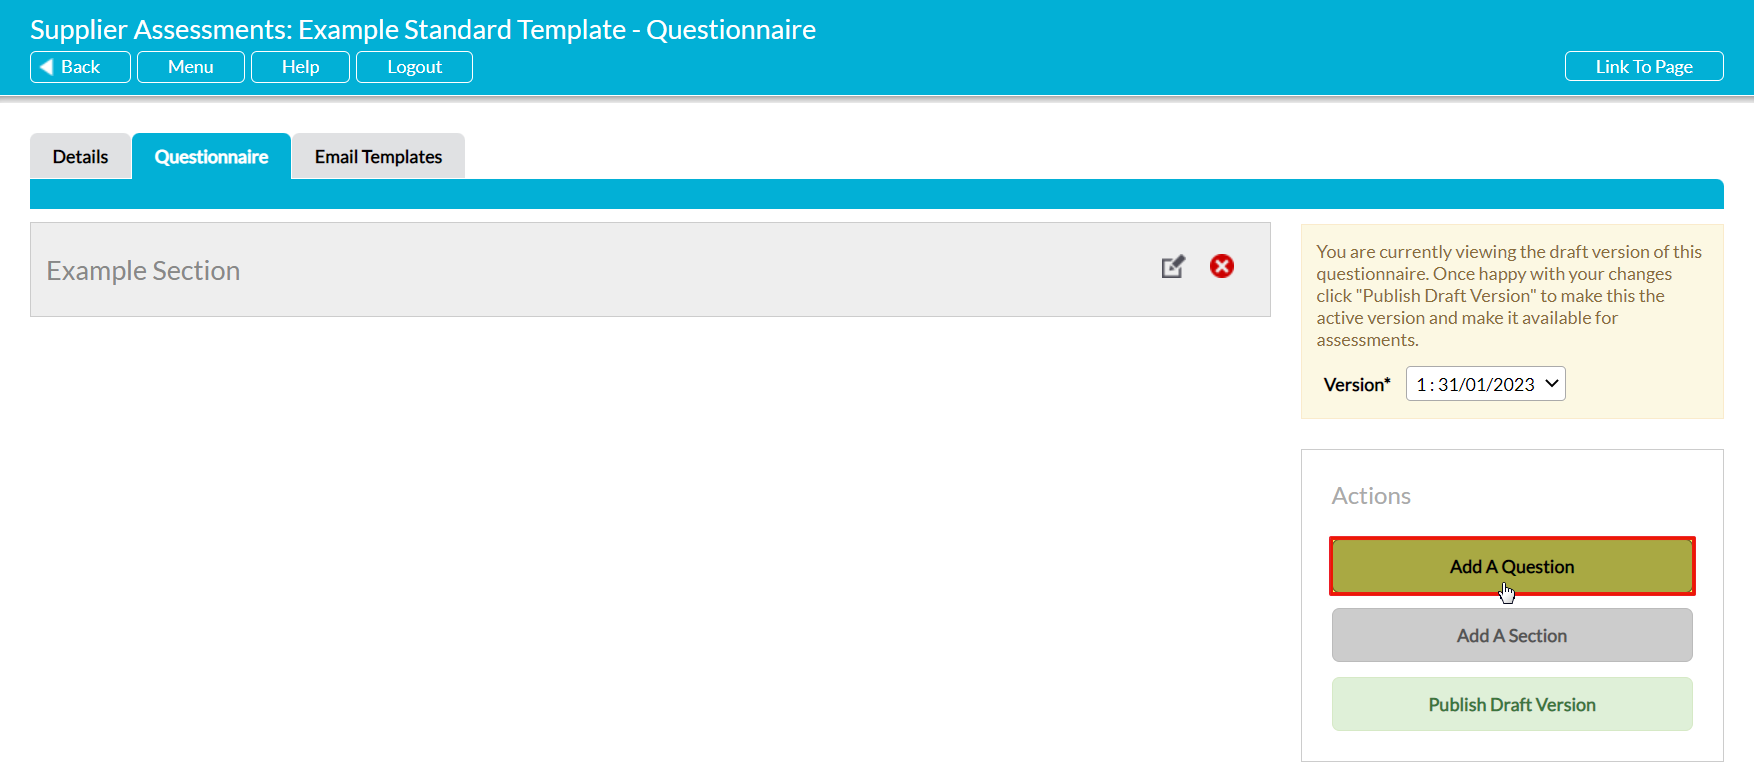
To create a new question for your template, click on the Add a Question button within the Actions Panel.
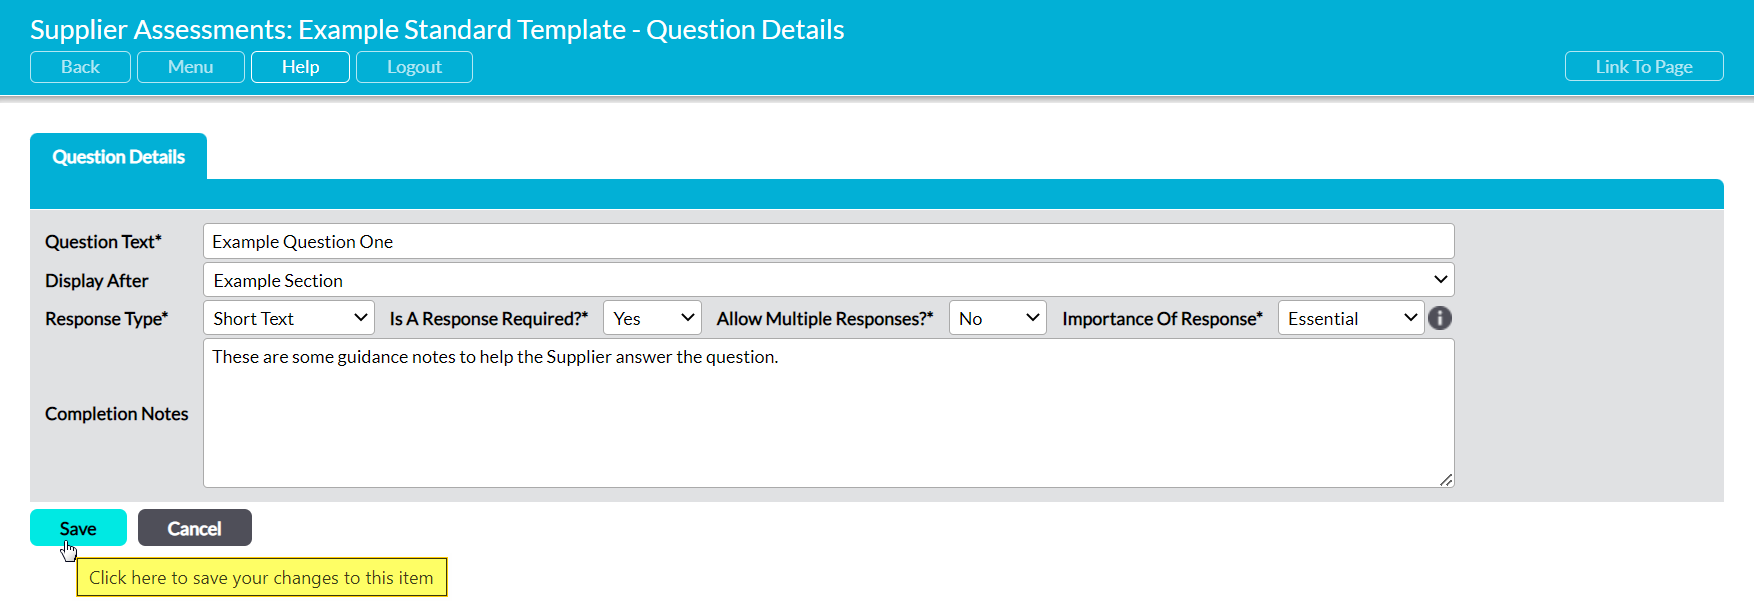
Activ will open on a new Questions Details form. Seven fields will be available for you to complete:
Question Text* – enter the question or requirement.
Display After – use the dropdown menu to specify which question or section the new question should follow. Note that this will default to ‘Start of Questionnaire’ if your template does not yet contain any questions or sections, and to the last item (i.e. question or section, as appropriate) within the template if it does contain questions/sections.
Response Type* – use the dropdown menu to specify what type of response is required for this question. Eight options are available: Short Text, Long Text, Numeric, File Upload, Date, Yes / No, URL, and Custom List. See Supplier Assessment Response Types for an explanation of each option. Note that if you select ‘Custom List’ an additional Custom List Options section will appear at the bottom of the form to allow you to enter the appropriate list items for the question. Enter each option into the individual text fields, and click on ‘Add an Option’ to add additional fields to your list.
Is a Response Required?* – specifies whether the question is mandatory. If this is set to ‘Yes’, the Supplier will not be able to submit their Assessment for review until they have responded to the question.
Allow Multiple Responses?* – specifies whether multiple responses can be entered against the question, and is mainly of use when used in conjunction with file uploads, URLs, or custom lists. By default it is set to ‘No’, meaning that only one response can be entered (e.g. in a custom list, only one option can be selected).
Importance of Response* – only visible internally when reviewing the Assessment, and not displayed to the Supplier. This field allows you to specify how critical this question (and its response) is to your organisation, and is mainly used to provide guidance to whomever Reviews the Assessment once it is complete. Two options are available: ‘Desirable’ and ‘Essential’. Note that by default this is set to ‘Essential’.
Completion Notes* – provides you with the option to enter some guidance text that can be used by the Supplier to help them complete each question. This text will be displayed at the top of the question when it is viewed in Fulfil mode.
Enter the necessary information, and then click Save.
Your question will appear in the left-hand panel, in the position that you specified. It will be displayed as a white row within the template, and will automatically include tags specifying:
- the question’s response type;
- whether the question must be answered (i.e. is compulsory); and
- the overall importance of the question to your organisation.
In addition, you will be able to edit or delete the question using the action links contained within its row.
*****
Step 3: Add Conditional Questions to your Template
If you have selected the ‘Yes/No’ or ‘Custom List’ response types against a question, Activ will provide you with the ability to create a set of conditional sub-questions that are associated with each of the available responses. These questions will be hidden from the Assessment when your Supplier initially opens it, but will automatically appear if they select the appropriate response when answering their parent question. This allows you to create a pool of questions that will only appear if the Supplier selects a specific option when answering the parent question. You may find this useful if (e.g.):
- the parent question asks whether a Supplier has a specific certification, and you wish to request a copy of that certification if they select ‘Yes’, or ask if they plan to attain it if they select ‘No’; or
- the parent question asks whether a Supplier is certified to any of a set of ISO Standards, and you wish to request key related Policies if they select the relevant option (e.g. an Environmental Policy if they select an ‘ISO 14001’ option, a Quality Policy if they select an ‘ISO 9001’ option, etc).
Note that:
- you will be able to create as many conditional questions per parent question as required;
- you can choose to have conditional questions linked to only one response option; and
- you will only be able to create one level of conditional questions (i.e. you cannot create a conditional question that is itself the ‘parent’ of a second set of conditional questions).
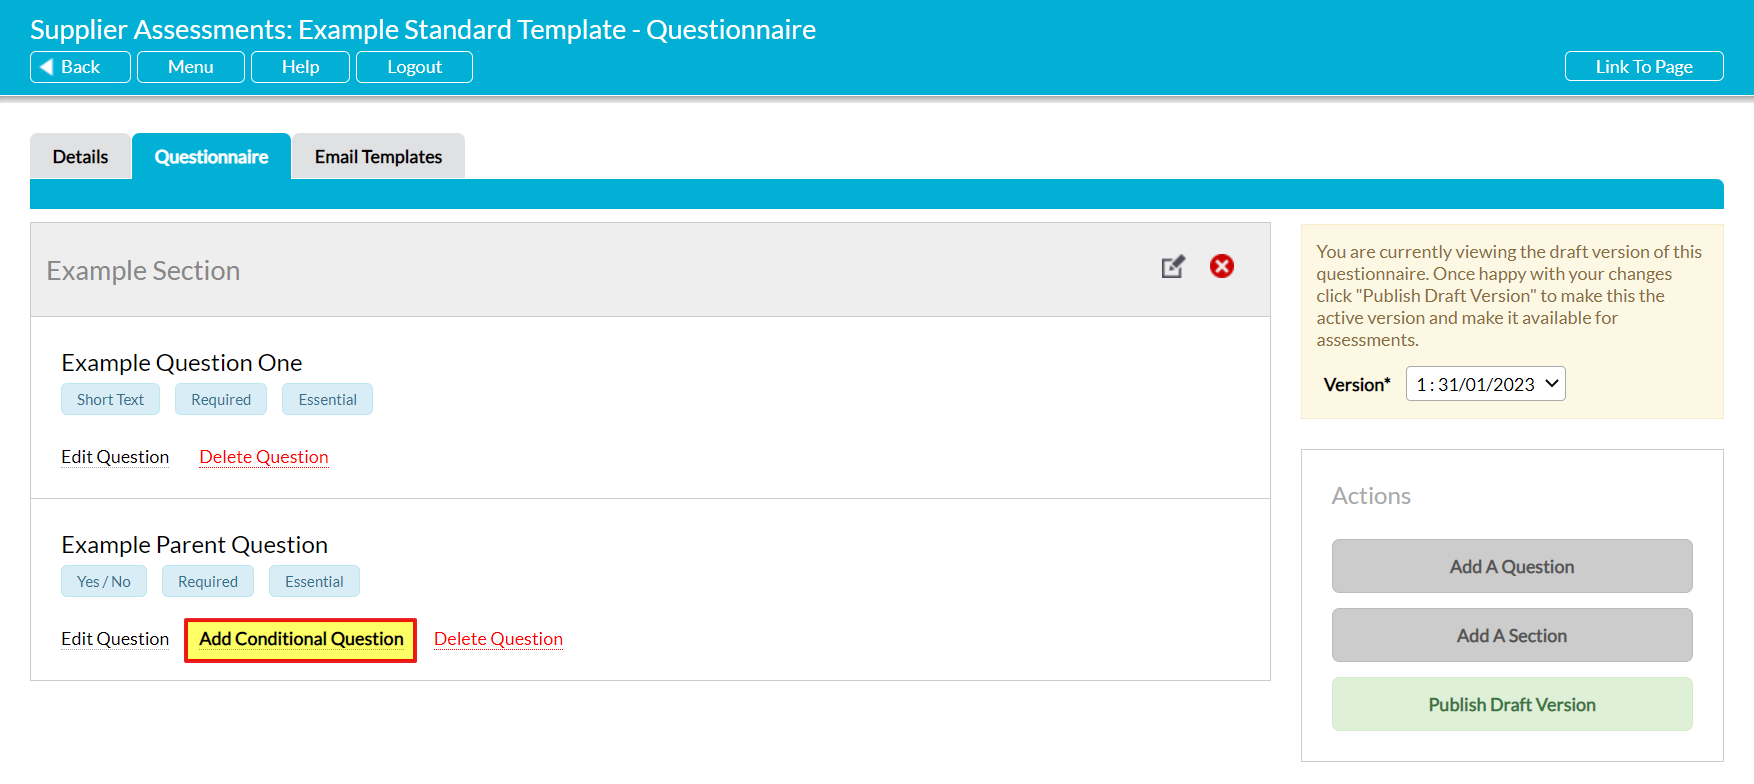
To add a conditional question to your questionnaire, locate the appropriate parent question within the page and click on Add Conditional Question within its row.
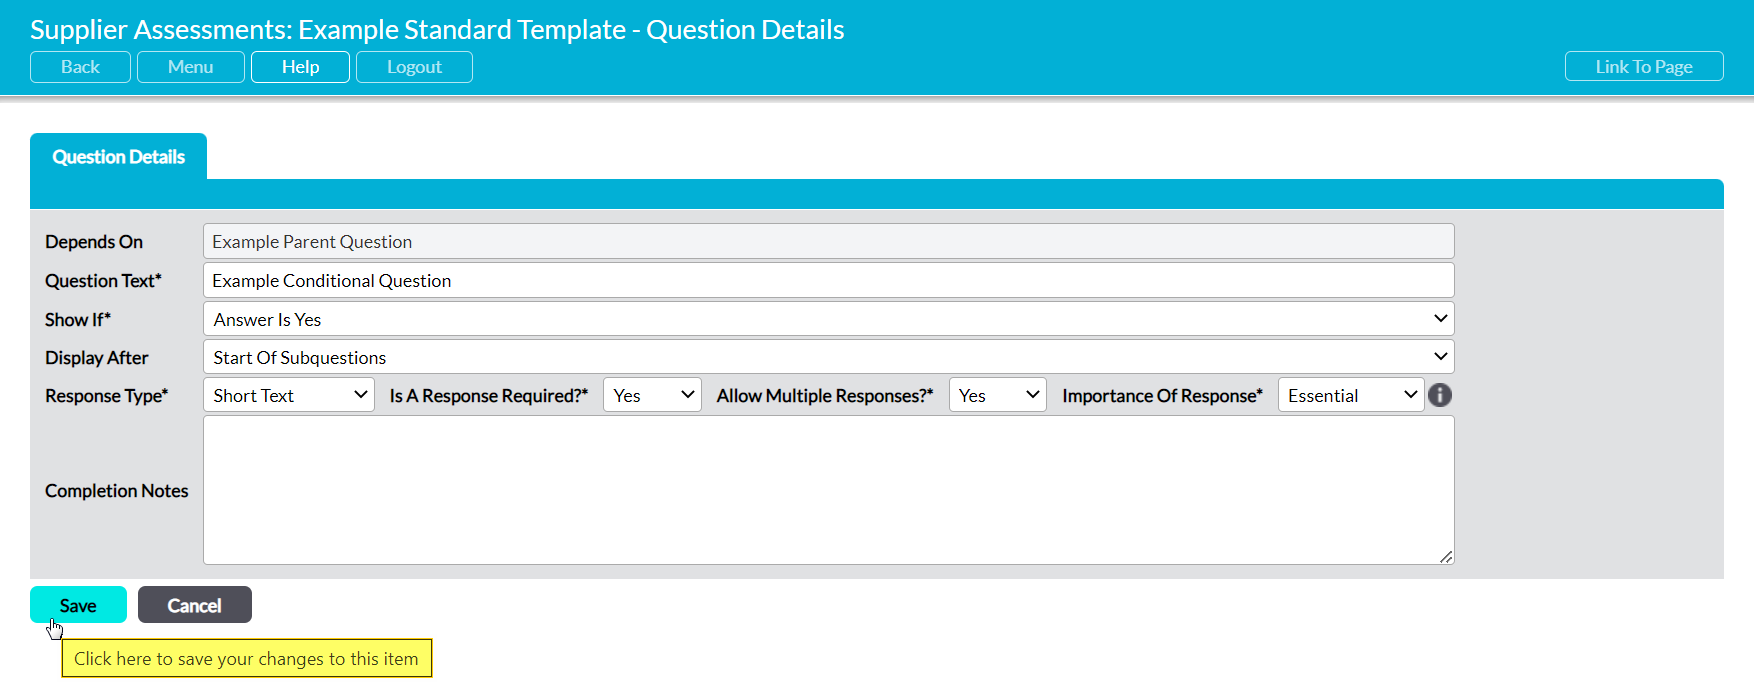
Activ will open a new Question Details form for you to complete. This will include all of the fields that are present when creating a standard question (see above), plus two additional fields that are exclusive to conditional questions. These are:
Depends On – automatically generated and cannot be changed. This will display the Question Text from the parent question, and is used to identify which question it is linked to.
Show If* – use the dropdown menu to specify when this question will be shown to the Supplier. The available options will be ‘Yes’ (the question will appear if they respond ‘Yes’ to the parent question) and ‘No’ (the question will appear if they respond ‘No’ to the parent question) for ‘Yes/No’ parent questions, and your custom list options for ‘Custom List’ parent questions.
Enter the necessary information, and then click Save.
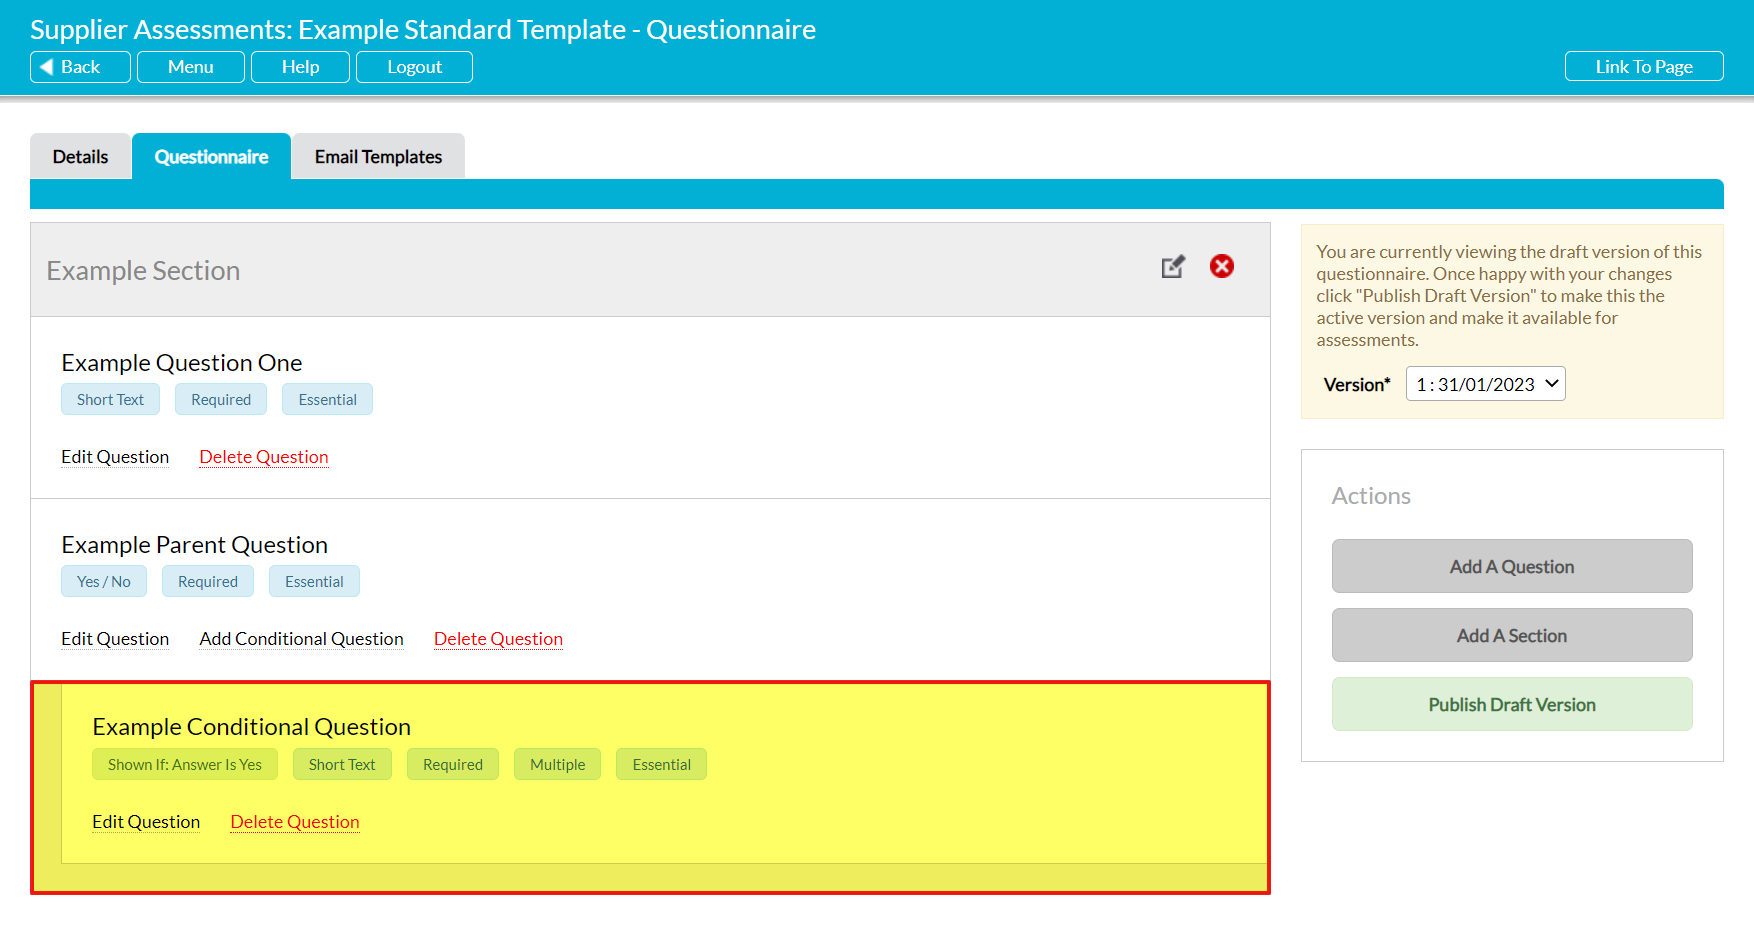
Your question will appear in the left-hand panel, and will:
- be displayed directly beneath its parent question;
- be indented to visually identify that it is a conditional question;
- be listed in the order specified if multiple sub-questions are created for the parent question; and
- include a tag that indicates which response option the question is tied to (this will be green if it is linked to ‘Yes’ responses, and red if it is linked to ‘No’ responses).
*****
Step 4: Specify the Accompanying Email Messages
Each Supplier Assessment Template that you create will automatically include a set of accompanying Email Templates, which are used to specify the email message that should accompany the Assessment’s Fulfilment link when it is sent to your Suppliers. Each Email Template is associated with a specific point in the Assessment ‘cycle’, with Activ automatically selecting the relevant Template for use at the point that you choose to email your Assessment to the relevant Fulfiller(s). The provided Email Templates are:
- Invitation Email – the Email Template that will be used the first time an Assessment is emailed to the Supplier.
- Resend Email – the Email Template that will be used if the initial Invitation has been sent to the Supplier, and you are chasing up an unfulfilled Assessment.
- More Information Email – the Email Template that will be used if the Assessment has been Fulfilled, Reviewed, and re-opened so that further information (or corrected information) can be requested. This Template only comes into use if someone has clicked on ‘Request More Information’ whilst Reviewing a Fulfilled Assessment.
By default, each Email Template will contain some short default text when the Assessment Template is initially created, so that you can begin using the Assessment Template without creating the Email Templates if required. However, Activ also allows you to customise each Email Template to meet your organisation’s needs. In addition, each Supplier Assessment Template includes its own set of Email Templates, separate to those used by other Assessment Templates, allowing you to customise your Emails to the specific Template being sent.
Note that if you wish to use the same email content for all of an Assessment’s Email Templates (i.e. send the same email regardless of whether your users are sending the initial invitation, a follow-up, or request for more information), then you will need to enter that content into all three Email Templates.
To customise an Assessment Template’s Email Templates, open the Assessment Template and click on its Email Templates tab. By default, Activ will open on the Assessment’s Invitation Email, but you can view the other Email Templates by clicking on the buttons displayed in the blue banner directly beneath the Assessment Template’s tabs.
Select the relevant Template, and then click on the Edit button at the bottom of the screen.

The form will be opened for editing, and three fields will be available for you to modify:
Subject – enter a brief descriptive title for the Email Template. This will become the Subject Line within the emails that are sent out to your Suppliers.
Message – enter the main body of the email. This should typically summarise what the Assessment is for and, in the case of the Resend and More Information Templates, why the email is being sent. If necessary, you can also provide relevant instructions for completing the Assessment, or signpost the Supplier towards relevant attachments in the Assessment, if any are included. Note that the link to the Assessment and some troubleshooting text will automatically be added to the message body when the Assessment is sent to the Supplier.
Send Replies To – optionally, enter the email address that any responses to the Supplier Assessment should be sent back to. Note that this should only be used where you wish to direct all responses to a single company email address: it should not be used if you want responses to be sent to the user who sends the email out. When Send Replies To is blank, Activ will set the sender’s email address as the ‘Reply To’ address (i.e. responses will be sent to whichever user sends the Fulfilment Request).
Enter the necessary details, and then click Save.

*****
Step 5: Specify who is Authorised to Fulfil/Review Assessments that Use this Template
If you chose to limit Review and Fulfilment of this template to named individuals when you were creating the template, then your template will include an additional tab and you will need to specify which of your users is authorised to complete these actions. Otherwise, you can skip this step.
To specify who is authorised to Review and Fulfil the Assessments that are created from this template, open the template and click on its Authorisations tab. This will open the template’s Authorisations page, which will list all users of your system and display which of them currently has permission to Review and Fulfil the Assessments that have been based on it. Note that Review and Fulfil permissions can be set individually, and that only the template’s creator will have these permissions when the ‘Assessments can only be fulfilled/reviewed by specific nominated people’ option is initially enabled.
To adjust who has these authorisations to the template, click on the Edit button at the bottom of the screen.
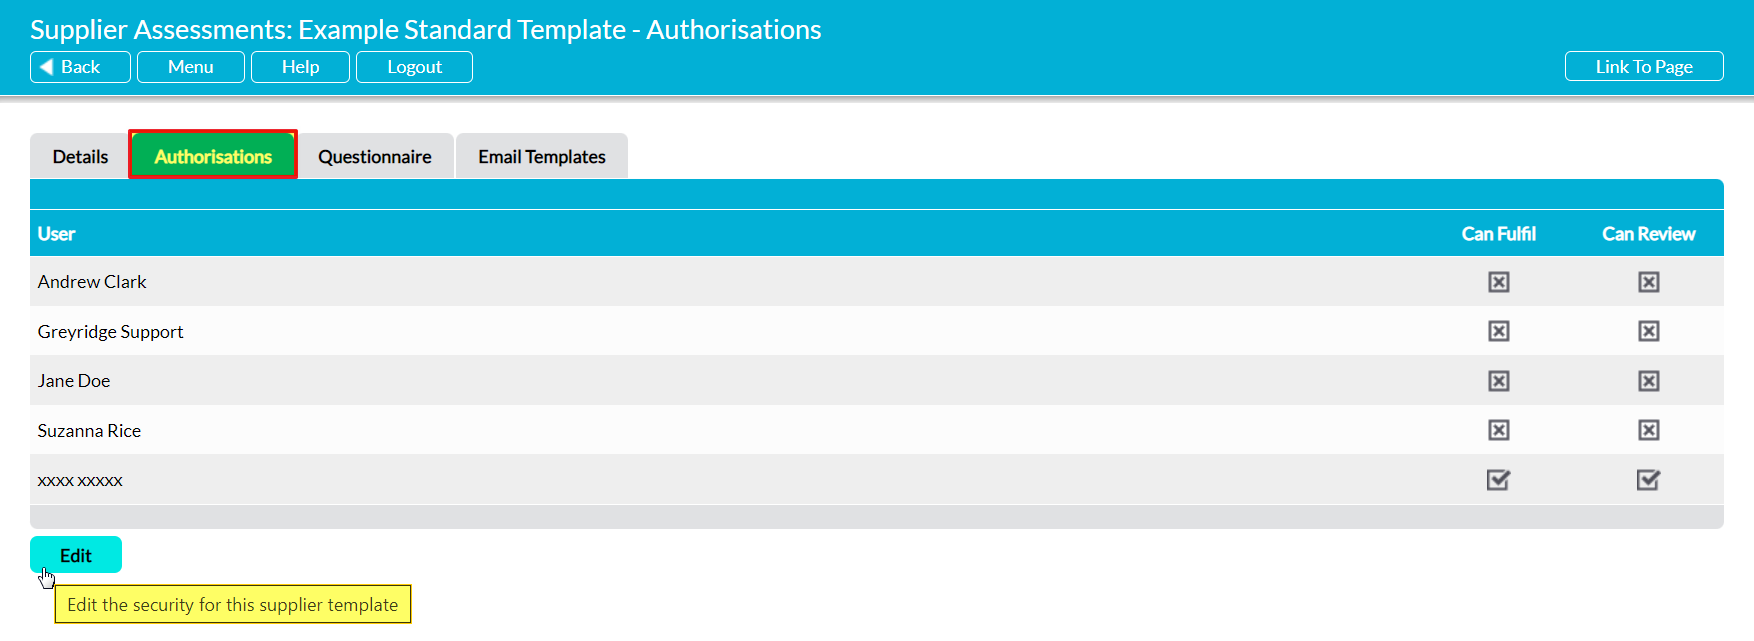
The form will be opened for editing. Use the checkboxes alongside each user’s name to select which users are authorised to Review and/or Fulfil this template’s Assessments, and then click Save.
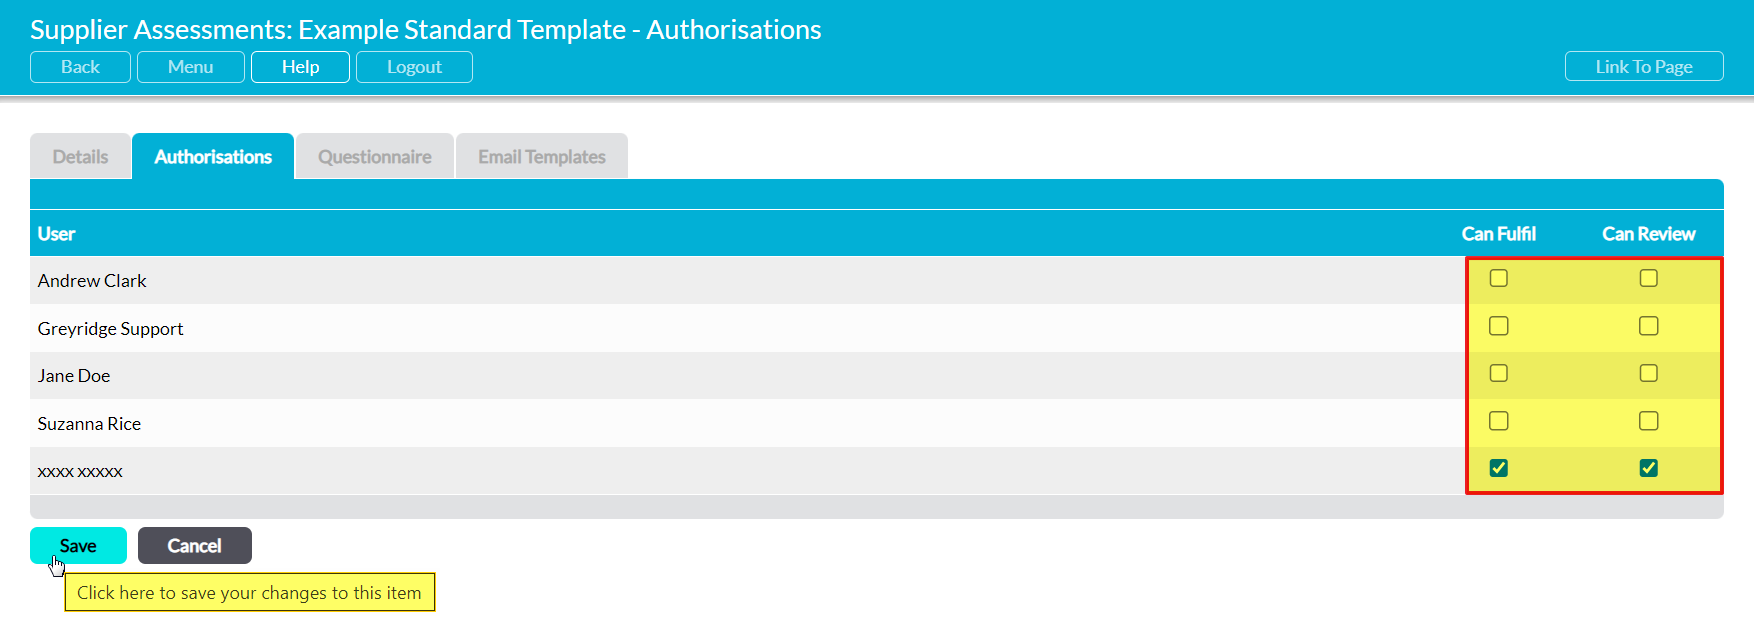
The specified individuals will now be able to Review and/or Fulfil any Supplier Assessments that have been based on this template.
*****
Step 6: Publish the Template
Once you have finished creating your new template, you will need to Publish the template’s initial draft to create a live version that can then be selected by your users when they are setting up new Supplier Assessments. Until this step has been completed, your template will be unavailable for selection by your users.
To publish the template, open the template on its Questionnaire tab and click on the Publish Draft Version button within the Actions panel.
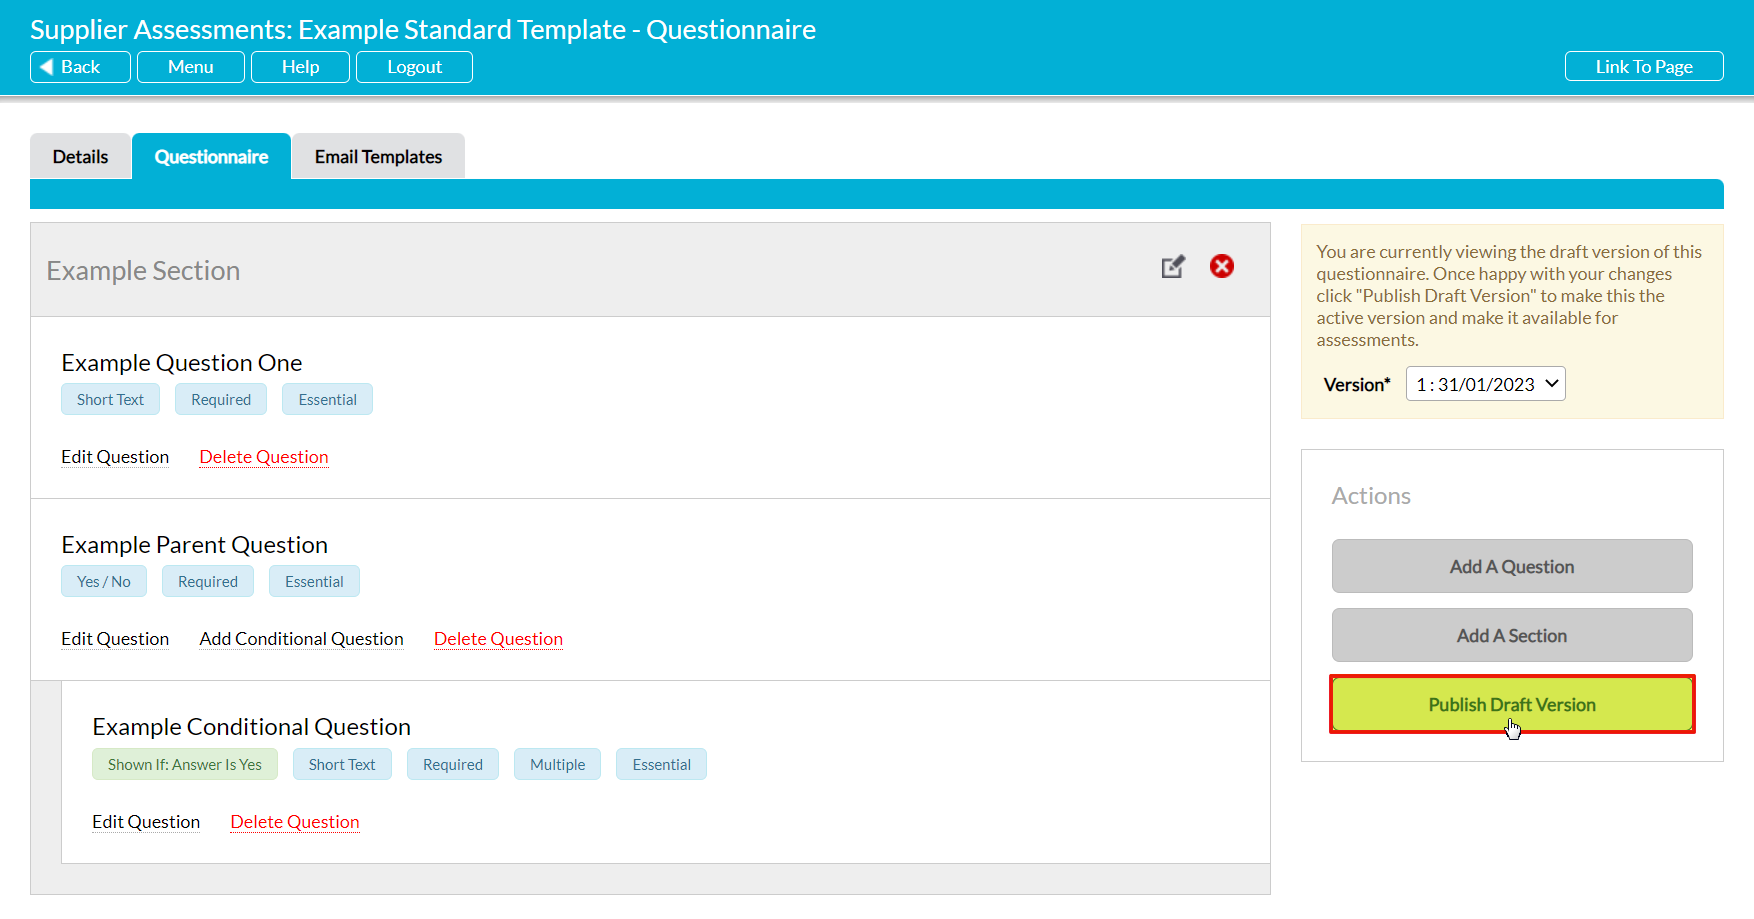
A popup will appear to confirm that the template has been published, and the template will automatically be made available for selection by users when they are setting up new Supplier Assessments. In addition, the template’s Version panel will turn green and be updated to display the fact that your template is now at version one.