Feedback Survey templates are a critical component of the Customers & Suppliers: Feedback area, as all Feedback Surveys that you create and send from your system will be based on one of the templates that exist within your system. It is not possible to send a Feedback Survey that does not use one of your templates, and as such it is important that you create and maintain a library of templates that will suit your future Feedback needs.
All of your Feedback Survey templates are created and managed from the Templates tab of the Customers & Suppliers: Feedback area. This tab is only accessible to users with ‘Admin’ system permissions to the area.
The template design workflow can be split into four steps:
- Step 1: Naming (Creating) the Template
- Step 2: Specifying the accompanying email messages
- Step 3: Designing Rating Questions
- Step 4: Designing Yes/No and Free-Text Questions
*****
Step 1: Naming (Creating) the Template
To add a new template to your system, open the Customers & Suppliers: Feedback area and click on the Templates tab. The page will open on the Survey Templates menu item. This is where the names of your existing templates are stored, and where you can add new templates.
Three fields are available at the top of the screen. These are:
Display As* – the name of the new template.
Disabled?* – this option allows you to decide whether the template should be ‘hidden’, preventing future use. The field defaults to ‘No’, meaning that the template will be available for selection when sending a Feedback Survey. If you select ‘Yes’ here, the template will not be available to select when creating a Feedback Survey. Note that new Feedback Surveys are immediately available for selection if you leave this field as its default, so you may wish to disable the template whilst you are creating it to prevent others from selecting it before it has been finished. If you disable a template after it has been used, existing Feedback Surveys using that template will remain on record within the system but it will not be possible to select the template when creating a new Feedback Survey. You can switch between ‘Yes’ and ‘No’ at any time to suit your needs.
Default?* – this field allows you to decide which one of your templates appears at the top of the drop-down list when you are creating a Feedback Survey. Typically, you would select ‘Yes’ in this field for the template that will be most commonly used.
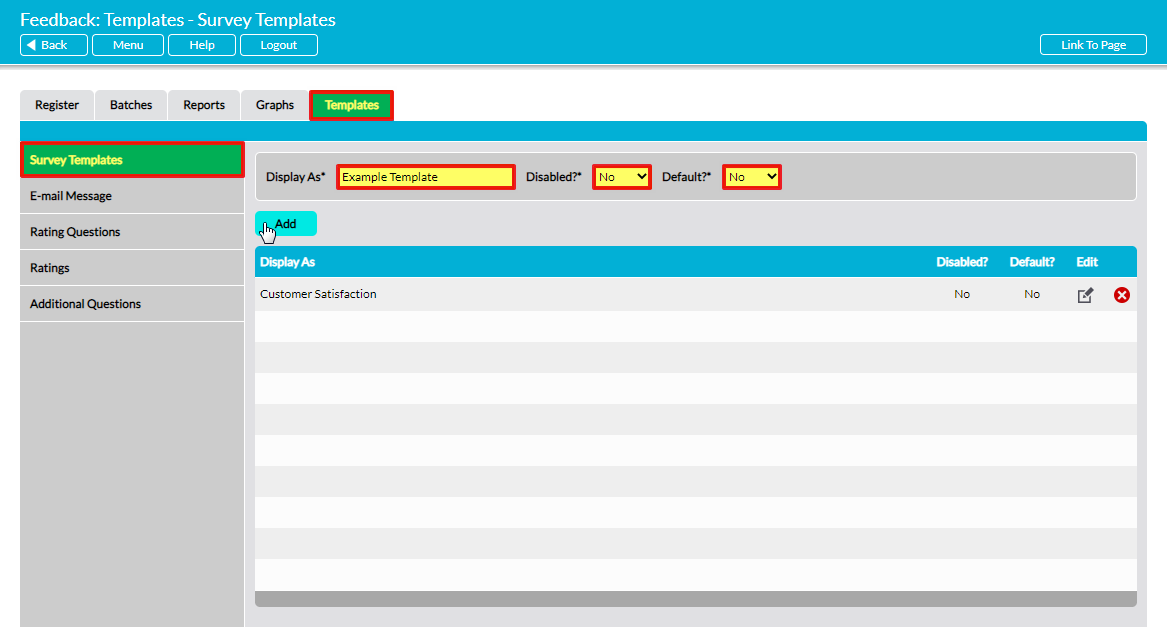
Enter the necessary details into the Display As*, Disabled*, and Default?* fields, and then click Add.
The new Feedback Survey template will now appear in the list, which is shown in alphabetical order. Note that this template’s content will currently be blank, as its details are set up in the next steps.
*****
Step 2: Specifying the accompanying email messages
Feedback Surveys are sent to recipients by email. These emails contain a link which will take the recipient to the Survey form and allow them to answer the questions. The body of the Survey email is fully customisable, and individual default messages can be created for each template within your system.
To create a default email message for your new template, click on the E-mail Message menu item. This will open four fields that allow you to enter and format the main body of the Survey email. These fields are:
Survey Template* – use the dropdown menu to specify which template the message is for.
E-mail Title – (optional) specify the subject/title for the message that will accompany the Survey when it is sent out.
Single Survey Message – (optional) specify the message that will accompany the Survey link if it is sent as a ‘Single’ Survey. When you send a ‘Single’ Feedback Survey (to one recipient) it is sent from your own email program. The formatting of this text will be determined by your program’s settings, but you can edit its appearance from within the email as you send it, just as you would with any other email.
Batch Survey Message – (optional) specify the message that will accompany the Survey link if it is sent as a ‘Batch’ Survey. This may be the same message as the one specified for a ‘single’ Survey (above), but must be entered separately because ‘Batch’ Surveys are sent to recipients via the Activ system’s server. Note that a line space is automatically introduced between paragraphs upon sending, but this line space is not apparent in the Message field. If you introduce a visible line space in the field it will appear as a double line space when your Survey is emailed.
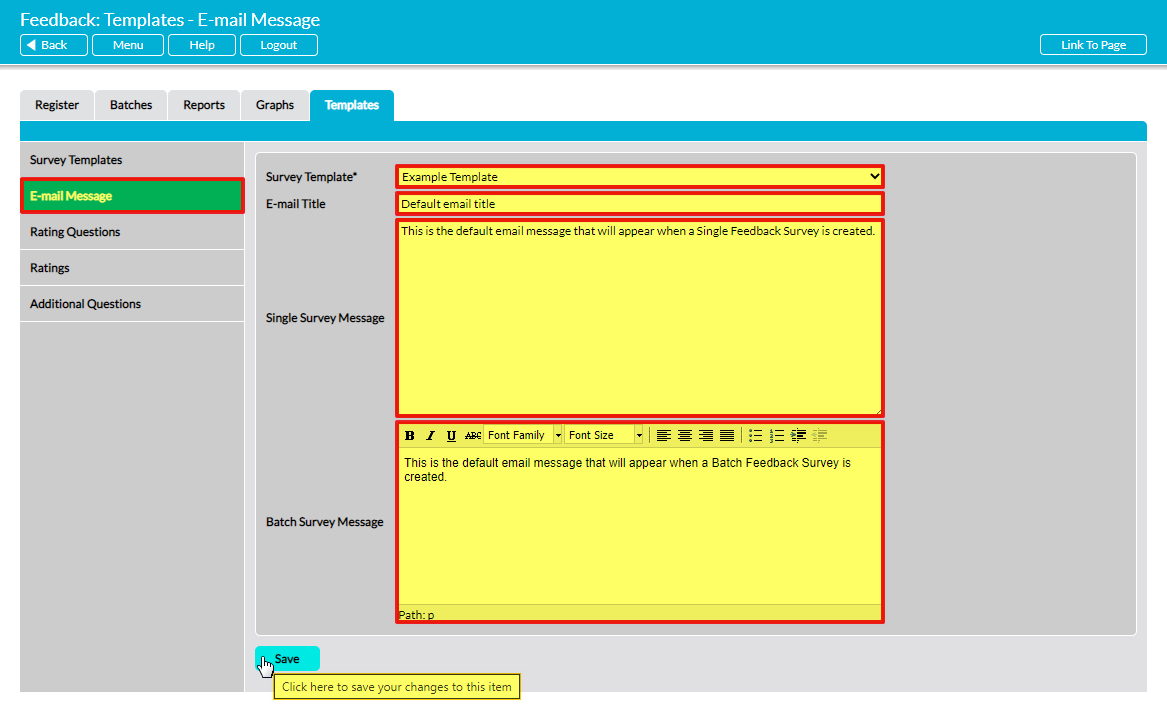
Enter the necessary details, and then click Save.
*****
Step 3: Designing Rating Questions
Activ allows you to create a set of rating questions that require the recipient to pick from options on a scale that is designed by you. These questions are created in two steps:
- Creation of the questions themselves
- Creation of the rating scale
Note that all rating questions within a given template will share a single rating scale. It is not possible to use two different scales within one template. In addition, adding ratings questions to your Surveys is optional: if you don’t wish to include rating questions, simply leave the related sections of the template blank. However, it is important to note that questions that do not use the rating system cannot be analysed using Activ’s inbuilt reports and graphs (see Analyse Feedback Surveys: Reports and Analyse Feedback Surveys: Graphs)
To begin designing your rating questions, click on the Rating Questions menu item within the Templates tab. Activ will display the questions that are associated with your default Survey template, if you have set a default template, or those belonging to the Customer Satisfaction template if you have not set a default.
Use the Survey Template* dropdown menu to select the template that you wish to edit.
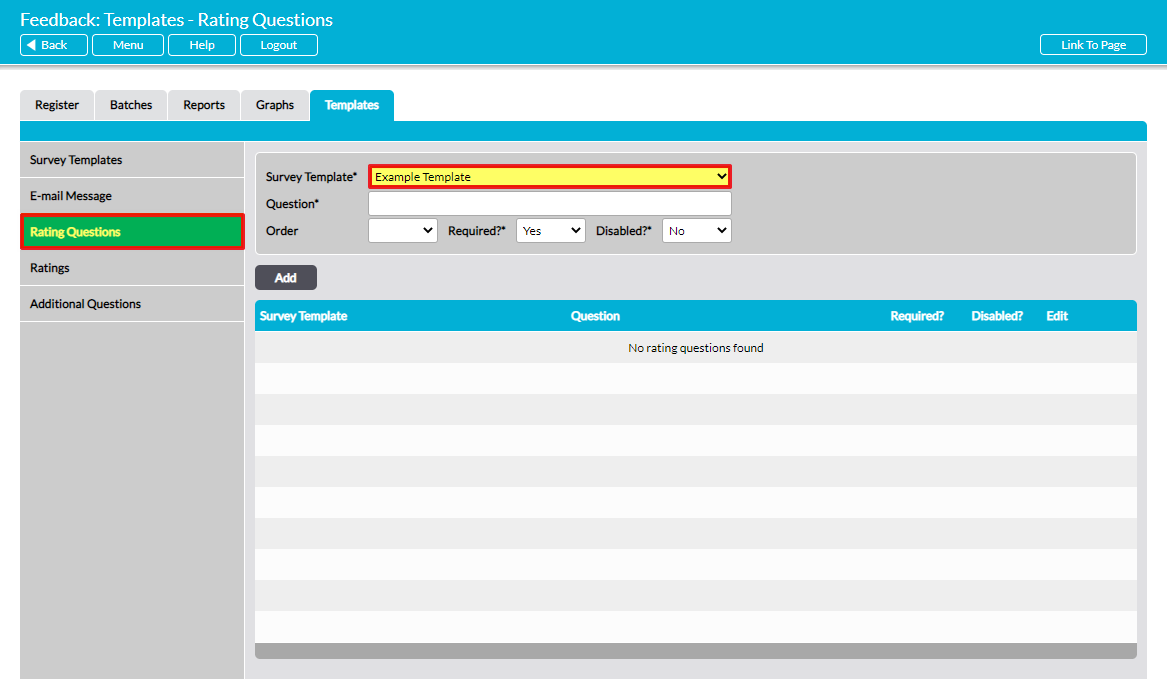
Once you have selected the appropriate template, use the remaining fields to enter the details of your ratings questions. These fields are:
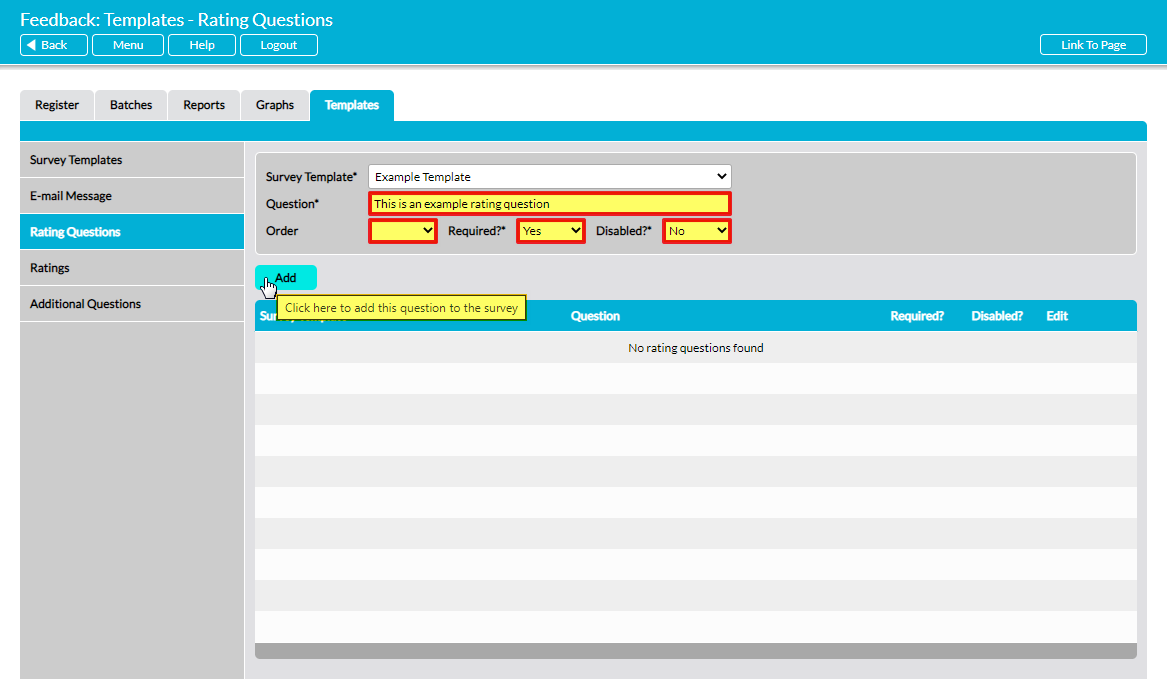
Question* – enter the question here.
Order – select the question’s position in relation to any other questions that are within the template. Note that you will not be able to specify an order when there are no other questions in the template.
Required?* – specify whether a response to this question is mandatory (‘Yes’) or optional (‘No’).
Disabled?* – the option to ‘hide’ a question to prevent future use. This field defaults to ‘No’, which means that the question will appear in any Survey that uses the template. If you select ‘Yes’, the question will not appear in any new Surveys that are based on the template, but will continue to appear within existing Surveys. You can switch between ‘Yes’ and ‘No’ at any time.
Click on Add when you have finished entering the necessary details.
Once you have finished entering your ratings questions, click on the Ratings menu item to open a list of the ratings answers that are associated with each template. Activ will display the ratings that are associated with your default Survey template, if you have set a default template, or the Customer Satisfaction template if you have not set a default.
Use the Survey Template* dropdown menu to select the template that you wish to edit.
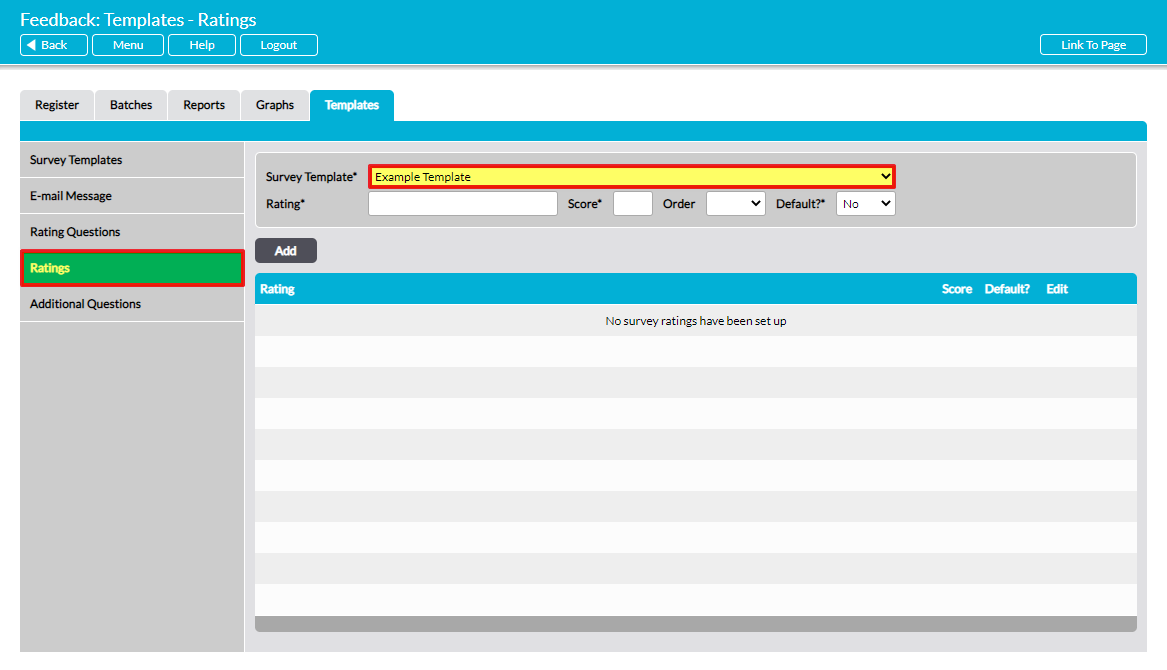
Once you have selected the appropriate template, use the remaining fields to enter the details of your rating answers. These fields are:
Rating* – enter each rating option here. This can be a word or short phrase (e.g. ‘very satisfied’) or a number (e.g. “10”). These are the options that will be displayed within the questionnaire.
Score* – assign a score to the new rating option. For example, on a 5-point rating scale ranging from ‘Very dissatisfied’ to ‘Very satisfied’, you might assign a score of 1 to ‘Very dissatisfied’ and a score of 5 to ‘Very satisfied’. The respondent will not see this score, as it is only used for internal reporting purposes within the Reports and Graphs sections.
Order – select the position of the rating within your scale. Your rating scale will be presented left to right within the survey form itself, with position 1 located furthest to the left. Note that you will not be able to specify an order when there are no other questions in the template.
Default?* – select ‘Yes’ here if you want the rating to be pre-selected as the default response to the question. Select ‘No’ if you don’t want the rating to be pre-selected as the default response to the question, which will compel the respondent to make a proactive selection.

Click on Add when you have finished entering the necessary details.
*****
Step 4: Designing Yes/No and Free-Text Questions
In addition to rating questions, Activ allows you to design templates that include (or consist entirely of) two other answer types. These are:
- Yes/No answers
- Free-text answers
Both of these question types are designed from the same area of your Activ system, and are an optional feature of Survey templates. It is important to note that these questions cannot be analysed using Activ’s inbuilt reports and graphs (see Analyse Feedback Surveys: Reports and Analyse Feedback Surveys: Graphs), as they have no underlying scores for your system to compare.
If you don’t wish to include these question types within a template, simple leave the related section of the template blank.
To begin designing your text-answer questions, click on the Additional Questions menu item within the Templates tab. Activ will display the Yes/No and Free-text questions that are associated with your default Survey template, if you have set a default template, or those belonging to the Customer Satisfaction template if you have not set a default.
Use the Survey Template* dropdown menu to select the template that you wish to edit.
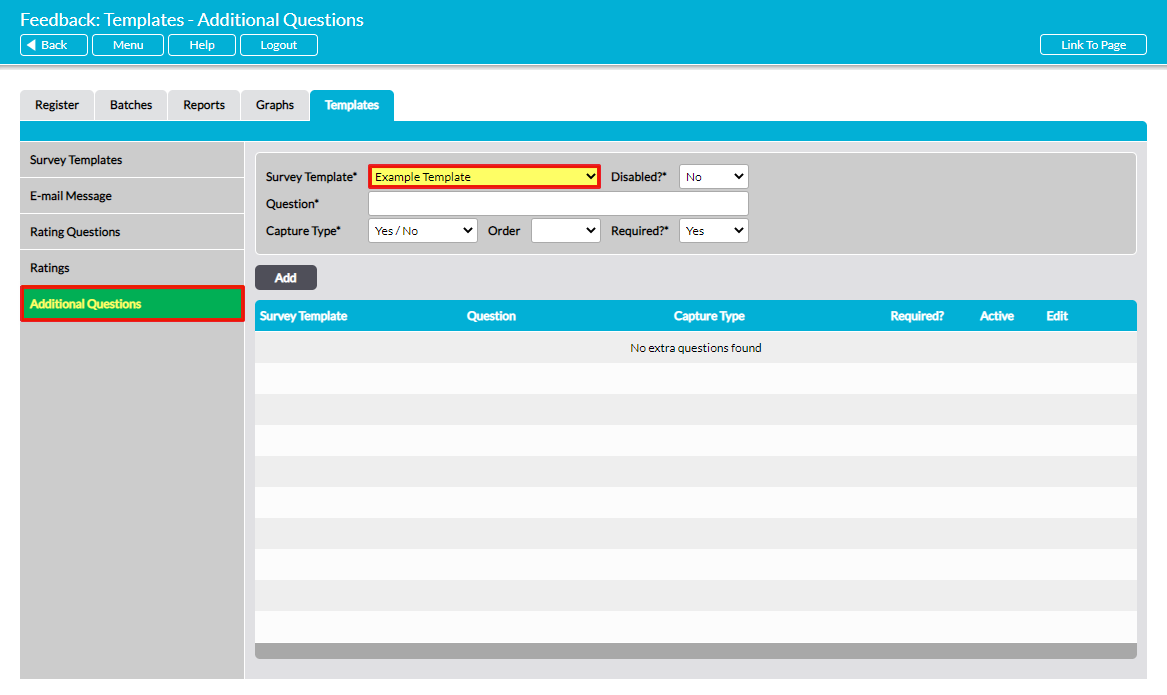
Once you have selected the appropriate template, use the remaining fields to enter the details of your text-answer questions. These fields are:
Question* – enter the question here.
Disabled?* – the option to ‘hide’ a question to prevent future use. This field defaults to ‘No’, which means that the question will appear in any Survey that uses the template. If you select ‘Yes’, the question will not appear in any new Surveys that are based on the template, but will continue to appear within existing Surveys. You can switch between ‘Yes’ and ‘No’ at any time.
Capture Type – select either ‘Yes / No’ or ‘Notes’ to specify the response type for this question. Selecting ‘Yes / No’ will restrict answers to simple yes or no responses, whilst selecting ‘Notes’ will enable free-text responses.
Order – select the question’s position in relation to any other questions that are within the template. Note that you will not be able to specify an order when there are no other questions in the template.
Required?* – specify whether a response to this question is mandatory (‘Yes’) or optional (‘No’).
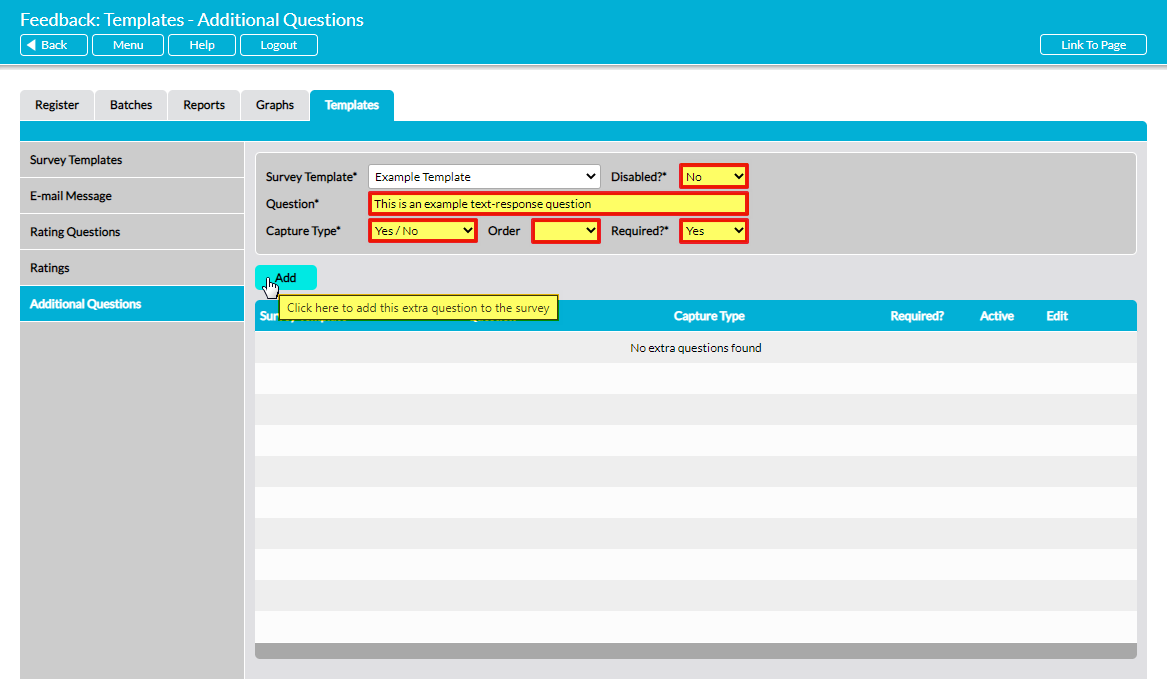
Click on Add when you have finished entering the necessary details.
