Some parameters used within the Incident Log module are selected from pre-defined lists, which are created and managed from the module’s Settings tab. Most settings included within this tab are pre-populated with default options, but you may find it necessary to customise or add to the existing options before you begin using the module.
The settings associated with the Incident Log are:
- Incident Categories
- Types
- Sub Types
- Person Types
- Incident Sites
- Severities
- Likely Recurrence
- Primary Causes
- Secondary Causes
- Hazard Types
- Hazard Sources
- Agencies
- Emergency Services
- Lock Incident Code?
*****
Incident Categories
The Incident Categories parameter allows you to identify the categories of Incident that will be reported on within your system, and is intended for a broad, high-level grouping of your Incident Logs. For example, you might create an Incident Category for ‘Accident’, but you would not typically create one for ‘Collision’ or ‘Equipment Damage’, as the latter options would be considered Incident Types (see below).
This area is prepopulated with four default options:
- Accident
- Near Miss
- Security
- Incident
To add a new Incident Category, open the Settings tab, and then select the Incident Categories item from the left-hand menu. Type the Category in the Display As* field at the top of the page, then use the dropdown fields to specify where in the list the new Category should be displayed (Order field), whether the option is to be Disabled?* (unavailable for selection), and whether it should be the Default?* (selected by default when a new Incident Log is raised), and then click Add.
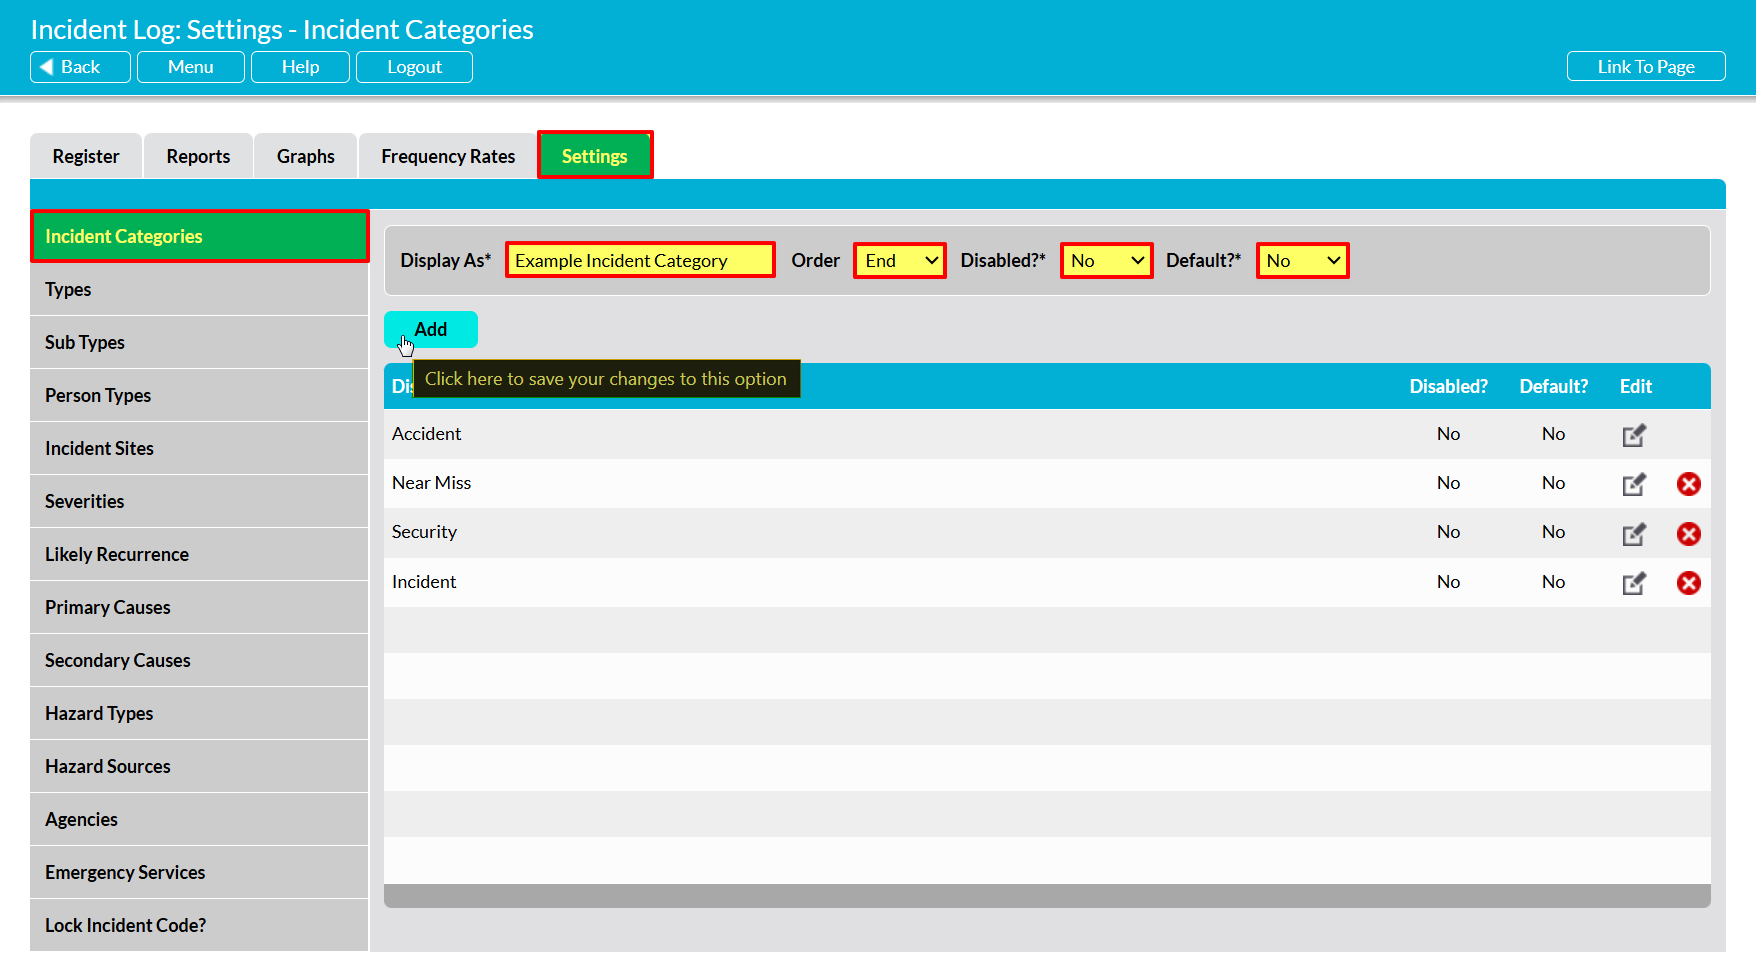
The newly added Category will be displayed in the list, in the position specified.
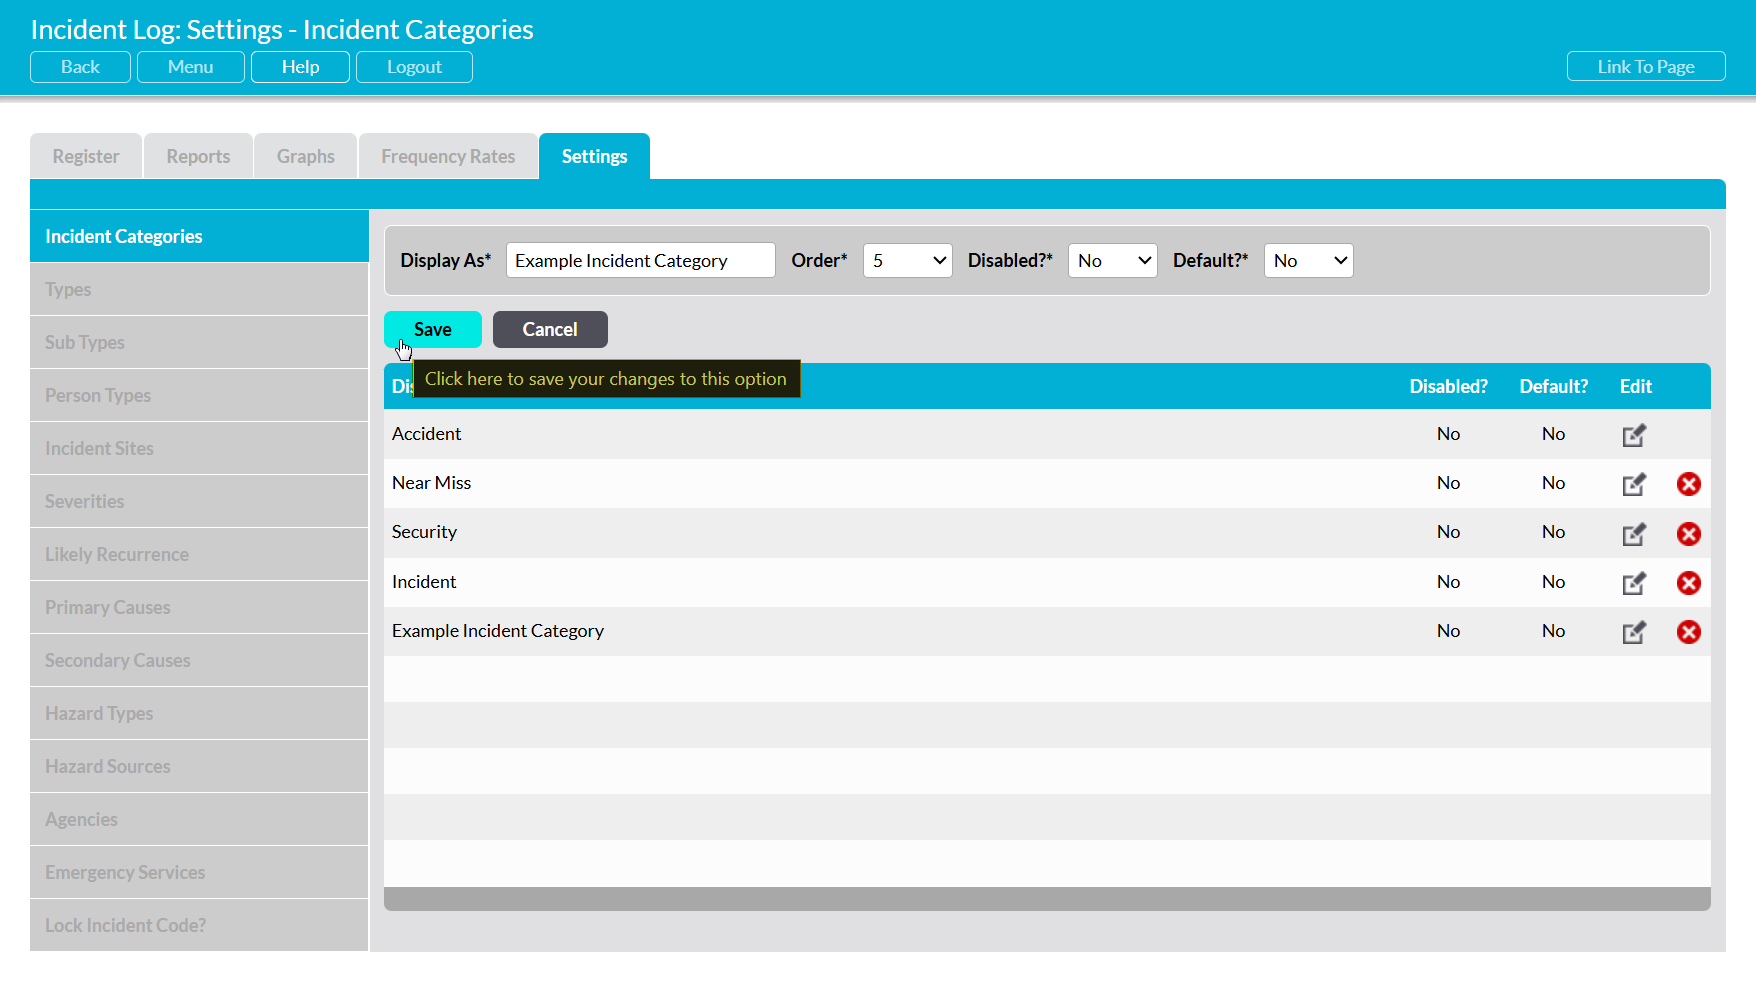
To edit an Incident Category, locate its record within the list and click on the Pencil Icon.
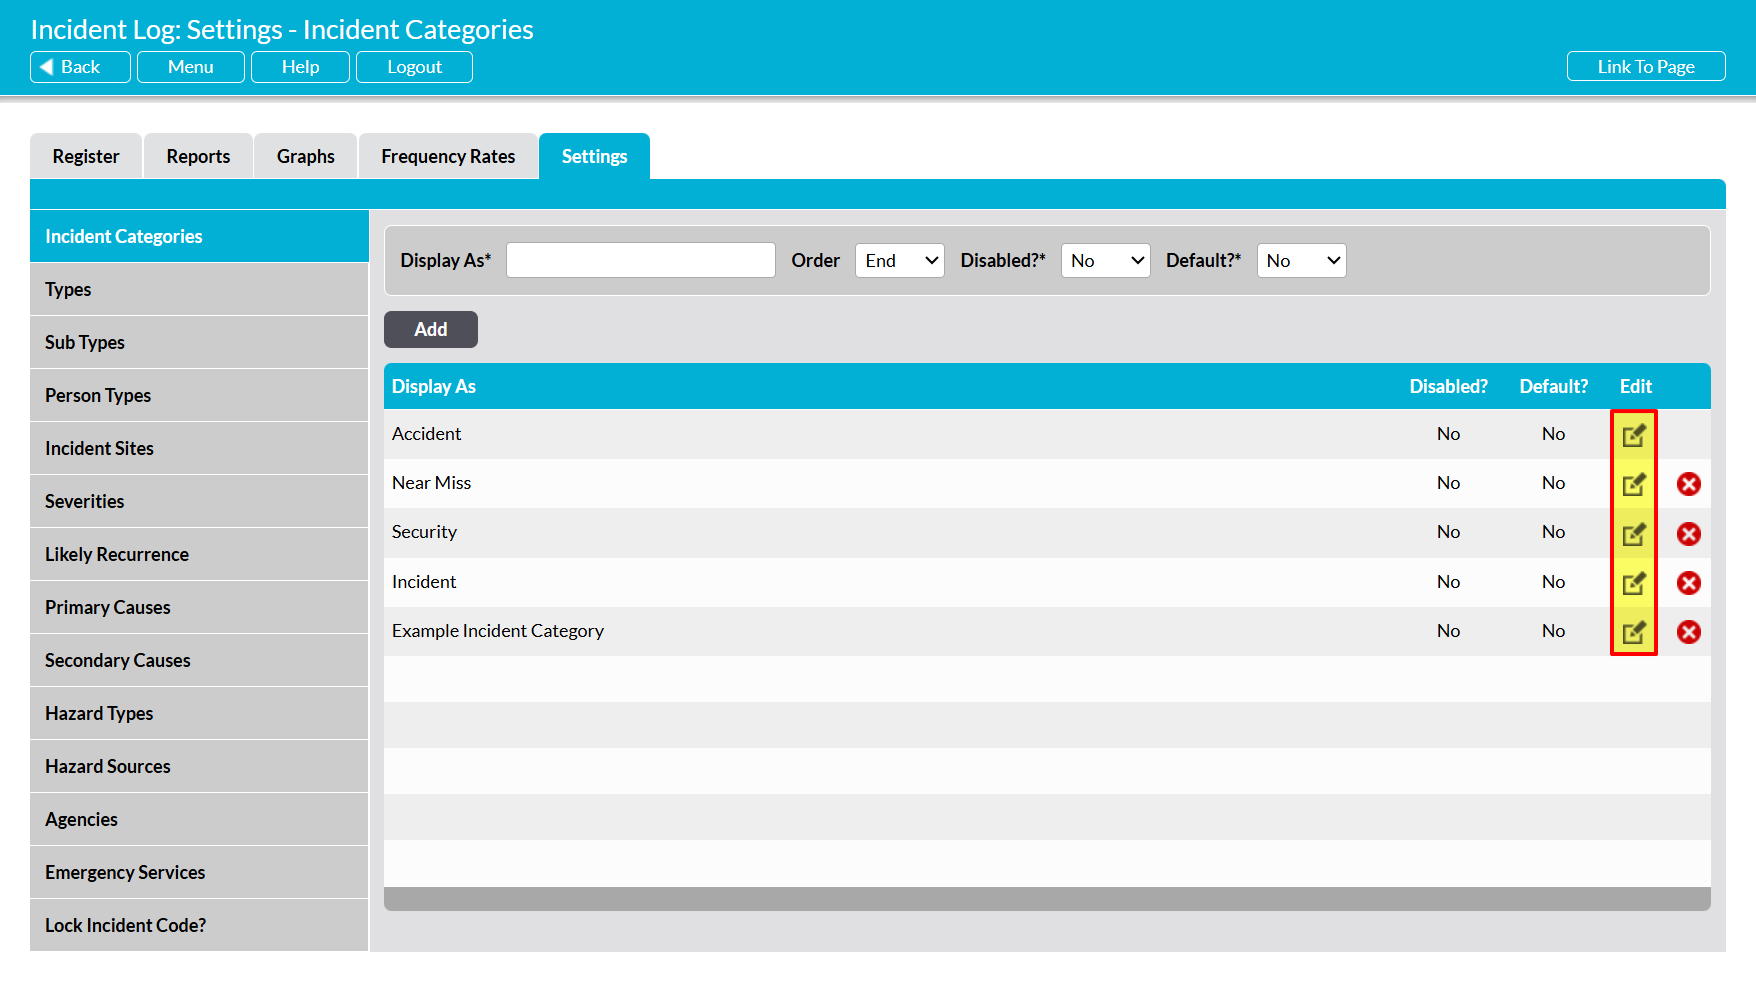
Make the necessary changes to the fields at the top of the page, and then click Save.
To delete an Incident Category from the list, locate its record and click on the red cross icon displayed to its right.
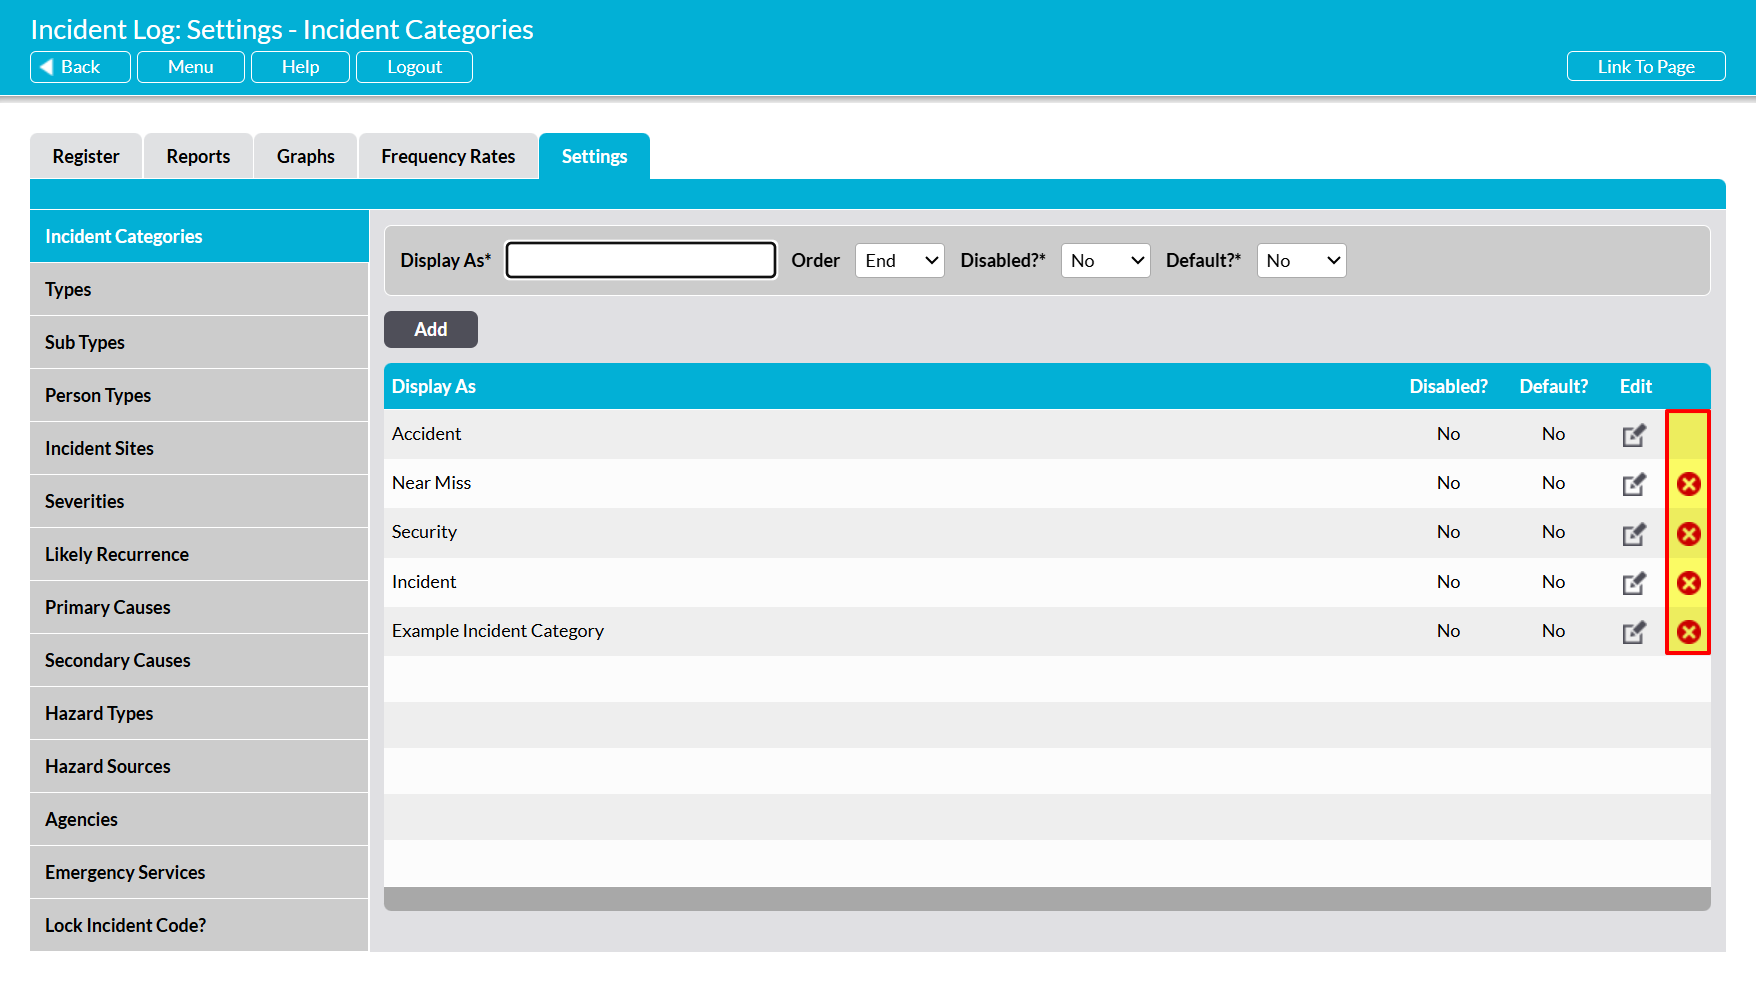
If the option hasn’t been used within the Incident Log module then it will be removed from the list. However, you will not be able to delete an Incident Category that has already been used in your system. Instead, you will need to Disable the option to remove it from dropdown lists and prevent its future selection.
*****
Types
The Type parameter allows you to identify the broad Types of Incident that will be reported on within your system, and is intended for high-level grouping of your Incident Logs. For example, you might create an Incident Type for ‘Injury’, but you would not typically create one for ‘Burns’ or ‘Cut’, as the latter options would be considered Sub-Types (see below).
This area is pre-populated with four default options:
- Environmental Impact
- Equipment/Plant Damage
- Injury/Illness
- Transport
To add a new Type, open the Settings tab, and then select the Types item from the left-hand menu. Enter the Type into the Display As* field at the top of the page, then use the dropdown fields to specify whether the option Requires Investigation (Incidents of this type cannot be closed without completing the Primary Cause and Investigation Results fields), is to be Disabled?* (unavailable for selection) and whether it is to be the Default?* (selected by default when a new Incident Log is added), then click Add.
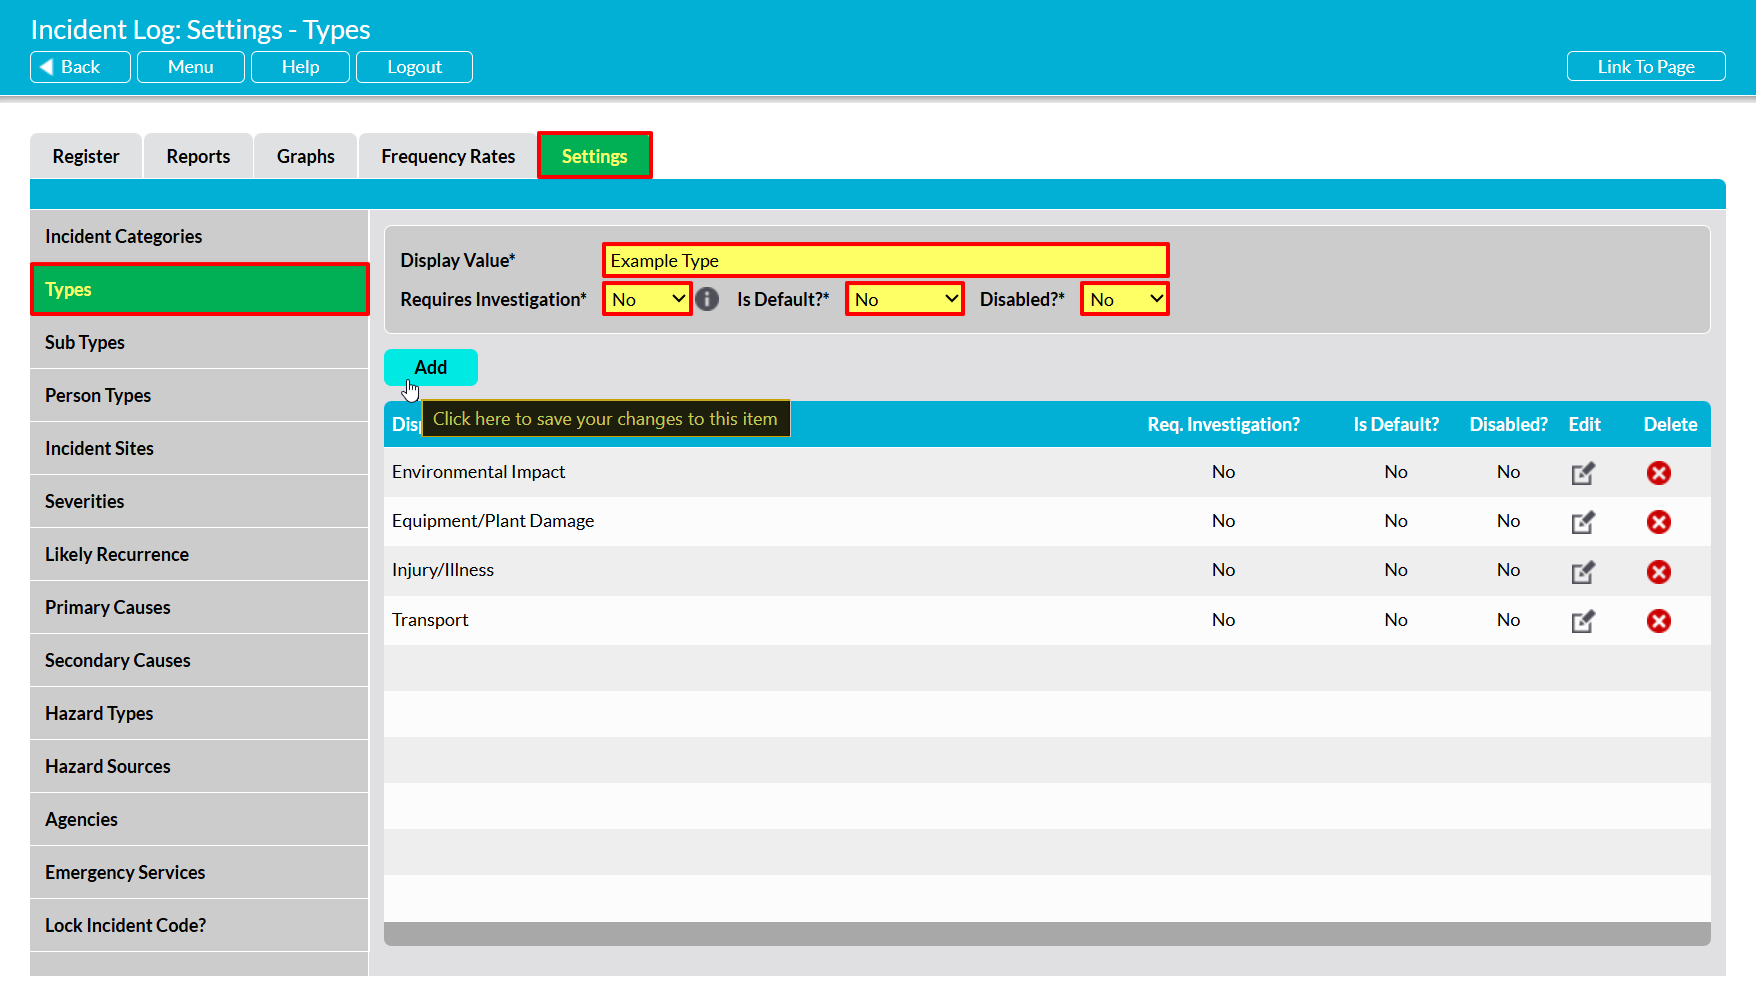
The newly added Type will now be displayed within the list. Note that Types are displayed alphabetically.
To edit a Type, locate its record within the list and click on the pencil icon. Make the necessary changes to the fields at the top of the page, and then click Save.
To delete a Type from the list, locate its record and click on the red cross icon displayed to its right. If the option hasn’t been used within any of your Incident Logs then it will be cleared from the list. However, you will not be able to delete a Type that has already been used within your system. Instead, you will need to Disable the option to remove it from dropdown lists and prevent its future selection.
*****
Sub Types
The Sub-Types perimeter is a ‘sub-setting’ of the Types parameter, and allows you to specify the precise nature of the individual Incidents that could occur at your sites or impact your company. It is intended for a more granular, specific, and low-level grouping of your Incident Logs, allowing you to run deeper-level reports on your broader Incident Types. All Sub-Types within your system must be associated with a ‘parent’ Type, and all Incidents that you log within Activ must include both a Type and an appropriate Sub-Type.
This area is pre-populated with twenty-nine default options, divided between the default Types as follows:
- Environmental Impact (Type)
- Carbon Emissions
- Chemical Spill
- Equipment/Plant Damage (Type)
- Accidental
- Malicious
- Negligence
- Injury/Illness (Type)
- Abrasion
- Amputation
- Bruise
- Burn
- Crush
- Cut
- Dislocation
- Distress
- Fever
- Fracture
- Infection
- Internal
- Loss of Consciousness
- Loss of Hearing
- Loss of Sight
- Muscle Strain
- Puncture
- Scald
- Skin Reaction
- Sprain
- Swelling
- Unable to Sleep
- Vomiting
- Transport (Type)
- (none – n/a)
To manage your Incident Log’s Sub-Types, open the Settings tab, and then select the Sub Types item from the left-hand menu. Use the Type* dropdown on the right-hand side to select the Type that the Sub-Type belongs to (or will belong to, if it has not yet been created).

You will be presented with a list of the Sub-Types that are currently associated with the selected Type.
To add a new Sub-Type, enter the Sub-Type into the Display As* field at the top of the page. Use the two dropdown’s to the field’s right to specify whether the option is to be Disabled?* (unavailable for selection) and whether it is to be the Default?* (selected by default when a new Incident Log is added), then click Add.

The newly added Sub-Type will now be displayed within the list. Note that Sub-Types are displayed alphabetically.
To edit a Sub-Type, locate its record within the list and click on the pencil icon. Make the necessary changes to the fields at the top of the page, and then click Save.
To delete a Sub-Type from the list, locate its record and click on the red cross icon displayed to its right. If the option hasn’t been used within any of your Incident Logs then it will be cleared from the list. However, you will not be able to delete a Sub-Type that has already been used within your system. Instead, you will need to Disable the option to remove it from dropdown lists and prevent its future selection.
*****
Person Types
The Person parameter allows you to identify the types of People who may be involved in or affected by any Incidents that are logged within your system. These individuals might be people who are directly employed by your company, or those who may be contracted to or otherwise ‘visit’ your sites.
The area is pre-populated with four default options:
- Contractor
- Employee
- None/Other
- Visitor
To add a new Person Type, open the Settings tab, and then select the Person Types item from the left-hand menu. Enter the Type into the Display As* field at the top of the page, then use the dropdown fields to specify whether the option is to be Disabled?* (unavailable for selection) and whether it is to be the Default?* (selected by default when a new Incident Log is added), then click Add.

The newly added Type will now be displayed within the list. Note that Types are displayed alphabetically.
To edit a Type, locate its record within the list and click on the pencil icon. Make the necessary changes to the fields at the top of the page, and then click Save.
To delete a Type from the list, locate its record and click on the red cross icon displayed to its right. If the option hasn’t been used within any of your Incident Logs then it will be cleared from the list. However, you will not be able to delete a Type that has already been used within your system. Instead, you will need to Disable the option to remove it from dropdown lists and prevent its future selection.
*****
Incident Sites
The Site parameter allows you to identify the Sites that your organisation operates at, and that might be impacted by an Incident, or at which an Incident might occur. Note that Sites is a ‘global’ setting parameter, meaning that the list of Sites recorded within your Incident Log is shared by most other modules that include a Sites parameter (the most notable exception being the Asset Manager). As such, it is important to remember that changing your Incident Log Sites will also change the Sites for all other modules (excluding Asset Manager).
This area is not pre-populated with any default options, as your sites will be unique to your company. However, note that you may find it useful to add options such as ‘All Sites’, ‘Client Site’, and ‘Off-Site’ to your Sites list if using this parameter, to cover cases where an Incident might impact your entire organisation (e.g. cloud security issues), occur at a client site (if you provide contractors, etc), or occur ‘between’ sites (e.g. during travel to/from your offices and/or your client’s offices).
To manage your Incident Log’s Sites, open the Settings tab, and then select the Incident Sites item from the left-hand menu. You will be presented with either:
- the Enable Sites for this module field, and no other data, if Sites is currently disabled for this module; or
- the above field, plus a register of Sites, if Sites is currently enabled for this module.
To enable Sites for the Incident Log, set the Enable Sites for this module field to Yes. Alternatively, to disable Sites (removing the Sites field from your Incident Log forms), change this field to No.

Activ will automatically save your selection.
To add a new Site, enter the Site into the Site* field at the top of the page, then use the dropdown fields to specify whether the option is to be Disabled?* (unavailable for selection) and whether it is to be the Default?* (selected by default when a new Incident Log is added), then click Add.
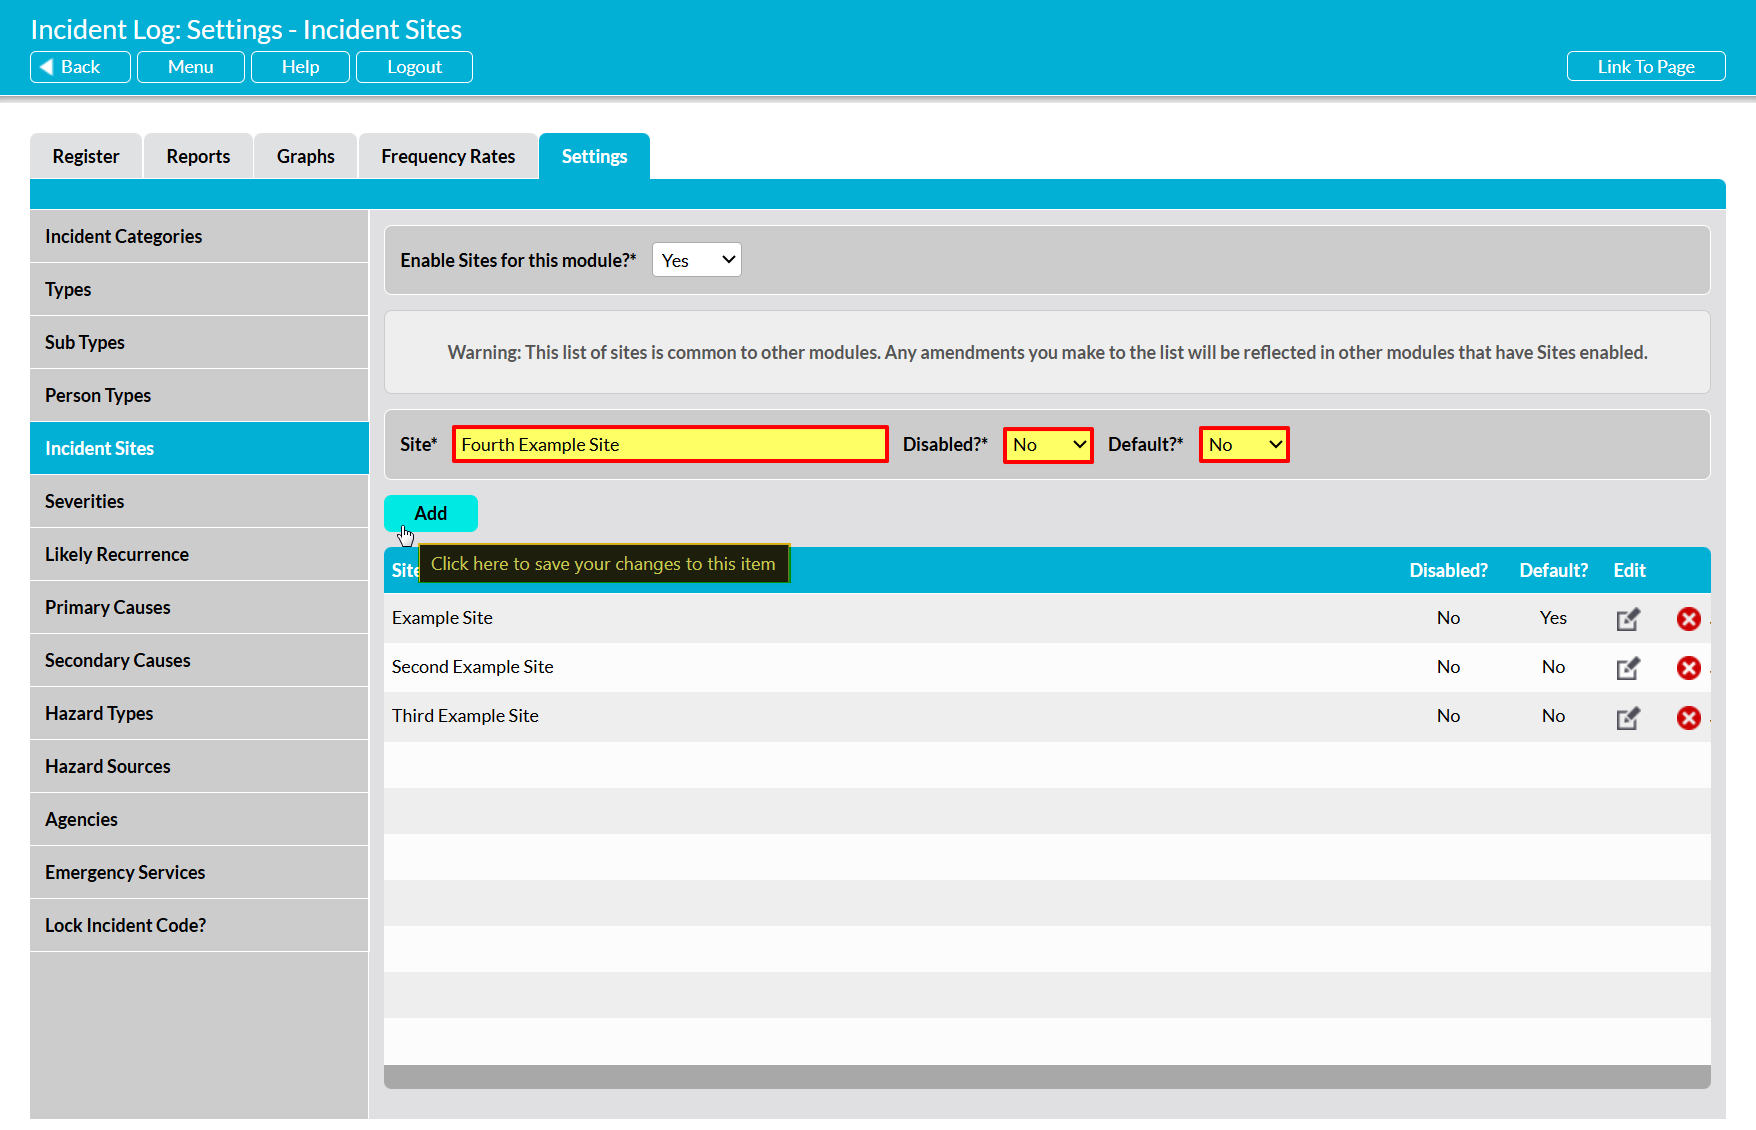
The newly added Site will now be displayed within the list. Note that Sites are displayed alphabetically.
To edit a Site, locate its record within the list and click on the pencil icon. Make the necessary changes to the fields at the top of the page, and then click Save.
To delete a Site from the list, locate its record and click on the red cross icon displayed to its right. If the option hasn’t been used within any of your Incident Logs then it will be cleared from the list. However, you will not be able to delete a Type that has already been used within your system. Instead, you will need to Disable the option to remove it from dropdown lists and prevent its future selection.
*****
Severities
The Severities parameter allows you to identify the severity levels that you expect to use within your Incident Logs, to identify how serious a given Incident is (or is suspected to be). The area is pre-populated with four default options:
- Minor
- Serious
- Reportable
- Major
To add a new Severity, open the Settings tab, and then select the Severities item from the left-hand menu. Enter the Severities into the Display As* field at the top of the page, then use the dropdown fields to specify whether the option is to be Disabled?* (unavailable for selection) and whether it is to be the Default?* (selected by default when a new Incident Log is added), then click Add.

The newly added Severities will now be displayed within the list. Note that Severities are displayed alphabetically.
To edit a Severity, locate its record within the list and click on the pencil icon. Make the necessary changes to the fields at the top of the page, and then click Save.
To delete a Severity from the list, locate its record and click on the red cross icon displayed to its right. If the option hasn’t been used within any of your Incident Logs then it will be cleared from the list. However, you will not be able to delete a Severity that has already been used within your system. Instead, you will need to Disable the option to remove it from dropdown lists and prevent its future selection.
*****
Likely Recurrence
The Likely Recurrence parameter allows you to identify appropriate terms for the likelihood that a given Incident may re-occur in the future. It is primarily used when assessing the Incident after the initial investigation has occurred, and is intended to help you highlight whether an Incident is likely to re-occur, and whether you therefore need to implement additional safeguards to reduce the current likelihood to more acceptable levels.
The area is pre-populated with three default options:
- Low
- Medium
- High
To add a new Likely Recurrence, open the Settings tab, and then select the Likely Recurrence item from the left-hand menu. Enter the Recurrence into the Display As* field at the top of the page, then use the dropdown fields to specify where in the list the new Category should be displayed (Order field), whether the option is to be Disabled?* (unavailable for selection) and whether it is to be the Default?* (selected by default when a new Incident Log is added), then click Add.
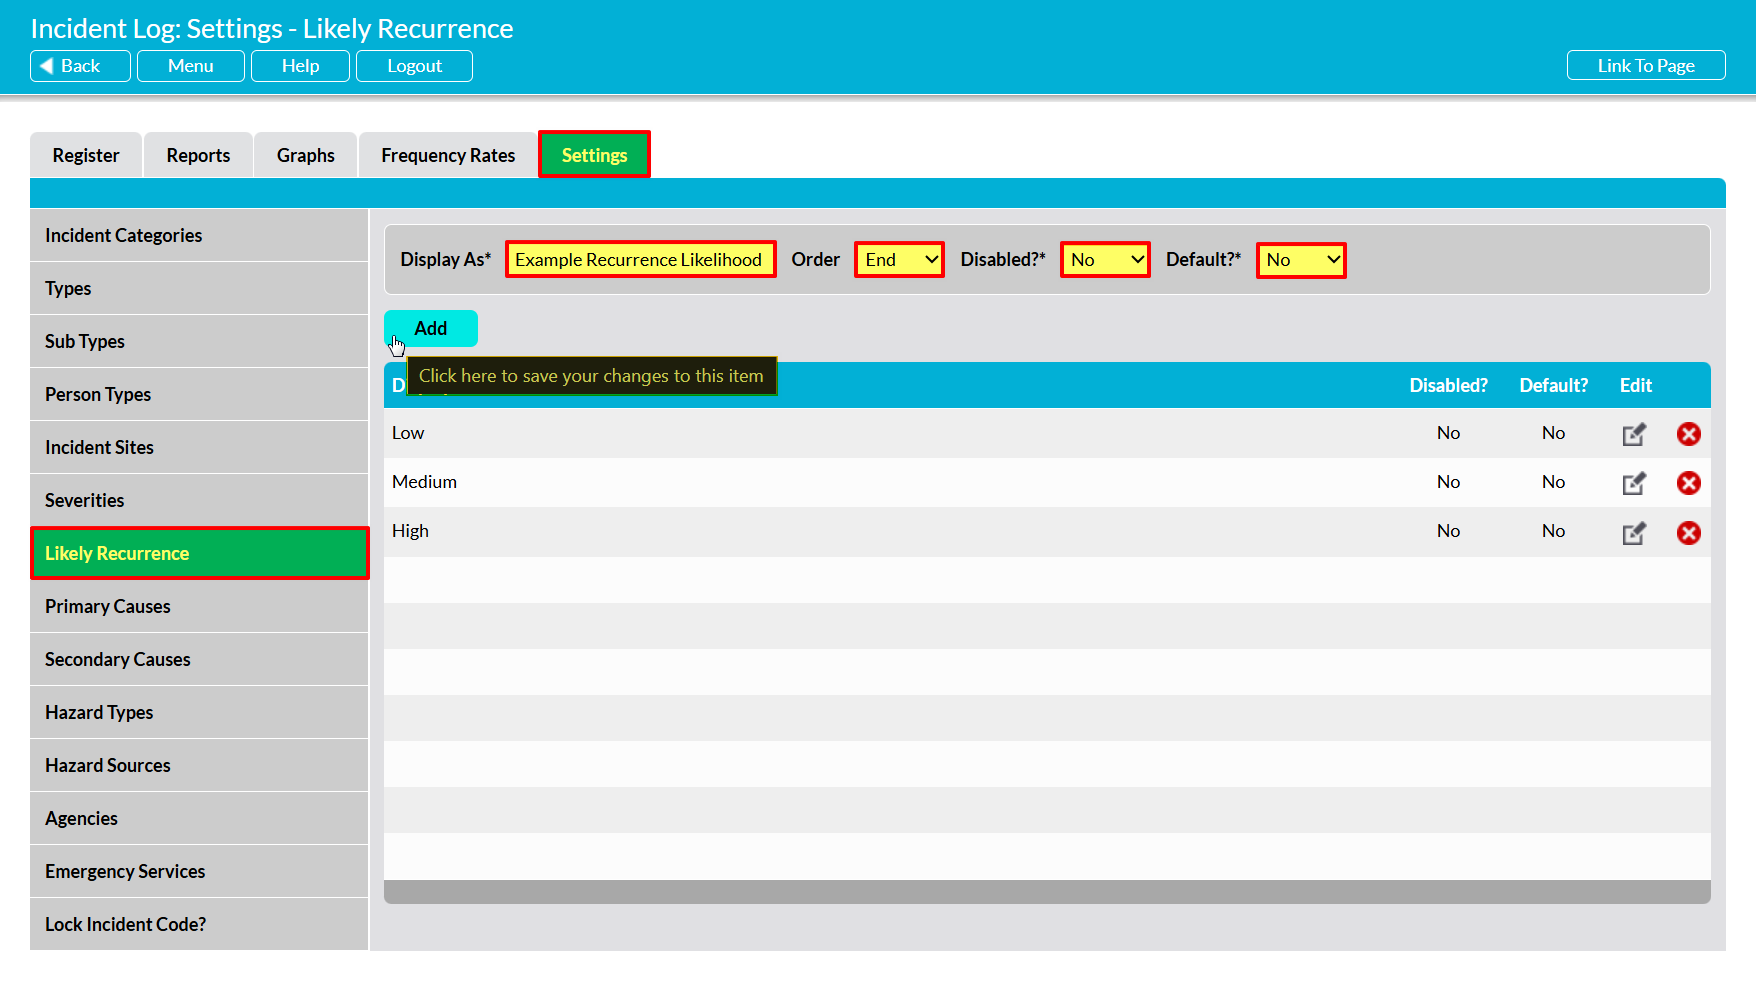
The newly added Recurrence will now be displayed within the list, in the position you specified.
To edit a Recurrence, locate its record within the list and click on the pencil icon. Make the necessary changes to the fields at the top of the page, and then click Save.
To delete a Recurrence from the list, locate its record and click on the red cross icon displayed to its right. If the option hasn’t been used within any of your Incident Logs then it will be cleared from the list. However, you will not be able to delete a Recurrence that has already been used within your system. Instead, you will need to Disable the option to remove it from dropdown lists and prevent its future selection.
*****
Primary Causes
The Primary Causes parameter allows you to configure a set of broad factors that could be, or are likely to be, the main cause of an Incident. This parameter is used when assessing the Incident after the initial investigation has occurred, and is intended to help you identify how the Incident occurred, so that you can ensure that appropriate safeguards are implemented to prevent or reduce re-occurrence. Note that not every Incident will have a Primary Cause, as some Incidents may be the result of multiple interconnected factors, or unforeseen circumstances that could not reasonably be controlled for.
The area is pre-populated with thirteen default options:
- Control measure not adequate
- Control measure not in place
- Employee capability
- Equipment capability
- Hazard not identified
- Inadequate maintenance
- Insufficient instruction/warning
- Loss of concentration
- Medical condition
- Stress
- Tiredness/fatigue
- Unsafe behaviour
- Work position
To add a new Primary Cause, open the Settings tab, and then select the Primary Cause item from the left-hand menu. Enter the Cause into the Display As* field at the top of the page, then use the dropdown fields to specify whether the option is to be Disabled?* (unavailable for selection) and whether it is to be the Default?* (selected by default when a new Incident Log is added), then click Add.
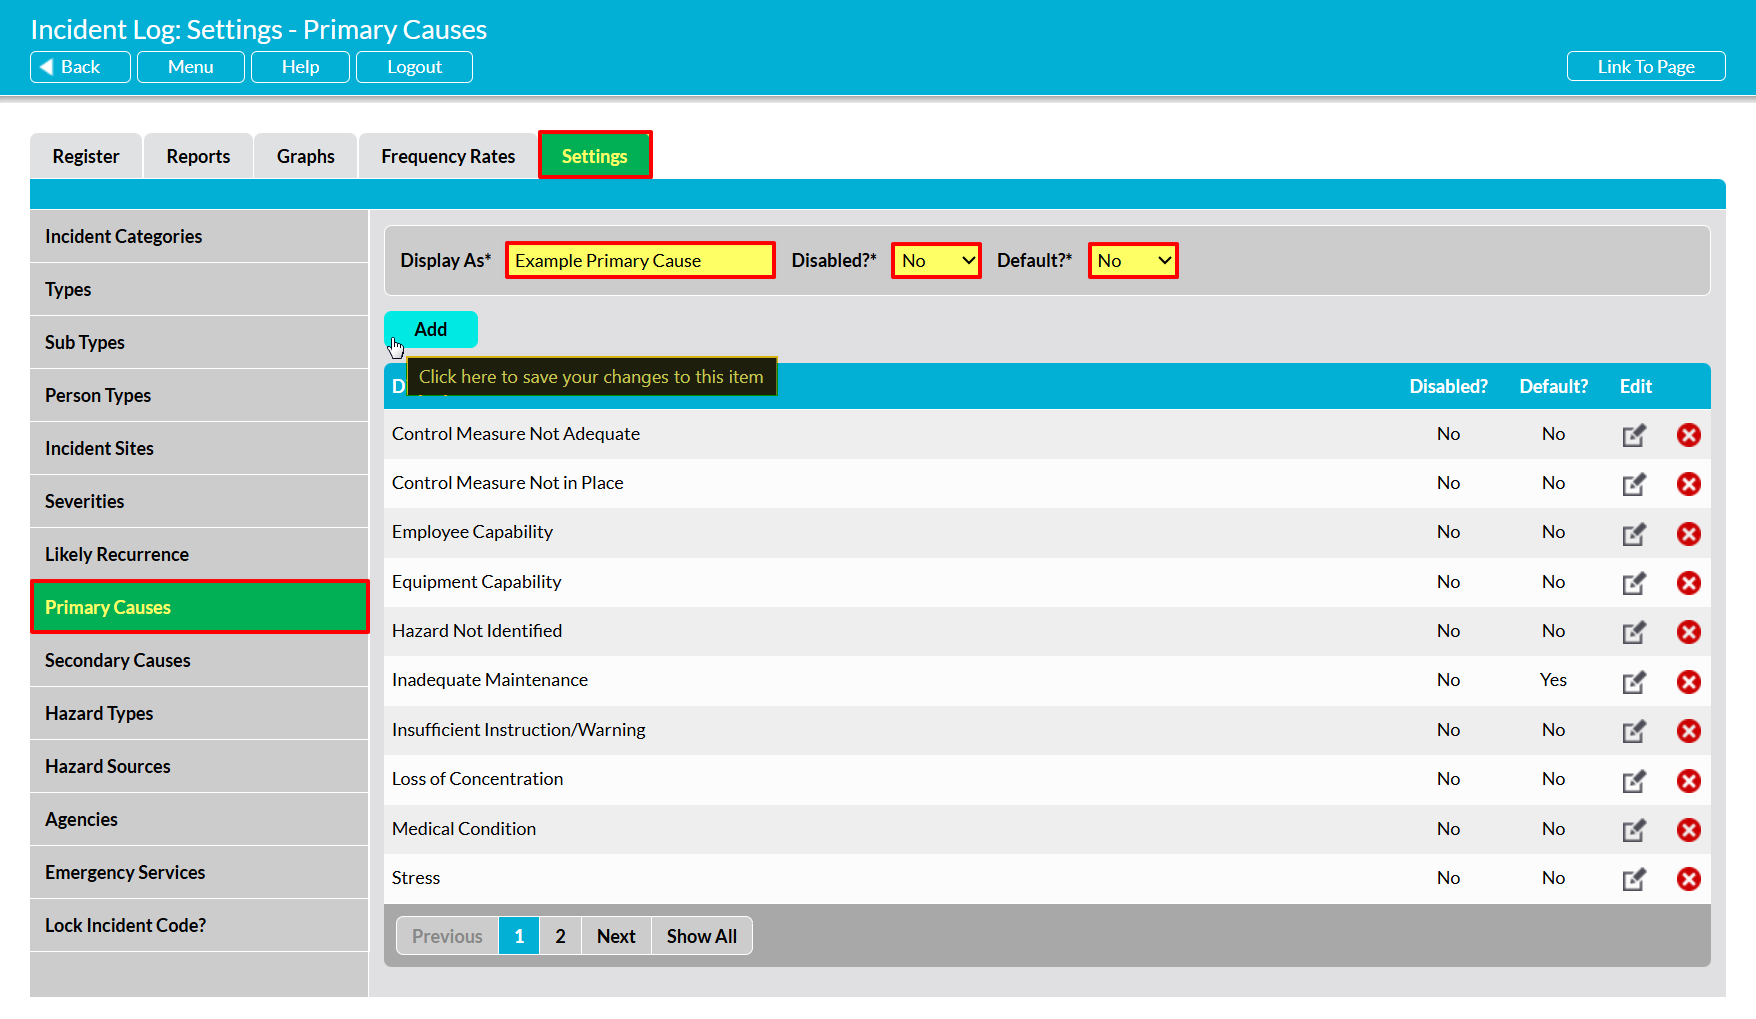
The newly added Cause will now be displayed within the list. Note that Causes are displayed alphabetically.
To edit a Cause, locate its record within the list and click on the pencil icon. Make the necessary changes to the fields at the top of the page, and then click Save.
To delete a Cause from the list, locate its record and click on the red cross icon displayed to its right. If the option hasn’t been used within any of your Incident Logs then it will be cleared from the list. However, you will not be able to delete a Cause that has already been used within your system. Instead, you will need to Disable the option to remove it from dropdown lists and prevent its future selection.
*****
Secondary Causes
The Secondary Causes parameter is typically used to support the ‘Primary Causes’ parameter, and allows you to configure a set of more specific factors that could be, or are likely to be, the cause of an Incident. For example, you might configure your Incident Log to have a Primary Cause of ‘Equipment Capability’, and supporting Secondary Causes of ‘Inspection’ and ‘Installation’. Alternatively, you also have the option to configure this area to list factors that are unlikely to cause an Incident by themselves, but could contribute to an Incident in combination with other, more significant issues.
The area is pre-populated with fifteen default options:
- Allocation of responsibilities
- Equipment design/specification
- Inspection
- Installation
- Organisational culture
- Planning process
- Procedure / system of work
- Recruitment process
- Resource availability
- Risk assessment quality
- Supervision
- Task design
- Testing
- Training process
- Work prioritisation
To add a new Secondary Cause, open the Settings tab, and then select the Secondary Causes item from the left-hand menu. Enter the Cause into the Display As* field at the top of the page, then use the dropdown fields to specify whether the option is to be Disabled?* (unavailable for selection) and whether it is to be the Default?* (selected by default when a new Incident Log is added), then click Add.
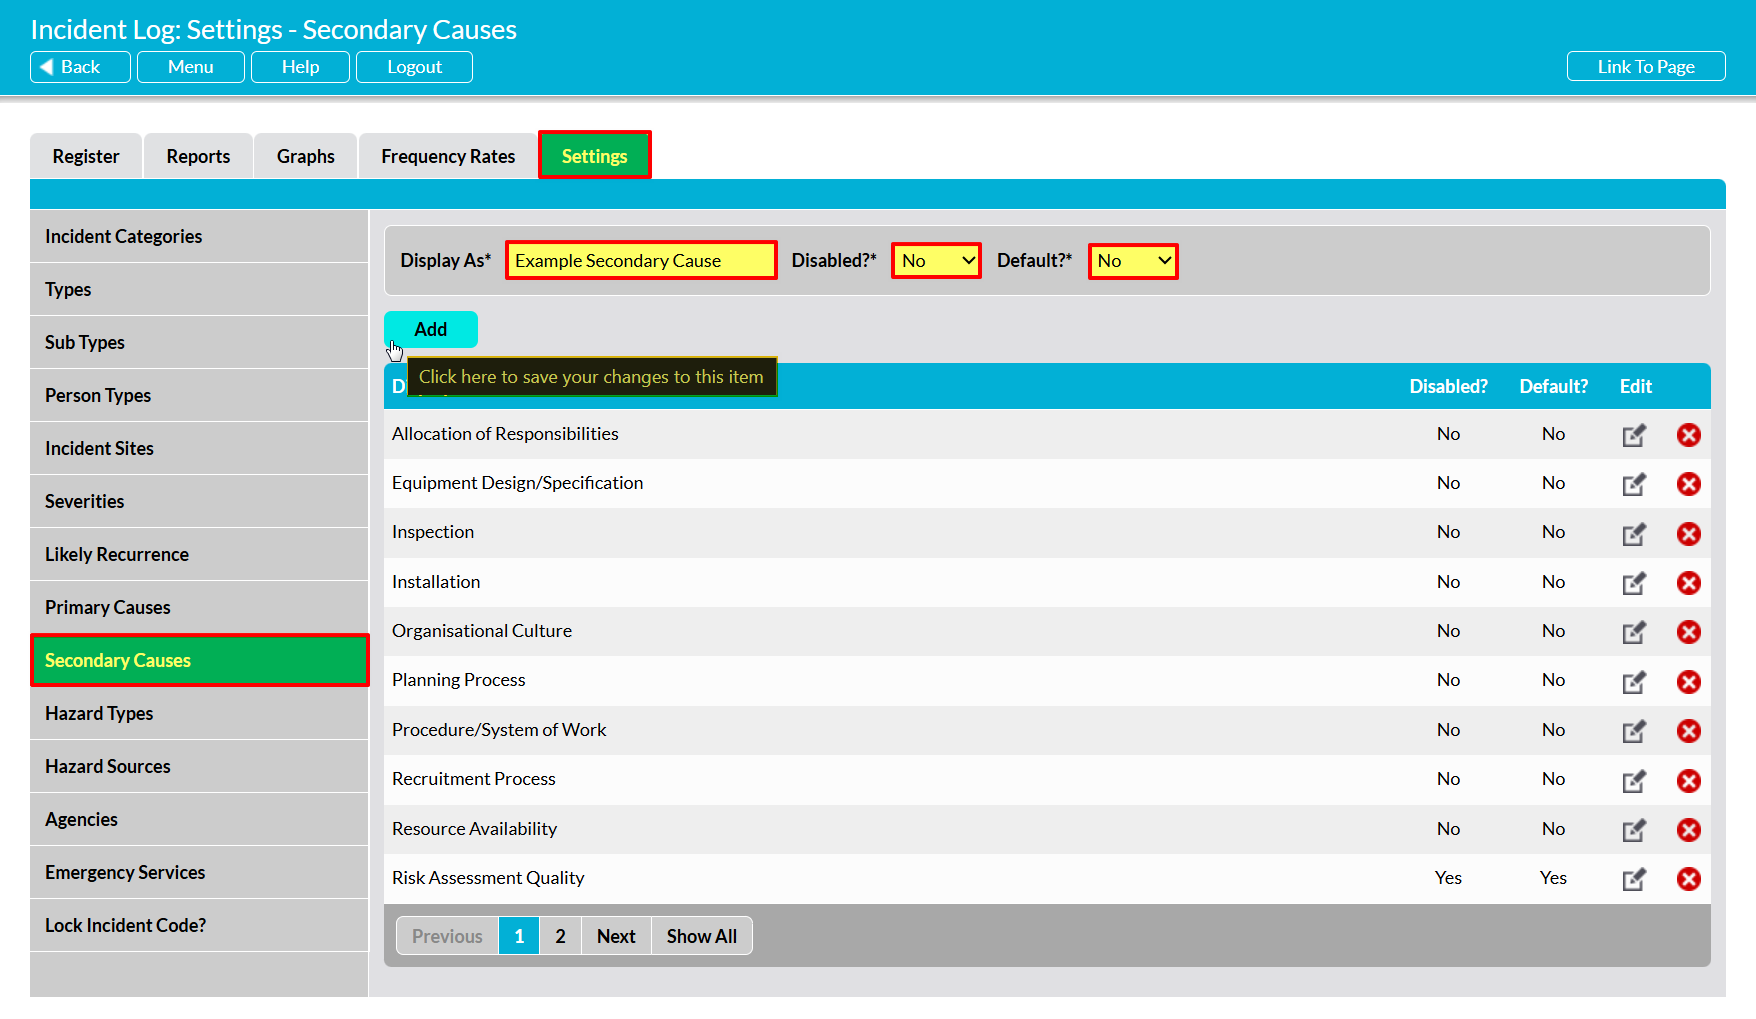
The newly added Cause will now be displayed within the list. Note that Causes are displayed alphabetically.
To edit a Cause, locate its record within the list and click on the pencil icon. Make the necessary changes to the fields at the top of the page, and then click Save.
To delete a Cause from the list, locate its record and click on the red cross icon displayed to its right. If the option hasn’t been used within any of your Incident Logs then it will be cleared from the list. However, you will not be able to delete a Cause that has already been used within your system. Instead, you will need to Disable the option to remove it from dropdown lists and prevent its future selection.
*****
Hazard Types
The Hazard Types parameter allows you to configure the broad types of Hazard that could affect your organisation, assets, and/or people. These Hazard Types can be higher level, general types, such as ‘access’ or ‘environmental’, or Hazards that are more specific to your organisation and industry, such as ‘chemical usage’ or ‘explosion’.
The area is pre-populated with seventeen default options:
- Access
- Biological agent
- Chemicals
- Confined space
- Dust
- Electricity
- Environmental/weather
- Equipment/tools
- Explosion
- Fire
- Manual handling
- Noise
- Radiation
- Transport (materials)
- Transport (people)
- Vibration
- Working at height
To add a new Hazard Type, open the Settings tab, and then select the Hazard Types item from the left-hand menu. Enter the Type into the Display As* field at the top of the page, then use the dropdown fields to specify whether the option is to be Disabled?* (unavailable for selection) and whether it is to be the Default?* (selected by default when a new Incident Log is added), then click Add.

The newly added Type will now be displayed within the list. Note that Types are displayed alphabetically.
To edit a Type, locate its record within the list and click on the pencil icon. Make the necessary changes to the fields at the top of the page, and then click Save.
To delete a Type from the list, locate its record and click on the red cross icon displayed to its right. If the option hasn’t been used within any of your Incident Logs then it will be cleared from the list. However, you will not be able to delete a Type that has already been used within your system. Instead, you will need to Disable the option to remove it from dropdown lists and prevent its future selection.
*****
Hazard Sources
The Hazard Sources parameter is a ‘sub-setting’ of the Hazard Types parameter, and allows you to specify the potential sources of each Hazard Type that could occur at your sites or impact your company. Note that this parameter is used in conjunction with the Hazard Types parameter, and that all Sources must be associated with a ‘parent’ Type.
This area is pre-populated with nearly two hundred default options, divided between the default Hazard Tyes. Due to the volume of available options, these are not listed within this article.
To manage your Incident Log’s Hazard Sources, open the Settings tab, and then select the Hazard Sources item from the left-hand menu. Use the Type* dropdown on the right-hand side to select the Hazard Type that the Source belongs to (or will belong to, if it has not yet been created).

You will be presented with a list of the Hazard Sources that are currently associated with the selected Hazard Type.
To add a new Source, enter the Source into the Display As* field at the top of the page. Use the dropdown fields to specify whether the option is to be Disabled?* (unavailable for selection) and whether it is to be the Default?* (selected by default when a new Incident Log is added), then click Add.

The newly added Source will now be displayed within the list. Note that Sources are displayed alphabetically.
To edit a Source, locate its record within the list and click on the pencil icon. Make the necessary changes to the fields at the top of the page, and then click Save.
To delete a Source from the list, locate its record and click on the red cross icon displayed to its right. If the option hasn’t been used within any of your Incident Logs then it will be cleared from the list. However, you will not be able to delete a Source that has already been used within your system. Instead, you will need to Disable the option to remove it from dropdown lists and prevent its future selection.
*****
Agencies
The Agencies parameter allows you to configure a list of Agencies that you may be required to report serious (or potentially serious) Incidents to. These will typically be governmental or regulatory Agencies that oversee your industry and/or the activities you undertake.
The area is pre-populated with four default options:
- EH
- EHO
- HSE
- Local Authority
To add a new Agency, open the Settings tab, and then select the Agencies item from the left-hand menu. Enter the Agency into the Display As* field at the top of the page, then use the dropdown fields to specify whether the option is to be Disabled?* (unavailable for selection) and whether it is to be the Default?* (selected by default when a new Incident Log is added), then click Add.

The newly added Agency will now be displayed within the list. Note that Agencies are displayed alphabetically.
To edit an Agency, locate its record within the list and click on the pencil icon. Make the necessary changes to the fields at the top of the page, and then click Save.
To delete an Agency from the list, locate its record and click on the red cross icon displayed to its right. If the option hasn’t been used within any of your Incident Logs then it will be cleared from the list. However, you will not be able to delete an Agency that has already been used within your system. Instead, you will need to Disable the option to remove it from dropdown lists and prevent its future selection.
*****
Emergency Services
The Emergency Services parameter allows you to configure a list of Emergency Service providers that may need to be called in during or as the result of an Incident, to support the investigation or the immediate management and treatment of the Incident.
The area is pre-populated with three default options:
- Ambulance
- Fire
- Police
To add a new Emergency Service, open the Settings tab, and then select the Emergency Services item from the left-hand menu. Enter the Service into the Display As* field at the top of the page, then use the dropdown fields to specify whether the option is to be Disabled?* (unavailable for selection) and whether it is to be the Default?* (selected by default when a new Incident Log is added), then click Add.

The newly added Service will now be displayed within the list. Note that Services are displayed alphabetically.
To edit a Service, locate its record within the list and click on the pencil icon. Make the necessary changes to the fields at the top of the page, and then click Save.
To delete a Service from the list, locate its record and click on the red cross icon displayed to its right. If the option hasn’t been used within any of your Incident Logs then it will be cleared from the list. However, you will not be able to delete a Service that has already been used within your system. Instead, you will need to Disable the option to remove it from dropdown lists and prevent its future selection.
*****
Lock Incident Code?
The Lock Incident Code parameter allows you to specify whether the Incident Code field should be locked to prevent modification, or whether employees should be able to manually edit the code if required. Note that it is typically recommended that this Code is locked for editing, and that a separate free-text Accident Book No field is also provided to enable you to enter your own codes if required.
Two options are available for this parameter:
- Yes – Activ’s automatically generated Incident Codes will be locked, preventing users from modifying them.
- No – Activ’s automatically generated Incident Codes will be unlocked, allowing users to modify them if required.
To update this parameter, open the Settings tab, and then select the Lock Incident Code? item from the left-hand menu. You will be presented with a single dropdown field, which will display your current selection (note that by default this parameter is set to ‘Yes’, meaning that Incident Codes will be locked).
Use the dropdown menu to select your preferred option as detailed above, and then click on Save to commit your changes.

